Subaru Solterra 2023-2026 Owner's Manual: Headlight aim
Vertical movement adjusting bolts
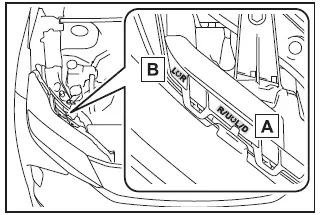
- Adjustment bolt A
- Adjustment bolt B
Before checking the headlight aim
- Park your Subaru Solterra on a flat, level surface.
- Ensure all tires are inflated to the recommended pressure.
- Have a person seated in the driver’s seat to simulate normal driving conditions.
- Gently bounce the vehicle several times to stabilize suspension position.
Adjusting the headlight aim
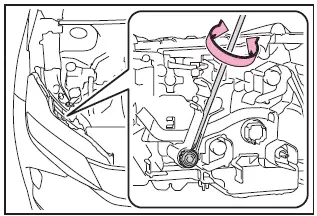
1. Using a Phillips-head screwdriver, rotate adjustment bolt A in the required direction.
Take note of both the rotation direction and the number of turns for accurate adjustment.
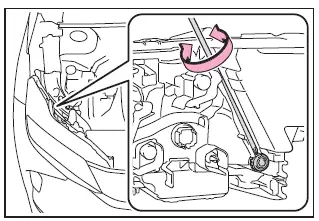
2. Adjust bolt B by turning it the same number of rotations and in the same direction as performed in step 1 to maintain alignment consistency in the Subaru Solterra.
If proper adjustment cannot be achieved using this method, have the Subaru Solterra inspected and adjusted by a SUBARU dealer.
Light bulbs
If any exterior lighting component on the Subaru Solterra fails to operate, it is recommended to have it replaced by an authorized SUBARU dealer.
■ LED lights
The lighting system of the Subaru Solterra uses multiple LED elements. If one or more LEDs fail, the entire unit may require replacement by a qualified technician.
■ Condensation build-up on the inside of the lens
Temporary condensation inside the headlight housing of the Subaru Solterra is generally normal and does not indicate a malfunction.
However, contact your SUBARU dealer if you observe any of the following conditions:
- Large water droplets forming inside the lens
- Visible accumulation of water within the headlight assembly
 Checking and replacing fuses
If any electrical system in your Subaru Solterra stops functioning,
it may be caused by a blown fuse. In such cases, inspect the fuse and replace it
if necessary to restore proper operation.
Chec ...

Other materials:
No.2 Car Navigation System Does Not Operation [Car Navigation System]
2
Even if the map screen is touched, the car-navigation system cannot be
operated
Possible DTC
—
POSSIBLE CAUSE
Audio unit malfunction (bad LCD panel)
Car-navigation unit malfunct ...
Adaptive Front Lighting System
(AFS)
The adaptive front lighting system (AFS)
automatically adjusts the headlight beams
to the left or right in conjunction with the
operation of the steering wheel after the
headlights have been turned on.
AFS OFF Indicator Light
When illuminated
This indicator light illuminates briefly
when ...
Rear Door Glass Removal/Installation
1. Fully lower the rear door glass.
2. Disconnect the negative battery cable..
3. Remove the rear door trim..
4. Remove the rear door speaker..
5. Remove the rear power window motor..
6. Remove the service hole cover.
7. Remove the rear door glass guide..
8. Remove the rear door qu ...
