Mazda 3 Service Manual: Rear Door Glass Removal/Installation
1. Fully lower the rear door glass.
2. Disconnect the negative battery cable..
3. Remove the rear door trim..
4. Remove the rear door speaker..
5. Remove the rear power window motor..
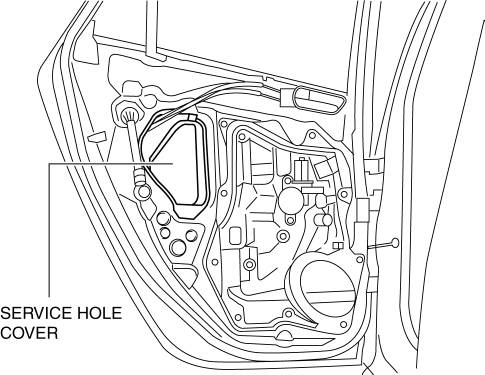
6. Remove the service hole cover.
7. Remove the rear door glass guide..
8. Remove the rear door quarter glass..
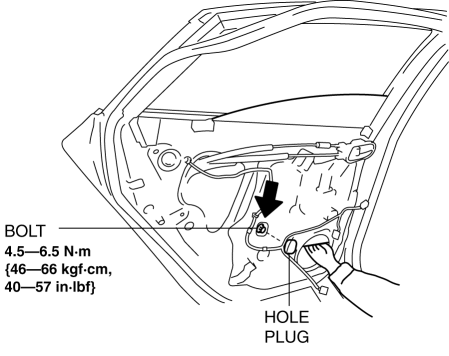
9. Remove the hole plug and bolt.
CAUTION:
-
If the bolts are removed without supporting the rear door glass, the rear door glass may fall off and be damaged. Remove the bolts while inserting your hand into the rear door speaker installation hole to support the rear door glass.
10. Lift the rear door glass up and remove while tilting it.

11. Install in the reverse order of removal.
CAUTION:
-
If the bolts are installed without supporting the rear door glass, the rear door glass may fall off and be damaged. When installing the rear door glass, align the glass edge with the rear door glass guide by hand through the speaker installation hole, and then install the bolts.
 Quarter Window Glass Removal
1. Remove the following parts:
a. Rear seat cushion.
b. Rear scuff plate.
c. Tire house trim.
d. Trunk side upper trim.
e. C-pillar trim.
2. Apply protective tape along the edge of the bod ...
 Rear Door Quarter Glass Removal/Installation
1. Fully lower the rear door glass.
2. Disconnect the negative battery cable..
3. Remove the rear door trim..
4. Remove the service hole cover.
5. Remove the hole plug.
6. Remove the ...
Other materials:
Front Bumper Reinforcement Removal/Installation
1. Disconnect the negative battery cable..
2. Remove the following parts:
a. Front bumper.
b. Seal plate.
3. Remove the bolts A.
4. Remove the bolts B.
5. Remove the front bumper reinforcement.
6. Install in the reverse order of removal. ...
Sae Standards
In accordance with new regulations, SAE (Society of Automotive Engineers)
standard names and abbreviations are now used in this manual. The table below
lists the names and abbreviations that have been used in Mazda manuals up to
now and their SAE equivalents.
...
Immobilizer System
The immobilizer system allows the
engine to start only with a key the system
recognizes.
If someone attempts to start the engine
with an unrecognized key, the engine
will not start, thereby helping to prevent
vehicle theft.
If you have a problem with the
immobilizer system or the key, co ...
