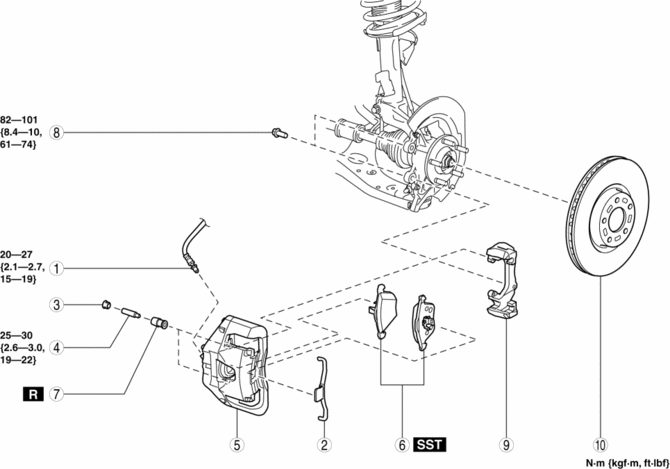
Mazda 3 Service Manual: Front Brake (Disc) Removal/Installation [Mzr 2.3 Disi Turbo]
1. Remove in the order indicated in the table.
2. Install in the reverse order of removal.
3. After installation, pump the brake pedal a few times and verify that the brakes do not drag.
|
1 |
Brake hose (See Brake Hose Installation Note.) |
|
2 |
Retaining clip (See Retaining Clip Removal Note.) |
|
3 |
Cap |
|
4 |
Bolt |
|
5 |
Caliper |
|
6 |
Disc pad (See Disc Pad Installation Note.) |
|
7 |
Boot |
|
8 |
Bolt |
|
9 |
Mounting support |
|
10 |
Disc plate |
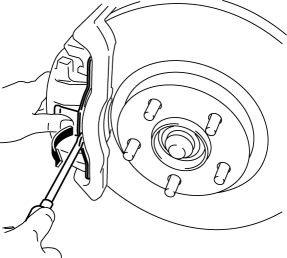
Retaining Clip Removal Note
1. Move the retaining clip in the direction shown by the arrow using a flathead screwdriver and remove it from the caliper.
Disc Pad Installation Note
1. Clean the exposed area of the piston.
2. Push the piston in using the SST
.
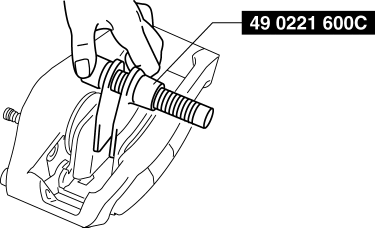
3. Install the disc pad to the caliper.
Brake Hose Installation Note
1. Install the brake hose to the caliper.
2. Tighten the flare nut while holding the brake hose at point A with a spanner or equivalent.
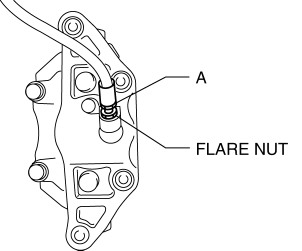
3. Verify that the brake hose is not twisted.
 Front Brake (Disc) Removal/Installation [Mzr 2.0, Skyactiv G 2.0, Mzr 2.5]
1. Remove in the order indicated in the table.
2. Install in the reverse order of removal.
3. After installation, pump the brake pedal a few times and verify that the brakes
do not drag.
...
 Rear Brake (Disc) Inspection
Brake Judder Repair Hints
Description
1. Brake judder concern has the following 3 characteristics:
Steering wheel vibration
1. The steering wheel vibrates in the rotation direction. This characte ...
Other materials:
Front Scuff Plate Removal/Installation
1. Detach tab A while pulling the front scuff plate in the direction of the arrow
(1) shown in the figure, then detach hook B, clips C, and pins D while pulling in
the direction of the arrow (2).
2. Detach tab E while pulling the front scuff plate in the direction of the arrow
(3) shown in t ...
SRS Air Bag Deployment Criteria
This chart indicates the applicable SRS equipment that will deploy depending
on the type of
collision.
(The illustrations are the representative cases of collisions.)
X: The SRS air bag equipment is designed to deploy in a collision.
*1 (With Front Passenger Occupant Classification Syste ...
Fuel Tank Inspection [Mzr 2.0, Mzr 2.5]
WARNING:
Fuel is very flammable liquid. If fuel spills or leaks from the pressurized
fuel system, it will cause serious injury or death and facility breakage. Fuel
can also irritate skin and eyes. To prevent this, always complete the “Fuel
Line Safety Procedure”, while referring ...
