Mazda 3 Service Manual: Front Brake (Disc) Removal/Installation [Mzr 2.0, Skyactiv G 2.0, Mzr 2.5]
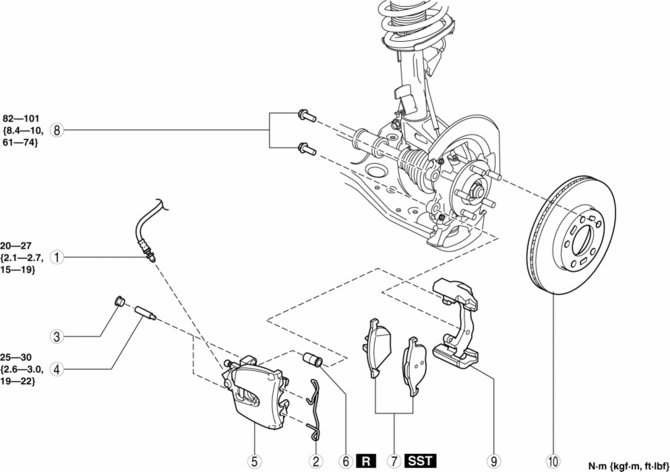
1. Remove in the order indicated in the table.
2. Install in the reverse order of removal.
3. After installation, pump the brake pedal a few times and verify that the brakes do not drag.
|
1 |
Brake hose (See Brake Hose Installation Note.) |
|
2 |
Retaining clip (See Retaining Clip Installation Note.) |
|
3 |
Cap |
|
4 |
Bolt |
|
5 |
Caliper |
|
6 |
Boot |
|
7 |
Disc pad (See Disc Pad Installation Note.) |
|
8 |
Bolt |
|
9 |
Mounting support |
|
10 |
Disc plate |
Disc Pad Installation Note
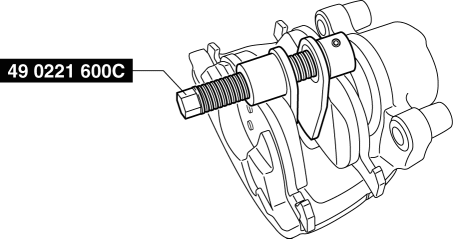
1. Clean the exposed area of the piston.
2. Push the piston in using the SST
.
3. Install the disc pad (outer side) to the mounting support.
4. Install the disc pad (inner side) to the caliper.
Retaining Clip Installation Note
1. Temporarily install the retaining clip to the caliper and mounting support as shown in the figure.
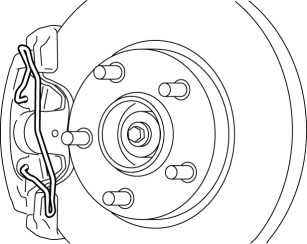
2. Secure the retaining clip so that part A does not slip off from the caliper while installing part B to the mounting support.
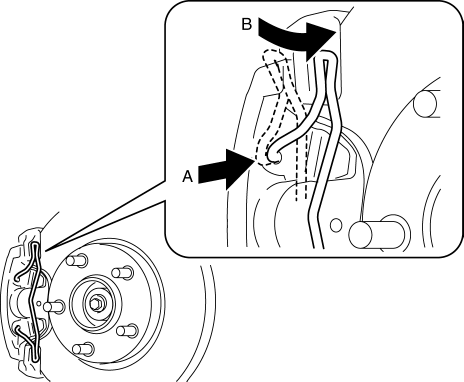
3. Verify that the retaining clip is securely installed to the caliper and the mounting support.
Brake Hose Installation Note
1. Install the brake hose to the caliper.
2. Tighten the flare nut while holding the brake hose at point A with a spanner or equivalent.
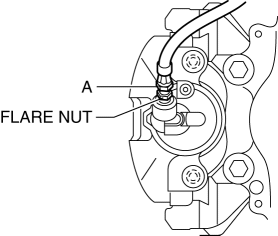
3. Verify that the brake hose is not twisted.
 Front Brake (Disc) Inspection
Brake Judder Repair Hints
Description
1. Brake judder concern has the following 3 characteristics:
Steering wheel vibration
1. The steering wheel vibrates in the rotation direction. This characte ...
 Front Brake (Disc) Removal/Installation [Mzr 2.3 Disi Turbo]
1. Remove in the order indicated in the table.
2. Install in the reverse order of removal.
3. After installation, pump the brake pedal a few times and verify that the brakes
do not drag.
...
Other materials:
Aerodynamic Under Cover No.1 Removal/Installation
1. Remove the aerodynamic under cover No.2..
2. Peel off the front mudguard..
3. Remove the bolts and fastener.
4. Remove the aerodynamic under cover No.1 in the direction of the arrow shown
in the figure.
CAUTION:
Be careful not to damage the aerodynamic under cover No.1 durin ...
How to use AUX mode (Type B)
Select the icon on the home screen to display the Entertainment screen.
Select to switch to the AUX mode. The following icons are
displayed in the lower
part of the center display.
Icon
Function
Displays the Entertainment menu. Use to switch to a diffe ...
Combination Switch Removal/Installation
CAUTION:
Handling the air bag module improperly can accidentally deploy the air bag
module, which may seriously injure you. Read the air bag system service warnings
and cautions before handling the air bag module..
1. Switch the ignition to off.
2. Disconnect the negative batte ...
