Mazda 3 Owners Manual: Floor Mat
| WARNING
Make sure the fl oor mats are hooked on
the retention pins to prevent them from
bunching up under the foot pedals:
Using a fl oor mat that is not secured is
dangerous as it will interfere with the
accelerator and brake pedal operation,
which could result in an accident.
Do not install two fl oor mats, one on top of the other, on the driver's side: Installing two fl oor mats, one on top of the other, on the driver's side is dangerous as the retention pins can only keep one fl oor mat from sliding forward. If using a heavy duty fl oor mat for winter use always remove the original fl oor mat. Loose fl oor mat(s) will interfere with the foot pedal and could result in an accident. |
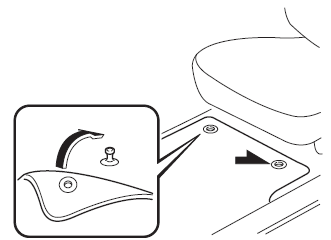
When setting a floor mat, position the floor mat so that its grommets are inserted over the pointed end of the retention posts.
 Hazardous Driving
WARNING
Be extremely careful if it is necessary to
downshift on slippery surfaces:
Downshifting into lower gear
while driving on slippery surfaces is
dangerous. The sudden change ...
 Rocking the Vehicle
WARNING
Do not spin the wheels at more than
56 km/h (35 mph), and do not allow
anyone to stand behind a wheel when
pushing the vehicle:
When the vehicle is stuck, spinning the
...
Other materials:
Sirius Satellite Radio Antenna Feeder Inspection
SIRIUS Satellite Radio Antenna Feeder No.1
NOTE:
SIRIUS satellite radio antenna feeder No.1 is integrated with the dashboard
wiring harness.
1. Disconnect the negative battery cable..
2. Remove the following parts:
a. Passenger-side front scuff plate.
b. Passenger-side front ...
Active Driving Display
WARNING
Always adjust the display brightness and position with the vehicle
stopped:
Adjusting the display brightness and position while driving the vehicle
is dangerous as
doing so could distract your attention from the road ahead and lead to
an accident.
...
Power (ignition) switch
In the Subaru Solterra, operating the power (ignition) switch while
carrying the electronic key allows you to start the EV system or switch between
different power modes quickly and efficiently.
The Subaru Solterra power system is designed for convenience and
safety, ensuring that the vehicle ...
