Subaru Solterra 2023-2026 Owner's Manual: Customization
In the Subaru Solterra, a variety of system parameters can be adjusted to better match driver preferences, offering enhanced comfort, usability, and personalization of vehicle functions.
WARNING
■ Back door closer
- If the Subaru Solterra back door is left slightly ajar, the integrated
closer mechanism will automatically engage and pull it into a fully closed and
latched position.
This function activates after a short delay. Exercise caution to avoid trapping fingers or objects, as improper handling may result in serious injury such as fractures.
- Be aware that the Subaru Solterra back door closer remains operational even when the power back door system is disabled.
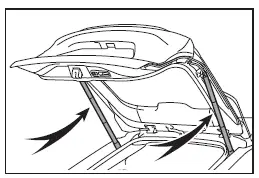
■ Power back door
Follow these safety guidelines when operating the Subaru Solterra power back door.
Ignoring these precautions may result in severe injury or fatal accidents.
- Always inspect the surrounding area to ensure there are no obstacles or objects that could interfere with the movement of the Subaru Solterra back door.
- If other people are nearby, confirm their safety and notify them before initiating opening or closing.
- If the power back door system is switched off during automatic operation,
the Subaru Solterra will immediately stop the movement.
The door must then be operated manually. Extra caution is required on slopes, as the door may move unexpectedly.
- If operating conditions are no longer met, the Subaru Solterra may emit
a warning buzzer and halt movement. In such cases, manual operation is required.
Be especially careful on inclines where the back door may shift suddenly.
- When parked on an incline, the Subaru Solterra back door may close unexpectedly after opening. Always confirm it is fully open and stable before use.
- In the following situations, the Subaru Solterra may detect an abnormal
condition and stop automatic operation. Manual handling will then be required:
- When the back door comes into contact with an obstacle
- When the 12-volt battery voltage drops suddenly, such as during system startup or when switching to ON mode
- If heavy accessories such as a bicycle carrier are attached, the Subaru
Solterra power back door may not function correctly or could close unexpectedly,
posing a risk of injury.
For optimal compatibility and safety, always use genuine Subaru Solterra accessories.
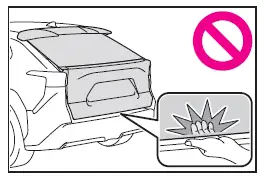
■ Jam protection function
Observe the following safety precautions.
Failure to do so may result in serious injury.
- Never intentionally use any part of your body to trigger the Subaru Solterra jam protection system.
- The jam protection system may not activate if an object becomes trapped just before the door is fully closed. Always remain cautious.
- The effectiveness of the jam protection system may vary depending on the shape or size of the object. Keep hands and objects clear at all times.
NOTICE
■ Back door spindles
The Subaru Solterra back door uses spindle mechanisms to maintain stable positioning during operation.
Follow these recommendations to prevent damage.
Failure to observe these guidelines may lead to malfunction of the Subaru Solterra back door system.
- Do not attach foreign materials such as stickers, films, or adhesives to the spindle rod.
- Avoid contact with the spindle rod using gloves or fabrics that may leave residue.
- Install only genuine Subaru Solterra accessories on the back door.
- Do not apply side force or place hands directly on the spindle components.
■ To prevent back door closer malfunction
Avoid applying excessive force to the Subaru Solterra back door while the closer mechanism is operating, as this may lead to system malfunction.
NOTICE
■ To prevent damage to the power back door
- Ensure there is no ice or debris between the Subaru Solterra back door and its frame before operation. Excessive resistance may cause system failure.
- Do not apply unnecessary force while the Subaru Solterra power back door is moving.
- Avoid damaging the sensors located on both edges of the Subaru Solterra back door. If these sensors are impaired, automatic closing may not function correctly.
■ Close & lock function
When activating the Subaru Solterra close & lock feature, a distinct buzzer tone will sound before the operation begins.
This sound confirms that the process has started successfully.
Once the Subaru Solterra back door is fully closed and locked, additional signals will indicate that all doors are secured.
Always verify that the confirmation signals have been emitted before leaving the Subaru Solterra to ensure all doors are locked.
Changing settings of the power back door system (vehicles with power back door)
The Subaru Solterra allows configuration of power back door settings through
the "Vehicle Settings" menu within the multi-information display, accessed via the
settings
 screen.
These customized settings remain active even after turning the power switch OFF. To revert to original values, manual reconfiguration is required.
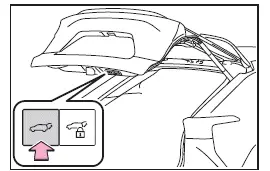
Adjusting the open position of the back door (vehicles with power back door)
The opening height of the Subaru Solterra power back door can be tailored to suit different environments such as low ceilings or garages.
1. Stop the back door at the desired position.
2. Press and hold the power back door switch for approximately 2 seconds.
After adjustment, the Subaru Solterra will emit four buzzer sounds confirming the new setting.
On subsequent openings, the back door will stop at the programmed height.

■ Canceling the adjusted open position of the back door
To reset the Subaru Solterra back door opening height to default, press and hold the switch for approximately 7 seconds.
After four initial beeps followed by two additional tones, the system will revert to the factory position.
■ Customization
The Subaru Solterra allows adjustment of the back door opening position directly via the multi-information display.
When multiple positions are set, priority is given to the most recently configured setting, whether adjusted via the back door switch or the display interface.
 Opening/closing the back door (vehicles without power back door)
■ Open
In the Subaru Solterra, the back door can be manually opened by lifting it upward
while pressing the back door opener switch. This action releases the latch and allows
smooth access to t ...
 Smart key system
In the Subaru Solterra, a wide range of vehicle operations can be
performed effortlessly simply by carrying the electronic key on your person, such
as in a pocket or bag. For optimal functionality ...
Other materials:
Outside the United States/
Canada
Government regulations in the United States/Canada require that automobiles
meet specific
emission regulations and safety standards. Therefore, vehicles built for use in
the United
States/Canada may differ from those sold in other countries.
The differences may make it difficult or even imp ...
Rear View Monitor Operation
The operation of the rear view monitor when reversing the vehicle varies
depending on
the traffic, road, and vehicle conditions. The amount of steering and the
timing also varies
depending on conditions, so confirm the surrounding conditions directly with
your eyes and
steer the vehicle in ...
PID/Data Monitor Inspection [Bcm]
1. Connect the M-MDS (IDS) to the DLC-2.
2. After the vehicle is identified, select the following items from the initialization
screen of the IDS.
a. Select “DataLogger”.
b. Select “Modules”.
c. Select “BCM/GEM”.
3. Select the applicable PID from the PID table.
4. Verif ...
