Mazda 3 Service Manual: Oil Pump Removal/Installation [Mzr 2.0, Mzr 2.5]
WARNING:
-
Hot engines and engine oil can cause severe burns. Turn off the engine and wait until it and the engine oil have cooled.
-
A vehicle that is lifted but not securely supported on safety stands is dangerous. It can slip or fall, causing death or serious injury. Never work around or under a lifted vehicle if it is not securely supported on safety stands.
-
Continuous exposure to USED engine oil has caused skin cancer in laboratory mice. Protect your skin by washing with soap and water immediately after working with engine oil.
1. Remove the battery cover..
2. Disconnect the negative battery cable..
3. Remove the plug hole plate..
4. Disconnect the wiring harness.
5. Remove the ignition coils..
6. Remove the spark plugs..
7. Remove the ventilation hose.
8. Remove the coolant reserve tank with the hose still connected and set it out of the way..
9. Remove the front wheel and tire. (RH).
10. Remove the aerodynamic under cover No.2 and splash shield as a single unit..
11. Drain the engine oil..
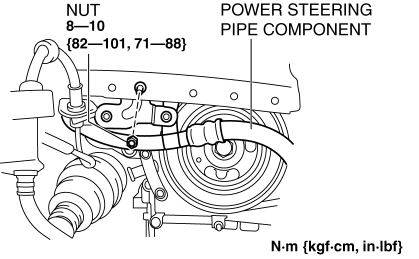
12. Remove the nut shown in the figure and set the power steering pipe component out of the way.
MZR 2.0

MZR 2.5
13. Remove the drive belt..
14. Remove the crankshaft position (CKP) sensor..
15. Remove the A/C compressor with the cooler hose still connected and secure it using wire or rope so that it is out of the way. (MZR 2.0).
16. Disconnect the drive shaft (RH) from joint shaft, set the drive shaft (RH) out of the way. (MTX).
17. Remove the engine front cover..
18. Remove the oil pan..
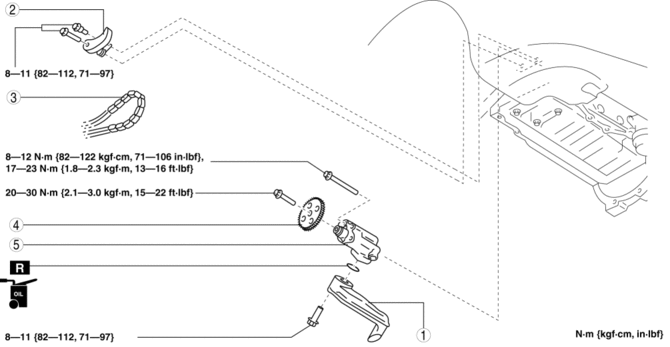
19. Remove in the order indicated in the table.
20. Install in the reverse order of removal.
21. Refill with the specified type and amount of the engine oil..
22. Start the engine and confirm that there is no oil leakage.
-
If there is oil leakage, repair or replace the applicable part.
23. Inspect the oil level..
24. Inspect for the ignition timing and idle speed..
25. Inspect the oil pressure..
|
1 |
Oil strainer |
|
2 |
Oil pump chain tensioner |
|
3 |
Oil pump chain |
|
4 |
Oil pump sprocket (See Oil Pump Sprocket Removal/Installation Note.) |
|
5 |
Oil pump (See Oil Pump Installation Note.) |
Oil Pump Sprocket Removal/Installation Note
1. Temporarily install the crankshaft pulley and crankshaft pulley lock bolt to the crankshaft, and lock the oil pump against rotation as shown in figure.
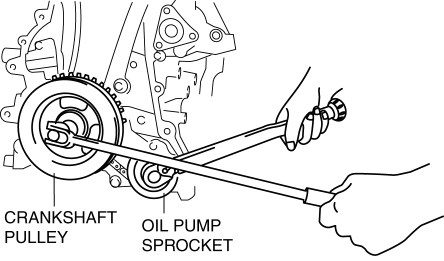
2. Remove/install the oil pump sprocket, and then remove the crankshaft pulley and crankshaft pulley lock bolt.
-
Tightening torque
-
20—30 N·m {2.1—3.0 kgf·m, 15—22 ft·lbf}
Oil Pump Installation Note
1. Tighten the oil pump bolts in two steps in the order shown in the figure.
-
Tightening torque
-
Step 1: 8—12 N·m {82—122 kgf·cm, 71—106 in·lbf}
-
Step 2: 17—23 N·m {1.8—2.3 kgf·m, 13—16 ft·lbf}
 No.16 Judder Upon Torque Converter Clutch (TCC) Operation [FS5 A EL]
16
Judder upon torque converter clutch (TCC) operation
DESCRIPTION
Vehicle jolts when TCC is engaged.
POSSIBL ...
 Oil Pump Removal/Installation [Mzr 2.3 Disi Turbo]
WARNING:
Hot engines and engine oil can cause severe burns. Turn off the engine and
wait until it and the engine oil have cooled.
A vehicle that is lifted but not securely supported ...
Other materials:
Service Cautions
Injury/damage Prevention Precautions
Depending on the vehicle, the cooling fan may operate suddenly even when
the ignition is switched to off. Therefore, keep hands and tools away from the
cooling fan even if the cooling fan is not operating to prevent injury to personnel
or damage t ...
Starter Inspection [Mzr 2.0, Mzr 2.5]
On-vehicle Inspection
1. Verify that the battery is fully charged.
2. The starter is normal if it rotates smoothly and without any noise when the
engine is cranked.
If the starter does not operate, inspect the following:
Remove the starter, and inspect the starter unit.
...
Camshaft Position (CMP) Sensor Inspection [Mzr 2.0, Mzr 2.5]
Visual Inspection
CAUTION:
When replacing the CMP sensor, make sure there is no foreign material on
it such as metal shavings. If it is installed with foreign material, the sensor
output signal will malfunction resulting from fluctuation in magnetic flux and
cause a deterioration i ...
