
Subaru Solterra 2023-2026 Owner's Manual: Brake Hold
In the Subaru Solterra, the brake hold system is engineered to maintain braking force automatically when the vehicle is stopped with the shift position in D or N and the system is activated. Once the brake pedal is used to bring the Subaru Solterra to a stop, the system keeps the brakes applied without requiring continuous pedal pressure. When the accelerator pedal is pressed while in D, the system smoothly releases the brakes, enabling a seamless and comfortable start.
Enabling the system
To activate the brake hold system in the Subaru Solterra, press the corresponding switch. When enabled, the brake hold standby indicator (green) A will illuminate. Once the system actively maintains brake pressure, the brake hold operation indicator (yellow) B will also turn on, clearly confirming that the Subaru Solterra is being held in place.
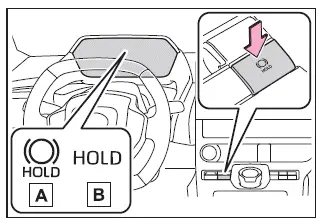
■ Brake hold system operating conditions
The brake hold system in the Subaru Solterra cannot be activated if certain essential safety conditions are not met:
- The driver's door is open or not fully closed.
- The driver is not wearing a seat belt.
- Messages such as "Parking Brake Unavailable" or "Parking Brake Malfunction Visit Your Dealer" are displayed on the multi-information display.
If any of these conditions occur while the brake hold system in the Subaru Solterra is already active, the system will automatically deactivate. The standby indicator will turn off, and if the system was holding the brakes, a warning buzzer will sound. At the same time, the parking brake will engage automatically to maintain vehicle stability.
■ Brake hold function
- If the brake hold function in the Subaru Solterra remains active for approximately 3 minutes without driver input, the system will automatically engage the parking brake. A warning buzzer and display message will notify the driver of this transition.
- On steep inclines, the brake hold system in the Subaru Solterra may not be sufficient to keep the vehicle stationary. In such cases, the driver should manually apply the brake pedal. A warning will be issued via buzzer and display notification. Always follow the instructions shown on the multi-information display.
- To deactivate the system while it is actively holding the vehicle, press the brake pedal firmly and then press the brake hold switch again.
■ When the parking brake is set automatically while the system is holding the brakes
If the Subaru Solterra automatically engages the parking brake while brake hold is active, use one of the following methods to release it:
- Press the accelerator pedal.
(Note: The parking brake will not release automatically if the driver’s seat belt is not fastened.)
- Operate the parking brake switch while pressing the brake pedal.
Always verify that the parking brake indicator light has turned off before resuming driving in the Subaru Solterra.
■ When an inspection at your SUBARU dealer is necessary
If the brake hold standby indicator (green) does not illuminate after pressing the switch while all operating conditions are met, the brake hold system in the Subaru Solterra may be malfunctioning. In this case, have the vehicle inspected by an authorized SUBARU dealer without delay.
■ If "Brake Hold Malfunction Press Brake to Deactivate Visit Your Dealer" or "Brake Hold Malfunction Visit Your Dealer" is displayed on the multi-information display
These messages indicate a potential malfunction within the Subaru Solterra brake hold system.
Arrange for prompt inspection of your Subaru Solterra at a SUBARU dealership to ensure continued safe operation.
■ Warning messages and buzzers
The Subaru Solterra uses audible alerts and on-screen messages to notify the driver of system status changes, warnings, or malfunctions. Whenever a message appears, carefully read and follow the instructions to maintain safety and system reliability.
WARNING
■ When the vehicle is on a steep incline
Use extra caution when relying on the brake hold system in the Subaru Solterra on steep slopes. The system may not provide sufficient holding force in such conditions.
■ When stopped on a slippery road
The brake hold system cannot compensate for reduced tire traction. Avoid relying on the system when the Subaru Solterra is stopped on slippery or low-grip surfaces.
NOTICE
■ When parking the vehicle
The brake hold system in the Subaru Solterra is not intended for long-term parking. If the power switch is turned off while the system is holding the brakes, the braking force may be released, potentially allowing the vehicle to move. Always depress the brake pedal, shift to P, and apply the parking brake before turning off the Subaru Solterra.
This advanced brake hold functionality in the Subaru Solterra enhances driving comfort in stop-and-go traffic while maintaining high safety standards and reducing driver fatigue.
 Parking brake
The parking brake system in the Subaru Solterra can be engaged or
released either automatically or manually, providing flexibility and enhanced convenience
depending on driving conditions.
When ...

Other materials:
Windshield Wiper Arm And Blade Adjustment
1. Operate the windshield wipers, and then turn off the windshield wiper motor
to set the wipers in the auto stop position.
2. Slide the serrated connecting part and adjust the windshield wiper arm and
blade so that its end is aligned with the hollowed mark in the ceramic coating.
NOTE: ...
Rear Door Quarter Glass Removal/Installation
1. Fully lower the rear door glass.
2. Disconnect the negative battery cable..
3. Remove the rear door trim..
4. Remove the service hole cover.
5. Remove the hole plug.
6. Remove the screw.
7. Remove the bolt A and B.
8. Remove the rear door glass guide.
9. Remove the pin ...
Key Removed from Vehicle
Warning Beep
Vehicles with advanced keyless function
If the key is taken out of the vehicle while
the ignition is not switched OFF and
all the doors are closed, the beep which
sounds outside of the vehicle will be heard
6 times, the beep which sounds inside
the vehicle will be heard 6 times, and the
KEY w ...
