Mazda 3 Service Manual: Charcoal Canister Removal/Installation [Mzr 2.0, Mzr 2.5]
Except for Mexico
1. Remove in the order indicated in the table.
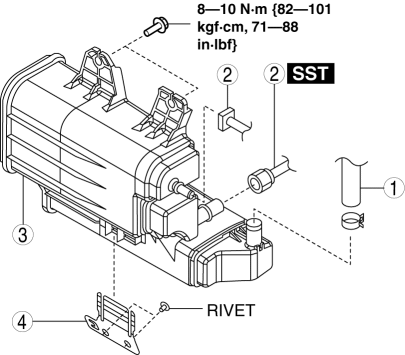
|
1 |
Evaporative hose |
|
2 |
Quick release connector (See QUICK RELEASE CONNECTOR (EMISSION SYSTEM) REMOVAL/INSTALLATION [MZR 2.0, MZR 2.5].) |
|
3 |
Charcoal canister (See Charcoal canister removal note.) |
|
4 |
Charcoal canister bracket (See Charcoal canister bracket removal note.) |
2. Install in the reverse order of removal.
Charcoal canister removal note
1. Remove the rear stabilizer..
2. Remove the rear coil spring..
3. Remove the rear lower arm..
4. Remove the rear crossmember component..
5. Remove the charcoal canister.
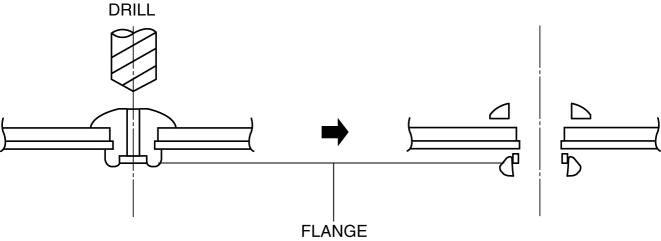
Charcoal canister bracket removal note
NOTE:
-
The charcoal canister bracket is installed using rivets.
1. Push out the mandrel using a hammer and punch (2—2.8 mm {0.08—0.11 in}
diameter).
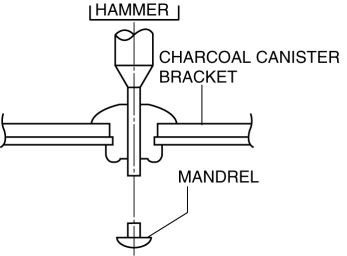
2. Remove the flange using a drill (5 mm {0.20 in}
drill bit).
Mexico
1. Remove in the order indicated in the table.
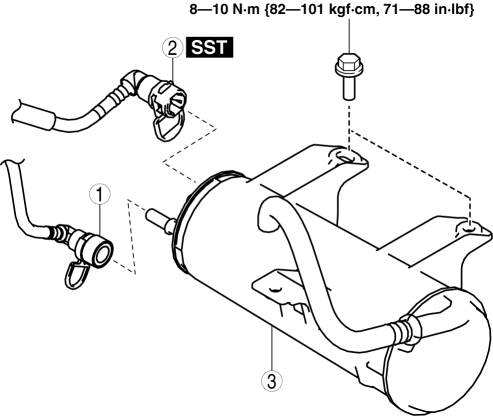
|
1 |
Quick release connector (See QUICK RELEASE CONNECTOR (EMISSION SYSTEM) REMOVAL/INSTALLATION [MZR 2.0, MZR 2.5].) |
|
2 |
Quick release connector (See QUICK RELEASE CONNECTOR (EMISSION SYSTEM) REMOVAL/INSTALLATION [MZR 2.0, MZR 2.5].) |
|
3 |
Charcoal canister |
2. Install in the reverse order of removal.
 Charcoal Canister Inspection [Mzr 2.0, Mzr 2.5]
Leakage Inspection
1. Perform the following procedures:
Assemble the hose used for inspection to port A.
Cover ports B and C with the caps.
Except for Mexico
Mexico
C ...
 Check Valve (One Way) Inspection [Mzr 2.3 Disi Turbo]
1. Disconnect the vacuum hose connected between the check valve and the purge
solenoid valve from the purge solenoid valve..
2. Disconnect the vacuum hose connected between the check valve (one-wa ...
Other materials:
Steering Wheel And Column Removal/Installation [With Advanced Keyless Entry
And Push Button Start System]
WARNING:
Handling the air bag module improperly can accidentally operate (deploy)
the air bag module, which may seriously injure you. Read the service warnings
before handling the air bag module..
1. Remove the driver-side front scuff plate..
2. Remove the driver-side front sid ...
Auxiliary Jack/Usb Port
NOTE:
“iPod” is a registered trademark of Apple Inc. in the United States and other
countries.
Purpose, Function
The Auxiliary jack/USB port outputs the audio signals of commercially-available
portable audio, a USB device, or an iPod connected to the Auxiliary jack/USB ...
Filament Repair
1. Clean the filament using isopropyl alcohol.
2. Attach tape to both sides of the filament.
3. Using a small brush or marking pen, apply silver paint.
4. After 2—3 min, carefully remove the tape without damaging the applied
area.
CAUTION:
Do not operate the rear window defro ...
