
Mazda 3 Owners Manual: System
The system operates only when the driver is in the vehicle or within operational range while the key is being carried.
NOTE When the battery power is low, or in places where there are high-intensity radio waves or noise, the operational range may become narrower or the system may not operate. For determining battery replacement, Refer to Keyless Entry System on .
Locking, Unlocking the Doors and the Liftgate
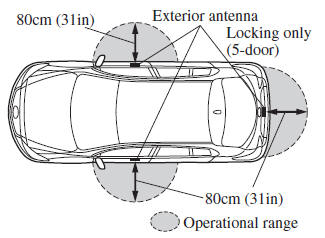
NOTE The system may not operate if you are too close to the windows or door handles, or liftgate.
Opening the Liftgate/Trunk Lid
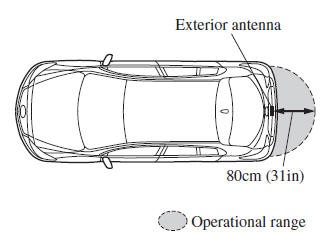
 Advanced Keyless Entry
WARNING
Radio waves from the key may aff ect
medical devices such as pacemakers:
Before using the key near people who
use medical devices, ask the medical
device manufacturer or ...
 Operational Range
WARNING
Always take all children and pets with
you or leave a responsible person with
them:
Leaving a child or a pet unattended in
a parked vehicle is dangerous. In hot
weathe ...
Other materials:
Drive Belt Inspection [Mzr 2.0, Mzr 2.5]
MZR 2.0
A/C drive belt
NOTE:
Drive belt deflection/tension inspection is not necessary because of the
use of the maintenance-free type A/C drive belt.
Replace the drive belt if it is found to be damaged during visual inspection,
or if there is a malfunction or noise in th ...
Windshield Defrosting and
Defogging
Set the mode selector dial to the
position.
Set the temperature control dial to the
desired position.
Set the fan control dial to the desired
speed.
If dehumidified heating is desired, turn
on the air conditioner.
WARNING
Do not defog the windshield using the
pos ...
Air Fuel Ratio (A/F) Sensor Removal/Installation [Mzr 2.0, Mzr 2.5]
WARNING:
A hot engine and exhaust system can cause severe burns. Turn off the engine
and wait until they are cool before removing the exhaust system.
1. Remove the battery cover..
2. Disconnect the negative battery cable..
3. Remove the plug hole plate..
4. Remove the air clea ...
