Mazda 3 Service Manual: Clock Spring Adjustment
NOTE:
-
The adjustment procedure is also specified on the caution label of the clock spring.
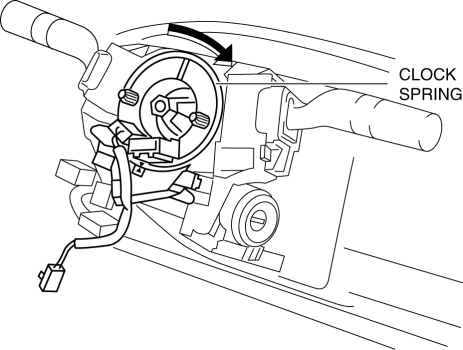
1. Set the front wheels straight ahead.
CAUTION:
-
The clock spring will break if over–wound. Do not forcibly turn the clock spring.
2. Turn the clock spring clockwise until it stops.
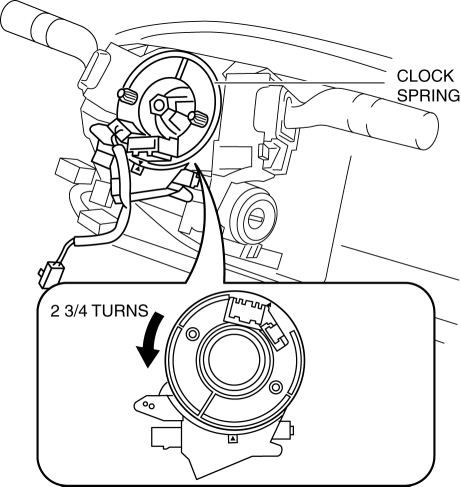
3. Turn the clock spring counterclockwise 2 3/4 turns
.
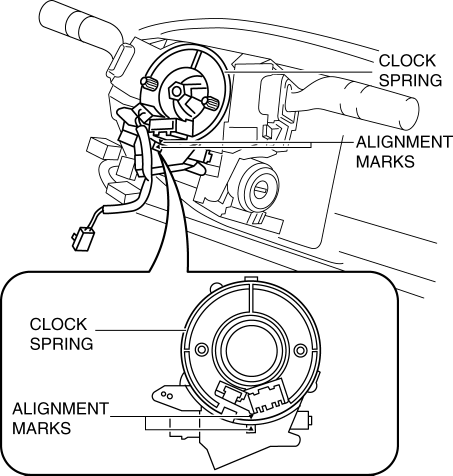
4. Align the mark on the clock spring with the mark on the outer housing.
 Active Command Modes Inspection [Instrument Cluster]
1. Connect the M-MDS (IDS) to the DLC-2.
2. After the vehicle is identified, select the following items from the initialization
screen of the IDS.
a. Select “DataLogger”.
b. Select “ ...
 Clock Spring Inspection [Standard Deployment Control System]
1. Disconnect the negative battery cable..
2. Remove the driver–side air bag module..
3. Remove the steering wheel..
4. Remove the column cover.
5. Remove the clock spring..
6. Verify that ...
Other materials:
Accessory Socket Inspection
Front
1. Disconnect the negative battery cable..
2. Remove the upper panel..
3. Remove the shift lever knob. (MTX).
4. Remove the selector lever knob. (ATX).
5. Remove the shift panel.
6. Remove the accessory socket (front).
7. Connect a tester as shown in the figure and verify that the ...
Replacing a Tire
WARNING
Always use tires that are in good
condition:
Driving with worn tires is dangerous.
Reduced braking, steering, and
traction could result in an accident.
Replace all four tires at the same time:
Replacing just one tire is dangerous. It
could cause poor handling ...
A/C Unit Removal/Installation
1. Set the air mix mode to MAX COLD.
2. Disconnect the negative battery cable..
3. Discharge the refrigerant..
4. Drain the engine coolant..
5. Remove the plug hole plate.
6. Remove the charge air cooler cover. (MZR 2.3 DISI Turbo).
7. Remove the insulator. (MZR 2.3 DISI Turbo)
8. ...
