Mazda 3 Service Manual: Down Switch Inspection [Fw6 A EL]
Continuity Inspection
NOTE:
-
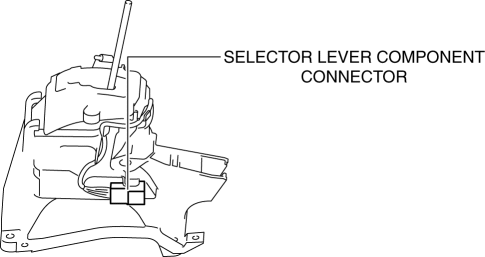
The down switch is built into the selector lever component.
1. Remove the battery cover..
2. Disconnect the negative battery cable..
3. Remove the console..
4. Disconnect the selector lever component connector.
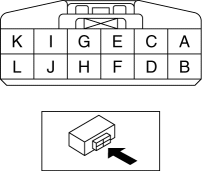
5. Verify that the continuity between selector lever component terminals C and H.
-
If not as verified, replace the selector lever component..
|
Test condition |
Continuity |
|
Selector lever is in the M position (−) side position. |
Continuity |
|
Selector lever is not in the M position (−) side position. |
No continuity |
 Down Switch Inspection [FS5 A EL]
1. Perform the following procedures.
a. Remove the battery cover..
b. Disconnect the negative battery cable.
c. Remove the console..
d. Disconnect the selector lever component connector.
...
 Drive Plate Removal/Installation [FS5 A EL]
1. Remove the transaxle..
2. Remove in the order indicated in the table.
1
Drive plate installation bolts
(See Drive Plate Installation Bolts Removal Note.)
(See ...
Other materials:
Bluetooth ® Preparation (Type A)
Bluetooth ® Hands-Free Preparation
Pairing code setting
The 4-digit pairing code setting for
registration of your cell phone (pairing)
can be set beforehand.
NOTE
The initial setting value is “0000”.
Press the pick-up button or talk button
with a short press.
Say: [Beep] “Setupâ ...
Sunroof Unit Removal/Installation
CAUTION:
If the sunshade is forced close while the sunroof is open, the sunshade could
be damaged.
1. Disconnect the negative battery cable..
2. Remove the rain sensor cover. (Vehicles with auto light/wiper system).
3. Disconnect the rain sensor connector. (Vehicles with auto l ...
Radar Sensors (Rear)
The radar sensors (rear) for the rear vehicle monitoring system are equipped
inside the rear
bumper, one each on the left and right sides.
Sedan
Hatchback
The surface area of the rear bumper near the radar sensors (rear) should
always be clean so
that the rear vehicle monitoring sys ...
