Mazda 3 Service Manual: Electric Power Steering Oil Pump Component Removal/Installation
CAUTION:
-
Be careful not to drop the electric power steering oil pump component as the internal parts of the EHPAS CM could be damaged. Replace the electric power steering oil pump component if it is subjected to an impact.
1. Remove the front mudguard (RH)..
2. Remove the aerodynamic under cover NO.2..
3. Remove the splash shield (RH).
4. Remove in the order indicated in the table.
5. Install in the reverse order of removal.
6. After installation, perform the EHPAS CM configuration procedure..
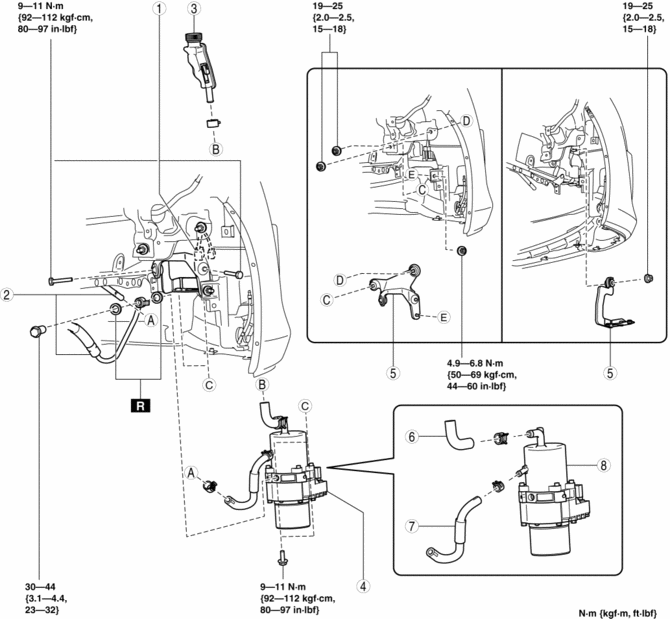
|
1 |
Connector (See Connector Removal Note.) |
|
2 |
Power steering pipe component (See Power Steering Pipe Component Removal Note.) |
|
3 |
Sub tank |
|
4 |
Electric power steering oil pump component (with hoses) |
|
5 |
Brackets |
|
6 |
Suction hose |
|
7 |
Return hose |
|
8 |
Electric power steering oil pump component |
Connector Removal Note
1. Before disconnecting the connector, clean the connector with a brush or cloth to remove foreign matter.
2. Disconnect the connector.
3. After removing the connector, install the cap included in the new pump kit package being careful that fluid or foreign matter does not penetrate the connector area of the control module.
NOTE:
-
If a new pump kit is not available, adhere protective tape to the connector.
Power Steering Pipe Component Removal Note
1. Disconnect the power steering pipe component and then drain the power steering fluid.
 Electric Power Steering Oil Pump Component Disassembly/Assembly
CAUTION:
The internal parts of the EHPAS control module and motor could be damaged
if they receive an impact. Be careful when handling the EHPAS control module
and motor to prevent the c ...
 Engine Oil Level Inspection [Mzr 2.0, Mzr 2.5]
1. Position the vehicle on level ground.
2. Warm up the engine.
3. Stop the engine and allow at least 5 min before continuing.
4. Remove the dipstick, wipe it cleanly, and reinstall it fully.
...
Other materials:
Operating the Compact Disc (CD) Player
Type
Playable data
Music/MP3/WMA/
AAC CD player
Music data (CD-DA)
MP3/WMA/AAC file
NOTE
If a disc has both music data (CD-DA)
and MP3/WMA/AAC files, playback of the
two or three file types differs depending on
how the disc was reco ...
Rear Seat Back Frame Removal/Installation
1. Remove the rear seat cushion..
2. Remove the rear buckle installation bolt..
3. Remove the rear seat back..
4. Remove the headrest.
5. Open the fasteners.
6. Detach the hooks.
7. Remove the child-restraint seat anchor covers in the order of (1), (2) as
shown in the figure. (5H ...
Positioning a floor jack
–Я—А–Є –≤–Є–Ї–Њ—А–Є—Б—В–∞–љ–љ—Ц –і–Њ–Љ–Ї—А–∞—В–∞ –і–ї—П Subaru Solterra
–Ј–∞–≤–ґ–і–Є –і–Њ—В—А–Є–Љ—Г–є—В–µ—Б—М —Ц–љ—Б—В—А—Г–Ї—Ж—Ц–є –≤–Є—А–Њ–±–љ–Є–Ї–∞ –і–Њ–Љ–Ї—А–∞—В–∞
—В–∞ –≤–Є–Ї–Њ–љ—Г–є—В–µ —А–Њ–±–Њ—В–Є –Љ–∞–Ї—Б–Є–Љ–∞–ї—М–љ–Њ –Њ–±–µ—А–µ–ґ–љ–Њ.
–Я—Ц–і —З–∞—Б –њ—Ц–і–љ—П—В—В—П Subaru Solterra – ...
