Mazda 3 Service Manual: Front ABS Wheel Speed Sensor Inspection
Sensor Output Value Inspection
CAUTION:
-
Resistance inspection using other testers may cause damage to the ABS wheel-speed sensor internal circuit. Be sure to use the M-MDS to inspect the ABS wheel-speed sensor.
1. Switch the ignition to off.
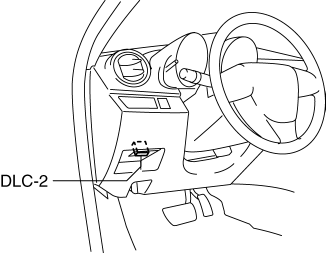
2. Connect the M-MDS to the DLC-2.
3. Select the following PIDs using the M-MDS:
-
WSPD_LF
(LF wheel-speed sensor)
-
WSPD_RF
(RF wheel-speed sensor)
4. Start the engine and drive the vehicle.
5. Verify that the display of the M-MDS shows the same value as the speedometer.
-
If there is any malfunction, replace the front ABS wheel-speed sensor.
Installation Visual Inspection
1. Inspect for the following:
-
If there is any malfunction, replace the part.
a. Excessive play of the front ABS wheel-speed sensor
b. Deformation of the front ABS wheel-speed sensor
Clearance Inspection
Preparation prior to inspection
1. Remove the front ABS wheel-speed sensor..
2. Remove the wheel hub, steering knuckle component..
3. Install the front ABS wheel-speed sensor to the removed the wheel hub, steering knuckle component, and tighten to the specified torque.
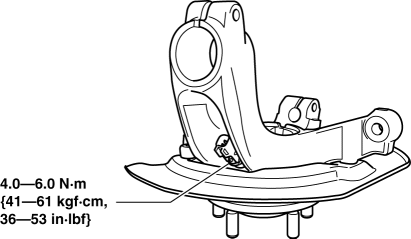
-
Tightening torque
-
4.0—6.0 N·m {41—61 kgf·cm, 36—53 in·lbf}
Clearance Inspection
1. Measure the gap between the front ABS sensor rotor and the front ABS wheel-speed sensor using a feeler gauge.
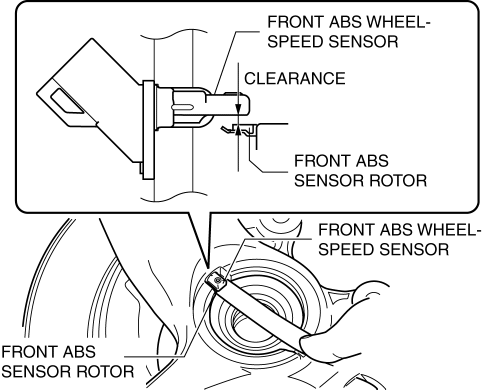
-
If not within the specification, verify the following items and repair or replace if necessary.
-
Is there deformation or damage to the front ABS sensor rotor?
-
Is there deformation or damage to the front ABS wheel speed sensor?
-
Is there foreign material adhering?
-
Clearance
-
2.1 mm {0.082 in} or less
Servicing after inspection
1. Remove the front ABS wheel-speed sensor from the wheel hub, steering knuckle component.
2. Install the wheel hub, steering knuckle component..
3. Install the front ABS wheel-speed sensor..
4. Inspect the front wheel alignment..
 ABS HU/CM Removal/Installation
WARNING:
If the ABS HU/CM configuration is not completed, it could result in an unexpected
accident due to the ABS being inoperative. If the ABS HU/CM or ABS CM is replaced,
always use t ...
 Front ABS Wheel Speed Sensor Removal/Installation
1. Remove in the order indicated in the table.
2. Install in the reverse order of removal.
3. After installation, verify that there is no twisting in the front ABS wheel-speed
sensor.
...
Other materials:
Pre-programming the HomeLink
System
NOTE
It is recommended that a new battery be
placed in the hand-held transmitter of the
device being programmed to HomeLink
for quicker training and accurate
transmission of the radio-frequency signal.
Verify that there is a remote control
transmitter available for the device you
would ...
Adaptive Front Lighting System
(AFS)
The adaptive front lighting system (AFS)
automatically adjusts the headlight beams
to the left or right in conjunction with the
operation of the steering wheel after the
headlights have been turned on.
AFS OFF Indicator Light
When illuminated
This indicator light illuminates briefly
when ...
Vehicle Speed Sensor (VSS) Inspection [FS5 A EL]
On-Vehicle Inspection
1. Inspect the power supply circuit for the VSS.
a. Remove the insulator from the transaxle.
b. Disconnect the VSS connector.
c. Switch the ignition to ON (engine off).
d. Measure the voltage at VSS connector terminal A (harness-side).
If there is a ...
