Mazda 3 Service Manual: Front Bumper Disassembly/Assembly
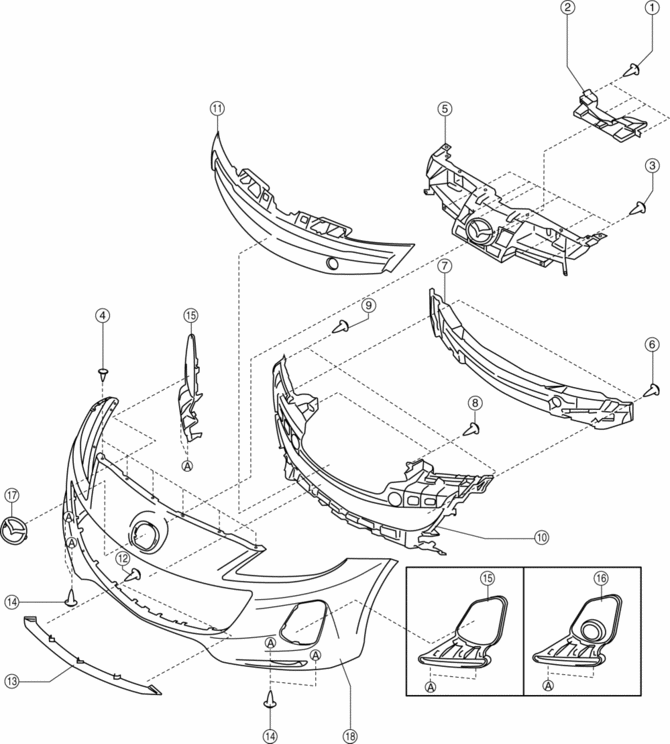
Standard Type
Except SKYACTIV-G 2.0
1. Disassemble in the order indicated in the table.
|
1 |
Screw A |
|
2 |
Guard cover |
|
3 |
Screw B |
|
4 |
Fastener C |
|
5 |
Intake air guide |
|
6 |
Fastener D |
|
7 |
Front energy-absorbing form |
|
8 |
Screw E |
|
9 |
Fastener F |
|
10 |
Front bumper mesh |
|
11 |
Front bumper upper mesh |
|
12 |
Screw G |
|
13 |
Airdam skirt |
|
14 |
Screw H |
|
15 |
Front fog light hole cover (Vehicles without front fog light) |
|
16 |
Front fog light cover (Vehicles with front fog light) |
|
17 |
Ornament |
|
18 |
Front bumper facia |
2. Assemble in the reverse order of disassembly.
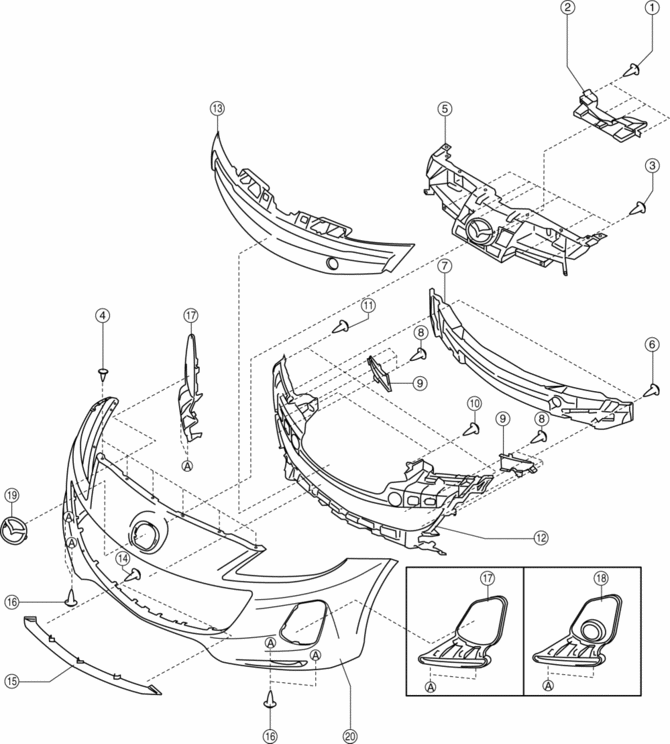
SKYACTIV-G 2.0
1. Disassemble in the order indicated in the table.
|
1 |
Screw A |
|
2 |
Guard cover |
|
3 |
Screw B |
|
4 |
Fastener C |
|
5 |
Intake air guide |
|
6 |
Fastener D |
|
7 |
Front energy-absorbing form |
|
8 |
Screw E |
|
9 |
Front bumper cover |
|
10 |
Screw F |
|
11 |
Fastener G |
|
12 |
Front bumper mesh |
|
13 |
Front bumper upper mesh |
|
14 |
Screw H |
|
15 |
Airdam skirt |
|
16 |
Screw I |
|
17 |
Front fog light hole cover (Vehicles without front fog light) |
|
18 |
Front fog light cover (Vehicles with front fog light) |
|
19 |
Ornament |
|
20 |
Front bumper facia |
2. Assemble in the reverse order of disassembly.
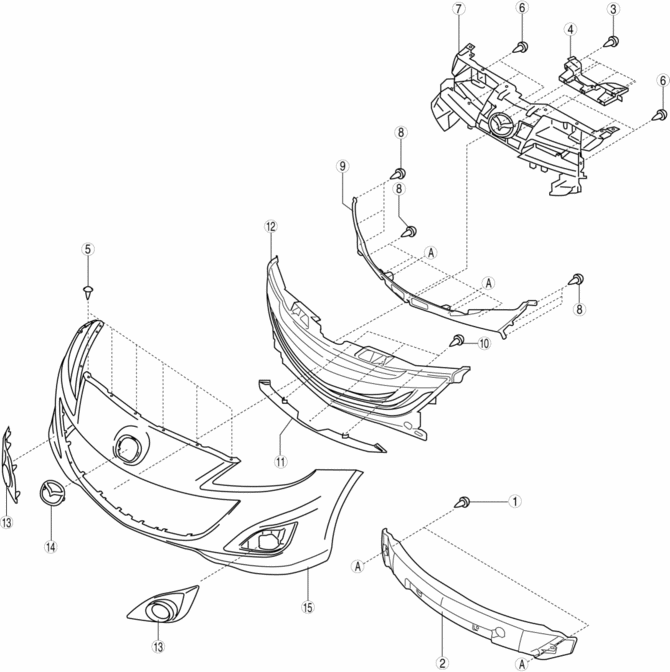
Mazdaspeed3 Type
1. Remove the front fog lights..
2. Disassemble in the order indicated in the table.
|
1 |
Fastener A |
|
2 |
Front energy-absorbing form |
|
3 |
Screw B |
|
4 |
Guard cover |
|
5 |
Fastener C |
|
6 |
Screw D |
|
7 |
Intake air guide |
|
8 |
Screw E |
|
9 |
Front bumper mesh rear |
|
10 |
Screw F |
|
11 |
Airdam skirt |
|
12 |
Front bumper mesh front |
|
13 |
Front fog light hole cover |
|
14 |
Ornament |
|
15 |
Front bumper facia |
3. Assemble in the reverse order of disassembly.
 Front Beltline Molding Removal/Installation
1. Fully open the front door glass.
2. Disconnect the negative battery cable..
3. Remove the inner garnish..
4. Remove the front door trim..
5. Remove the power outer mirror..
6. Remove clip ...
 Front Bumper Reinforcement Removal/Installation
1. Disconnect the negative battery cable..
2. Remove the following parts:
a. Front bumper.
b. Seal plate.
3. Remove the bolts A.
4. Remove the bolts B.
5. Remove the front bumper r ...
Other materials:
Front Seat Belt Removal/Installation [Two Step Deployment Control System]
WARNING:
Handling the front seat belt (pre-tensioner seat belt) improperly can accidentally
deploy the pre-tensioner seat belt, which may seriously injure you. Read the
air bag system service warnings and cautions before handling the front seat
belt..
WARNING:
The side ...
Theft Deterrent System Reading Freeze Frame Data
1. Connect the M-MDS (IDS) to the DLC–2.
2. After the vehicle is identified, select the following items from the initialization
screen of the IDS.
Select “Body”.
Select "Burglar Service Functions".
3. Then, select the following item from the screen menu. ...
Charcoal Canister Removal/Installation [Mzr 2.0, Mzr 2.5]
Except for Mexico
1. Remove in the order indicated in the table.
1
Evaporative hose
2
Quick release connector
(See QUICK RELEASE CONNECTOR (EMISSION SYSTEM) REMOVAL/INSTALLATION [MZR
2.0, MZR 2.5].)
3
Charc ...
