Mazda 3 Service Manual: Front Stabilizer Control Link Inspection
1. Remove the front stabilizer control link from the vehicle.. (See FRONT STABILIZER REMOVAL/INSTALLATION [MZR 2.3 DISI Turbo]
2. Inspect for bending or damage. If there is any malfunction, replace the stabilizer control link.
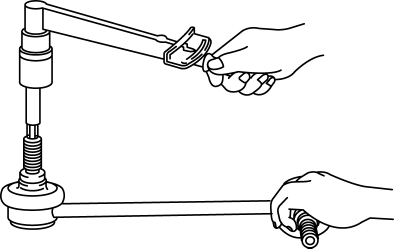
3. Rotate the ball joint stud 10 times
and shake it side to side 10 times
.
4. Measure the ball joint rotational torque using an Allen wrench and a torque wrench.
-
Front stabilizer control link ball joint rotational torque
-
0.2—0.9 N·m {3—9 kgf·cm, 2—7 in·lbf}
-
If not within the specification, replace the front stabilizer control link.
 Front Shock Absorber Inspection
1. Remove the front shock absorber..
2. Inspect for damage and oil leakage.
3. Compress and extend the front shock absorber piston rod at least three
times at a steady rate. From the fourth comp ...
 Front Stabilizer Removal/Installation [Mzr 2.0, Skyactiv G 2.0, Mzr 2.5]
1. Remove the joint cover..
2. Disconnect the steering shaft from the steering gear and linkage..
3. Remove the front crossmember component..
4. Remove in the order indicated in the table.
5. ...
Other materials:
Seat Weight Sensor Calibration [Two Step Deployment Control System]
CAUTION:
If any of the following work is performed, perform the seat weight sensor
calibration using the M-MDS.
Replacement with a new seat weight sensor
Replacement with a new seat weight sensor control module
Replacement with new passenger-side seat pa ...
Available Language (Type A)
The available languages are English,
Spanish, and Canadian French. If the
language setting is changed, all of the
voice guidance and voice input commands
are done in the selected language.
NOTE
If the language setting is changed,
device registration is maintained.
Phonebook records are ...
Instrument Cluster Removal/Installation
CAUTION:
When replacing the instrument cluster, the configuration procedure must be
performed before removing the instrument cluster. Replacing the instrument cluster
without performing the configuration procedure will result in system malfunction.
1. Perform the instrument clust ...
