Mazda 3 Service Manual: Front Stabilizer Removal/Installation [Mzr 2.0, Skyactiv G 2.0, Mzr 2.5]
1. Remove the joint cover..
2. Disconnect the steering shaft from the steering gear and linkage..
3. Remove the front crossmember component..
4. Remove in the order indicated in the table.
5. Install in the reverse order of removal.
6. Inspect the wheel alignment and adjust it if necessary..
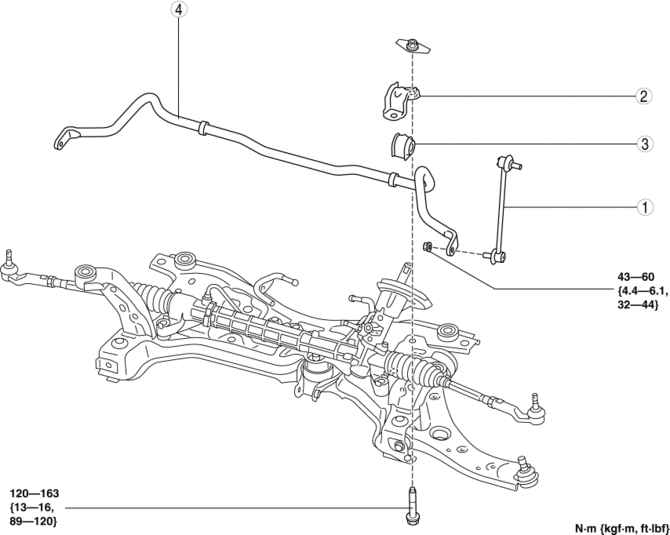
|
1 |
Front stabilizer control link |
|
2 |
Front stabilizer bracket (SeeFront Stabilizer Bracket Removal Note.) (See Front Stabilizer, Front Stabilizer Bushing and Front Stabilizer Bracket Installation Note.) |
|
3 |
Front stabilizer bushing (SeeFront Stabilizer, Front Stabilizer Bushing and Front Stabilizer Bracket Installation Note.) |
|
4 |
Front stabilizer (See Front Stabilizer, Front Stabilizer Bushing and Front Stabilizer Bracket Installation Note.) |
Front Stabilizer Bracket Removal Note
1. Secure the front stabilizer bracket flange using a vise.
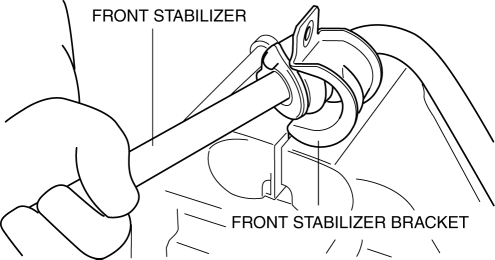
2. Remove the front stabilizer.
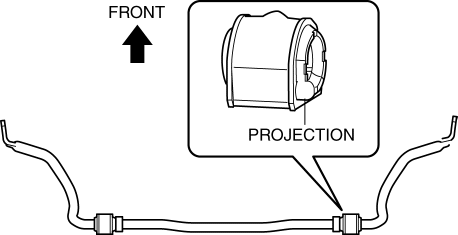
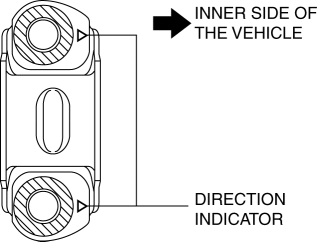
Front Stabilizer, Front Stabilizer Bushing and Front Stabilizer Bracket Installation Note
1. Install the front stabilizer bushing so that the projection points to the right side of the vehicle.
2. Point the direction indicator on the stabilizer bracket inward and install front stabilizer bracket using a vise.
3. Temporarily install the front stabilizer component.
4. Tighten the bolts following order.
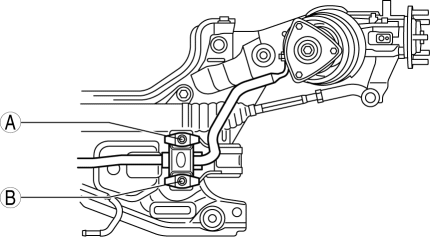
a. Temporarily tighten bolts A and B shown in the figure.
b. Tighten bolt A.
c. Tighten bolt B.
d. Tighten bolt A.
 Front Stabilizer Control Link Inspection
1. Remove the front stabilizer control link from the vehicle.. (See FRONT STABILIZER
REMOVAL/INSTALLATION [MZR 2.3 DISI Turbo]
2. Inspect for bending or damage. If there is any malfunction, replac ...
 Front Stabilizer Removal/Installation [Mzr 2.3 Disi Turbo]
1. Remove the joint cover..
2. Disconnect the steering shaft from the steering gear and linkage..
3. Remove the front crossmember component..
4. Remove in the order indicated in the table.
5. ...
Other materials:
Engine Coolant Replacement [Mzr 2.0, Mzr 2.5]
WARNING:
Never remove the cooling system cap or loosen the radiator drain plug while
the engine is running, or when the engine and radiator are hot. Scalding engine
coolant and steam may shoot out and cause serious injury. It may also damage
the engine and cooling system.
Tu ...
Starter Disassembly/Assembly [Mzr 2.0, Mzr 2.5]
1. Disassemble in the order indicated in the table.
2. Assemble in the reverse order of disassembly.
1
Magnetic switch
2
Adjustment washer
3
Rear housing
4
Brush and brush holder
...
Wheel Hub Component Removal/Installation
CAUTION:
Performing the following procedures without first removing the ABS wheel-speed
sensor may possibly cause an open circuit in the wiring harness if it is pulled
by mistake. Before performing the following procedures, disconnect the ABS wheel-speed
sensor connector (axle side) ...
