Subaru Solterra 2023-2026 Owner's Manual: Head restraints
In the Subaru Solterra, head restraints are installed on every seat and are engineered to provide crucial support for the head and neck, helping to reduce the risk of injury during sudden braking or collisions.
WARNING
■ Head restraint precautions
Always follow these safety recommendations when using head restraints in the Subaru Solterra.
Ignoring these guidelines may result in serious injury or fatal consequences.
- Use only the head restraints specifically designed for each seat in the Subaru Solterra.
- Ensure the head restraints are always adjusted to the correct height and position.
- After adjustment, press down firmly to confirm that the head restraint is securely locked.
- Never operate the Subaru Solterra without properly installed head restraints.
Vertical adjustment
■ Front seats
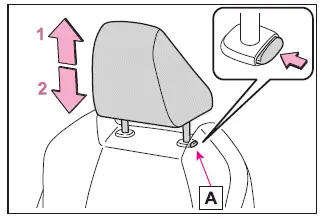
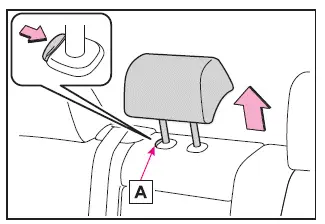
- Up
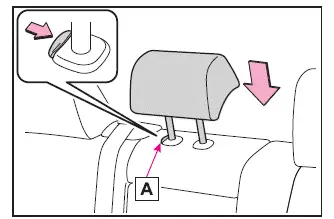
Raise the head restraint by pulling it upward. - Down
Lower the head restraint by pressing the lock release button A while pushing downward.
■ Rear center seat
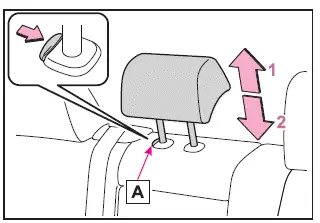
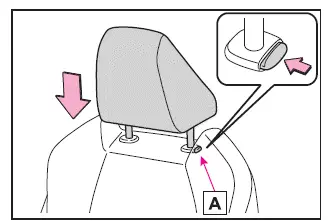
- Up
Pull the head restraint upward. - Down
Press the release button A and push the head restraint downward.
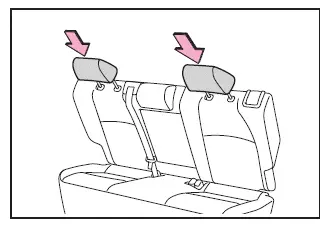
■ Rear outer seats
The head restraints on the Subaru Solterra rear outer seats are fixed and cannot be adjusted.
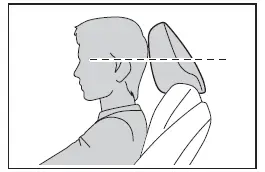
■ Adjusting the height of the head restraints (front seats)
For maximum protection in the Subaru Solterra, adjust the head restraint so that its center aligns with the top of your ears.
■ Adjusting the rear center seat head restraint
When using the rear center seat in the Subaru Solterra, always raise the head restraint at least one step above its fully stowed position.
Removing the head restraints
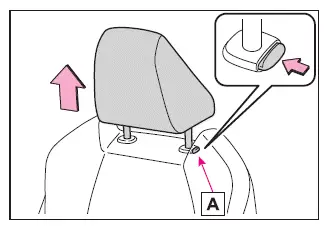
■ Front seats
To remove a front head restraint in the Subaru Solterra, pull it upward while pressing the release button A.
If removal is restricted by contact with the roof, adjust the seat height or backrest angle to create additional clearance.
■ Rear center seat
Pull the head restraint upward while pressing the release button A to remove it.
■ Rear outer seats
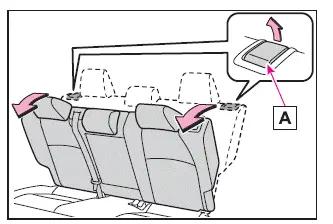
1. Pull the seatback release lever A and fold the seatback down until the head restraint can be removed safely.
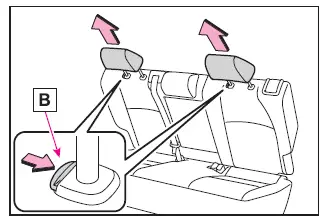
2. Press the release button B and pull the head restraint upward.
Installing the head restraints
■ Front seats
Align the head restraint posts with the mounting holes and push downward until it locks into position in the Subaru Solterra.
Hold the release button A while lowering the head restraint to adjust its height precisely.
■ Rear center seat
Insert the head restraint into the mounting points and press down until it clicks securely into place.
■ Rear outer seats
1. Fold the Subaru Solterra rear seatback down using lever A to access the mounting area.
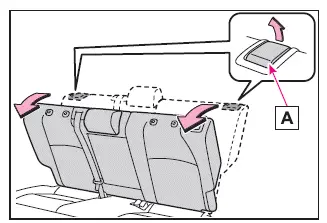
2. Insert the head restraint and push it down firmly until it locks into position.
 Rear seats
In the Subaru Solterra, rear seatbacks can be reclined or folded
using simple lever operations, providing flexibility for passenger comfort and cargo
space expansion.
Adjustment procedure
Pull t ...

Other materials:
i-ELOOP
On conventional vehicles, the kinetic energy that is generated when the
vehicle is
decelerated by applying the brakes or during engine braking ends up being
discarded as
heat. By utilizing this discarded kinetic energy to generate electricity and use
it to power the
vehicle's electrical dev ...
Key Reminder Switch Removal/Installation
1. Disconnect the negative battery cable. (See BATTERY REMOVAL/INSTALLATION [MZR
2.0, MZR 2.5].)(See BATTERY REMOVAL/INSTALLATION [MZR 2.3 DISI Turbo].)(See BATTERY
REMOVAL/INSTALLATION [SKYACTIV-G 2.0].)
2. Remove the column cover. (See COLUMN COVER REMOVAL/INSTALLATION.)
3. Disconnect the ...
Refrigerant Pressure Sensor Removal/Installation [Full Auto Air Conditioner]
1. Disconnect the negative battery cable..
2. Discharge the refrigerant..
3. Disconnect the refrigerant pressure sensor connector.
CAUTION:
If moisture or foreign material enters the refrigeration cycle, cooling ability
will be lowered and abnormal noise will occur. Always immediate ...
