
Subaru Solterra 2023-2026 Owner's Manual: Rear seats
In the Subaru Solterra, rear seatbacks can be reclined or folded using simple lever operations, providing flexibility for passenger comfort and cargo space expansion.
Adjustment procedure
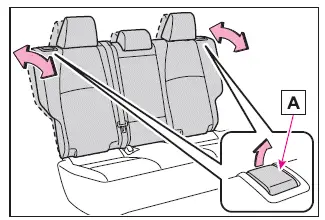
Pull the seatback angle adjustment lever A to adjust the angle of the Subaru Solterra rear seatback.
WARNING
■ When operating the seatback
Follow these precautions when handling the Subaru Solterra rear seats.
Failure to comply may result in serious injury or death.
- Ensure that no passengers are struck by the moving seatback.
- Keep hands and body parts away from hinges and moving components to prevent injury.
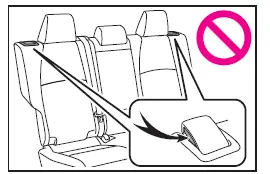
- After adjusting, verify that the Subaru Solterra seatback is securely
locked.
If the red indicator is visible, the seat is not properly secured. Ensure the red marking is no longer visible.
Folding down the rear seatbacks
■ Before folding down the seatbacks
1. Park the Subaru Solterra in a safe and stable location.
Apply the parking brake and shift the gear selector to position P.
2. Adjust the front seat position and backrest angle to ensure there is no interference when folding the rear seat.
3. Lower the head restraint of the rear center seat.
4. Return the rear seat armrest to its original stored position if extended.
This step is not required when folding only one side of the Subaru Solterra rear seat.
■ Folding down the rear seatbacks
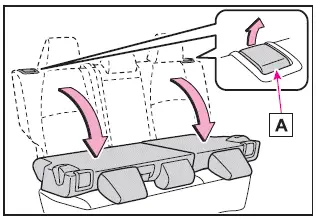
Pull the adjustment lever A and fold the Subaru Solterra seatback forward.
■ Returning the rear seatbacks
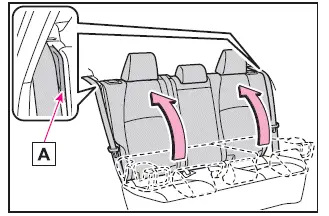
To avoid trapping the seat belt, guide it outside the seat belt guide A before returning the Subaru Solterra seatback to its upright position.
Ensure the seatback is firmly locked after returning it to position.
WARNING
■ When folding the rear seatbacks down
Observe the following safety precautions when operating the Subaru Solterra seats.
Failure to do so may result in serious injury or fatal consequences.
- Never fold the Subaru Solterra seatbacks while the vehicle is in motion.
- Ensure the vehicle is stationary on a level surface with the parking brake applied and gear selector in P.
- Do not allow passengers to sit on folded seatbacks or inside the luggage compartment.
- Do not allow children to access or play in the cargo area.
- Do not operate the rear seat if it is occupied.
- Keep hands and feet clear of moving joints and hinges during operation.
- Prevent children from operating the Subaru Solterra seat mechanisms.
■ After returning the rear seatback to the upright position
Always perform the following checks after restoring the Subaru Solterra rear seats.
Failure to do so may result in serious injury in the event of sudden braking or collision.
- Confirm that the seatback is securely locked by gently pushing it forward
and backward.
If the red indicator remains visible, the seat is not properly locked. Ensure it is fully secured before use.
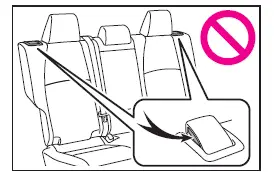
- Verify that all seat belts are properly positioned and not twisted or trapped within the Subaru Solterra seat structure.
 Front seats
In the Subaru Solterra, the front seats are designed for precise
adjustment in multiple directions (forward/backward, height, and angle), allowing
the driver and passenger to achieve an optimal an ...
 Head restraints
In the Subaru Solterra, head restraints are installed on every seat
and are engineered to provide crucial support for the head and neck, helping to
reduce the risk of injury during sudden braking ...
Other materials:
Front Beltline Molding Removal/Installation
1. Fully open the front door glass.
2. Disconnect the negative battery cable..
3. Remove the inner garnish..
4. Remove the front door trim..
5. Remove the power outer mirror..
6. Remove clip A using a fastener remover and pull the front beltline molding
in the direction of the arrow (1) ...
Joint Shaft Assembly [Mzr 2.0, Mzr 2.5 (MTX)]
1. Assemble in the order indicated in the table.
1
Bracket
2
Dust seal (RH)
.
3
Bearing
.
4
Dust seal (LH)
.
5
Joint shaft
.
Dust Seal ...
When Liftgate/Trunk Lid Cannot be Opened
If the vehicle battery is dead or there is a
malfunction in the electrical system and
the liftgate/trunk lid cannot be opened,
perform the following procedure as an
emergency measure to open it:
(5–door)
Remove the cap on the interior
surface of the liftgate with a flathead
screwdrive ...
