Subaru Solterra 2023-2026 Owner's Manual: Front seats
In the Subaru Solterra, the front seats are designed for precise adjustment in multiple directions (forward/backward, height, and angle), allowing the driver and passenger to achieve an optimal and ergonomically correct driving position for comfort and safety.
Adjustment procedure
Manual seat (driver and passenger seat)
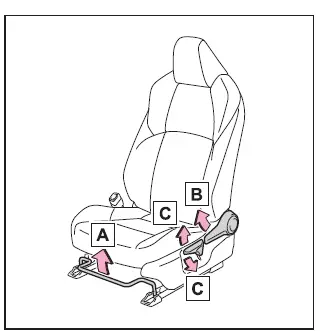
- Seat position adjustment lever (forward/backward movement)
- Seatback angle adjustment lever
- Vertical height adjustment lever
Power seat (if equipped)
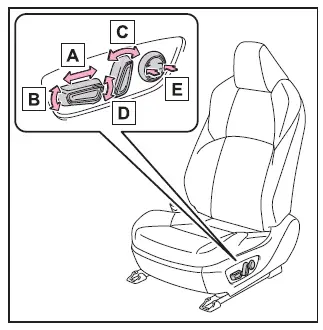
- Seat position adjustment switch
- Seat cushion front angle adjustment switch
- Seatback angle adjustment switch
- Vertical height adjustment switch
- Lumbar support adjustment switch (driver seat only)
These controls in the Subaru Solterra allow fine-tuning of seating posture, helping reduce fatigue and improve driving precision over long distances.
■ When adjusting the seat
- Ensure that no passengers or objects are in contact with the seat before adjusting the Subaru Solterra seat position.
- When raising or tilting the seat, take care that the head restraint does not contact the ceiling or sun visor.
■ Power easy access system (if equipped)
In the Subaru Solterra, the driver’s seat may automatically move depending on the power switch mode and seat belt usage, providing easier entry and exit from the vehicle.
WARNING
■ When adjusting the seat position
- When adjusting seats in the Subaru Solterra, ensure that movement does not cause injury to passengers.
- Keep hands and feet away from moving mechanisms under the seat.
There is a risk of fingers or limbs becoming trapped in the seat components.
- Maintain sufficient clearance for your feet to prevent them from being caught during seat adjustment.
- For manual seats: After adjustment, always confirm that the Subaru Solterra seat is securely locked in place.
■ Seat adjustment
To minimize the risk of sliding under the seat belt in the event of a collision, avoid reclining the Subaru Solterra seat excessively.
If the seat is reclined too far, the lap belt may shift from the pelvis to the abdomen, and the shoulder belt may contact the neck, significantly increasing the risk of serious injury or fatal consequences during an accident.
Never adjust the Subaru Solterra seat while driving, as sudden movement may lead to loss of vehicle control.

 Rear seats
In the Subaru Solterra, rear seatbacks can be reclined or folded
using simple lever operations, providing flexibility for passenger comfort and cargo
space expansion.
Adjustment procedure
Pull t ...
Other materials:
On/Off Solenoid Removal/Installation [Fw6 A EL]
WARNING:
A hot transaxle and ATF can cause severe burns. Turn off the engine and wait
until they are cool.
Always wear protective eye wear when using the air compressor. If the air
compressor is used, any particles of dirt or soiling could spatter and get into
the eyes.
...
Using My Room Mode
In the Subaru Solterra, when the charging cable is connected, selected
electrical systems such as the climate control and audio setup can operate using
energy supplied directly from an external power source, allowing you to comfortably
use the vehicle interior without relying entirely on the t ...
Precaution [Dynamic Stability Control (DSC)]
1. The ABS warning light and/or brake system warning light and/or DSC indicator
light and/or DSC OFF light illuminate even when the system is normal.
Warning lights that may illuminate and/or flash
Cases in which the light may illuminate
Conditions in ...
