Mazda 3 Service Manual: On/Off Solenoid Removal/Installation [Fw6 A EL]
WARNING:
-
A hot transaxle and ATF can cause severe burns. Turn off the engine and wait until they are cool.
-
Always wear protective eye wear when using the air compressor. If the air compressor is used, any particles of dirt or soiling could spatter and get into the eyes.
1. Remove the battery cover..
2. Disconnect the negative battery cable..
3. Remove the aerodynamic under cover No.2..
4. Clean the transaxle exterior throughout with a steam cleaner or cleaning solvents.
5. Drain the ATF..
6. Remove the oil pan.
CAUTION:
-
To avoid damaging the control valve body, if there is a large amount of foreign material at the bottom of the oil pan when the oil pan is removed, replace the oil strainer with a new one.
-
If there is not a large amount of foreign material at the bottom of the oil pan, the oil strainer does not have to be replaced.
NOTE:
-
Always use new oil pan installation bolts when re-installing the oil pan because the oil pan installation bolts cannot be reused.
7. Disconnect the on/off solenoid connector.
NOTE:
-
Disconnect the on/off solenoid connector by pressing the connector tab with your fingers.
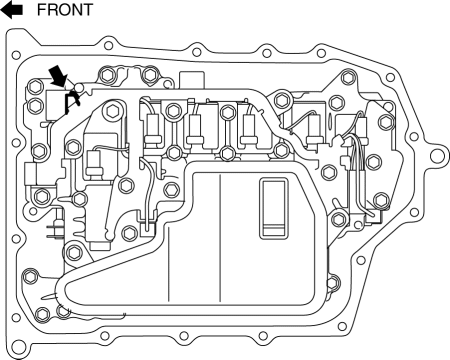
8. Remove the on/off solenoid.
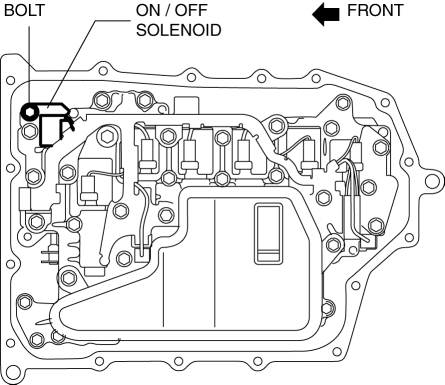
9. Install the on/off solenoid.
-
Tightening torque
-
9—10 N·m {92—101 kgf·cm, 80—88 in·lbf}
10. Connect the on/off solenoid connector.
11. Apply a light coat of silicon sealant (TB1217E) to the contact surfaces of the oil pan and transaxle case.
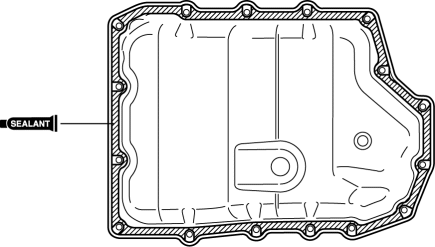
CAUTION:
-
If any sealant remains on the sealing surfaces of the transaxle case and oil pan, transaxle damage may occur. Use a cleaning fluid to remove any old sealant from the transaxle case and oil pan.
12. Install the oil pan with new bolts before the applied sealant starts to harden.
-
Tightening torque
-
8—10 N·m {82—101 kgf·cm, 71—88 in·lbf}
13. Install the aerodynamic under cover No.2..
14. Add the ATF..
15. Connect the negative battery cable..
16. Install the battery cover..
17. Perform the “Mechanical System Test”..
 Oil Seal (Control Valve Body) Replacement [Fw6 A EL]
1. Remove the battery cover..
2. Disconnect the negative battery cable..
3. Remove the air cleaner component..
4. Disconnect the control valve body connector.
5. Remove the hose clamp.
...
 Pilot Bearing Inspection [A26 M R]
CAUTION:
Secure the steering wheel using tape or a cable to prevent the steering shaft
from rotating after disconnecting the steering shaft. If the steering wheel
rotates after the steer ...
Other materials:
Steering wheel
Adjustment procedure
1. Firmly hold the Subaru Solterra steering wheel and push the adjustment lever
downward to release the lock.
2. Move the steering wheel vertically and horizontally to achieve the most comfortable
driving position.
Once the desired position is reached, pull the leve ...
Climate Control Unit Removal/Installation [Manual Air Conditioner]
1. Disconnect the negative battery cable..
2. Remove the following parts:
a. Upper panel.
b. Shift lever knob (MTX).
c. Selector lever knob (ATX).
d. Shift panel.
e. Side wall.
f. Console.
g. Front scuff plate.
h. Front side trim.
i. Dashboard under cover.
j. Glove compartment. ...
Headlight Bulb Removal/Installation
Halogen Type
Low-beam
1. Disconnect the negative battery cable..
2. Disconnect the connector.
3. Remove the cover.
4. Remove the adaptor.
5. Remove the headlight bulb (LO).
CAUTION:
A halogen bulb generates extremely high heat when it is illuminated. If the
surface of ...
