Subaru Solterra 2023-2026 Owner's Manual: If you have a flat tire
The Subaru Solterra is designed without a conventional spare wheel and instead comes equipped with an advanced emergency tire puncture repair kit, providing a modern and space-efficient solution for unexpected tire damage.
In the Subaru Solterra, minor punctures caused by objects such as nails or screws embedded in the tread area can be temporarily sealed using the emergency repair kit, allowing you to continue driving cautiously to a safe service location.
The kit includes a sealant bottle specifically engineered for the Subaru Solterra. This sealant is intended for single-use application and can temporarily restore one tire without removing the foreign object. However, depending on the severity, location, or structural damage of the tire, the repair may not always be possible using this system.
After applying the temporary fix with the Subaru Solterra repair kit, it is essential to visit an authorized SUBARU dealer as soon as possible for a permanent repair or full tire replacement.
WARNING
■ If you have a flat tire
Never continue driving with a completely deflated tire.
Even short-distance driving with insufficient tire pressure may cause irreversible damage to both the tire and the wheel assembly, significantly increasing the risk of loss of control or an accident.
Before repairing the vehicle
- Safely stop the Subaru Solterra on a firm, level surface away from traffic.
- Engage the parking brake to secure the vehicle.
- Shift the gear selector to the P position.
- Turn off the EV system completely.
- Activate the hazard warning lights.
- Carefully inspect and assess the extent of tire damage.
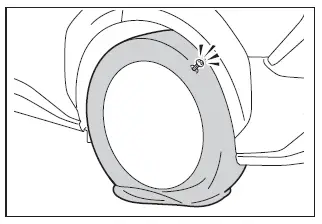
The emergency repair kit for the Subaru Solterra should only be used when the puncture is limited to the tread area and caused by a nail or screw.
- Do not remove the penetrating object, as doing so may enlarge the puncture and prevent effective sealing.
- To minimize sealant leakage, reposition the Subaru Solterra so that the puncture point is located at the top of the tire whenever possible.
■ A flat tire that cannot be repaired with the emergency tire puncture repair kit
In certain conditions, the Subaru Solterra repair kit will not be sufficient. In these situations, immediate professional assistance from a SUBARU dealer is required.
- If the tire has been driven while underinflated or completely flat
- If there are cracks, cuts, or structural damage outside the tread area, especially on the sidewall
- If the tire bead has separated from the wheel rim
- If the tread damage exceeds 0.16 in. (4 mm) in length
- If the wheel itself is bent, cracked, or otherwise damaged
- If two or more tires are punctured simultaneously
- If multiple sharp objects have penetrated a single tire
Location of the emergency tire puncture repair kit and tools
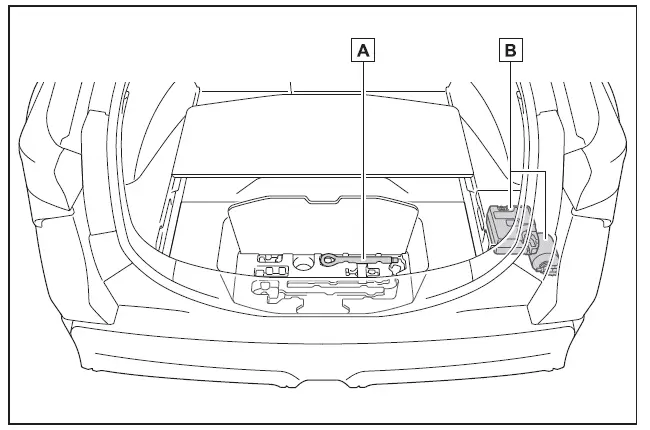
- Towing eyelet
- Emergency tire puncture repair kit
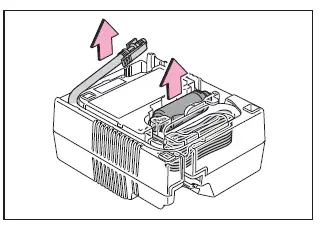
Emergency tire puncture repair kit components
■ Bottle
- Sticker
■ Compressor
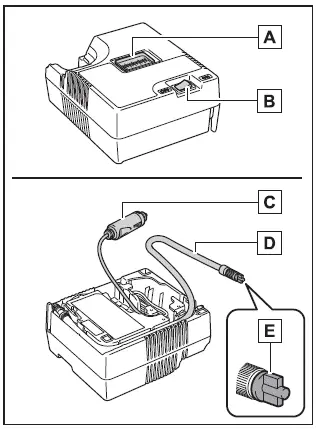
- Air pressure gauge
- Compressor switch
- Power plug
- Hose
- Air release cap
■ Emergency tire puncture repair kit
- The Subaru Solterra sealant is intended strictly for one-time use per tire. If used, replacement components must be obtained through an authorized SUBARU dealer.
- The compressor unit can be reused multiple times for inflation tasks.
- The sealant operates effectively within a wide temperature range from -40ºF (-40ºC) to 140ºF (60ºC).
- This kit is specifically calibrated for the original tire specifications of the Subaru Solterra and must not be used for incompatible tire sizes or unrelated applications.
- Contact with sealant may cause permanent stains on clothing.
- If sealant spills onto wheels or painted surfaces, it should be wiped off immediately using a damp cloth to prevent lasting marks.
- During use, the Subaru Solterra compressor may generate noticeable noise,
which is normal and not an indication of malfunction.
This operational sound is part of the standard pressurization process.
- The kit is not intended for routine tire pressure checks or adjustments.
WARNING
■ If you have a flat tire
Operating the Subaru Solterra with a damaged or flat tire, even briefly, can lead to critical tire failure and permanent wheel damage, increasing the likelihood of a dangerous driving situation.
Operating the Subaru Solterra with a completely deflated tire may lead to the formation of a circular groove along the sidewall structure. In such conditions, attempting to use the repair kit could result in sudden tire rupture or explosion.
■ Caution while driving
- Always store the Subaru Solterra emergency repair kit securely in the luggage compartment. Improper storage may increase the risk of injury during sudden braking or in the event of a collision.
- This repair kit is specifically engineered for the Subaru Solterra. Using it on other vehicles may compromise safety and could result in severe accidents, including serious injury or fatal consequences.
- Never use the repair kit on tires of non-original size or specification. If the tire is not properly restored, it may fail unexpectedly, leading to dangerous driving situations.
■ Precautions for use of the sealant
- The sealant used in the Subaru Solterra repair kit is hazardous if swallowed. In case of ingestion, drink plenty of water immediately and seek urgent medical assistance.
- If the sealant comes into contact with your eyes or skin, rinse thoroughly with clean water without delay. If irritation or discomfort continues, consult a healthcare professional.
Taking out the emergency tire puncture repair kit
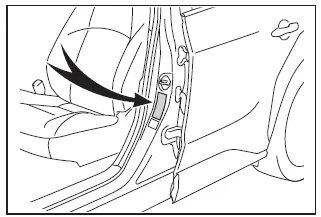
1. Open the rear deck board of the Subaru Solterra.
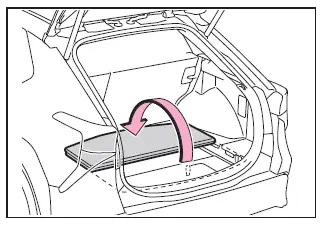
2. Carefully remove the protective cover to expose the compartment.
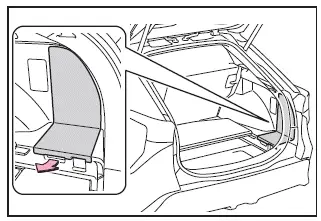
3. Take out the Subaru Solterra emergency tire puncture repair kit.
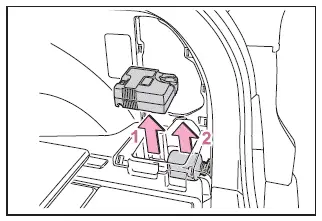
- Compressor
- Bottle
Emergency repair procedure
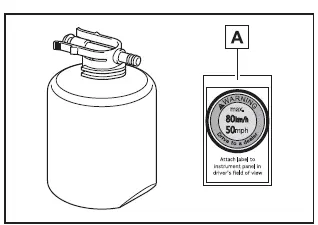
1. Remove the Subaru Solterra repair kit from its plastic packaging.
Affix the included warning sticker in clearly visible locations inside the vehicle.
(See step 10.)
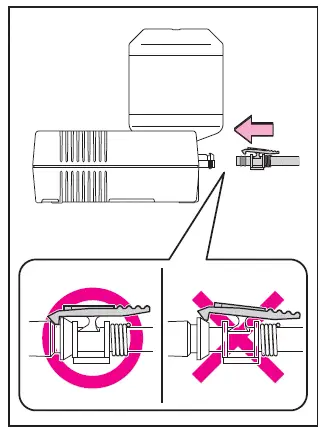
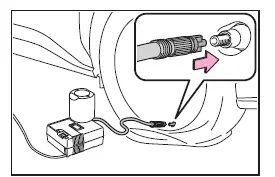
2. Detach the hose and pull out the power plug from the compressor unit.
3. Securely attach the sealant bottle to the compressor.
Insert the bottle straight into the designated slot and ensure the locking claws are properly engaged.
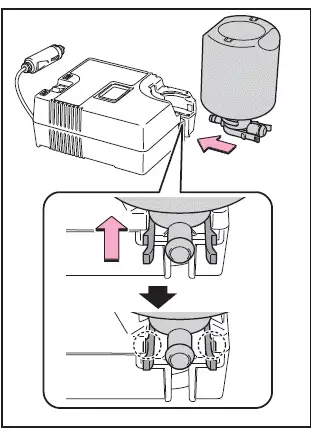
4. Connect the hose firmly to the bottle.
Verify that the connection is tight and properly seated.
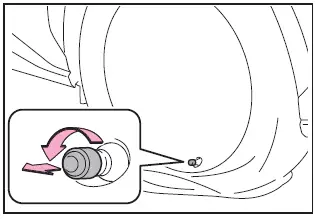
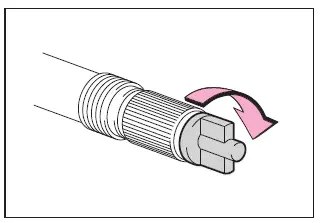
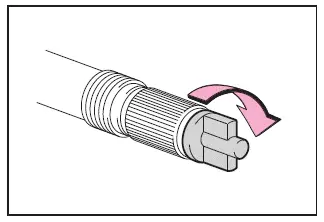
5. Remove the valve cap from the affected tire.
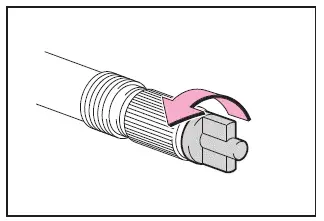
6. Extend the hose and remove the air release cap.
Keep the cap safely as it will be required later.
7. Connect the hose to the tire valve.
Rotate clockwise until securely fastened.

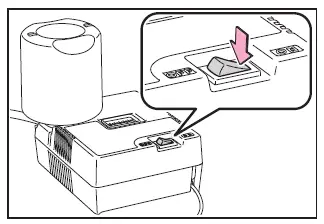
8. Confirm that the compressor switch is in the OFF position.
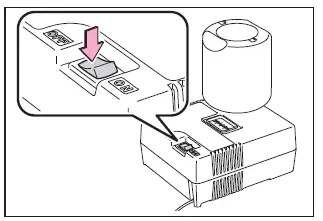
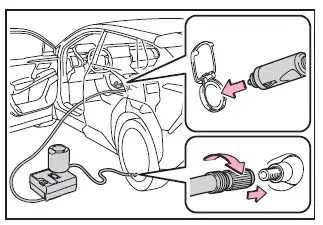
9. Plug the compressor into the Subaru Solterra power outlet.
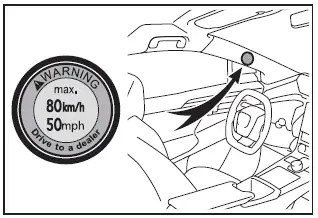
10. Place the warning sticker where it is clearly visible from the driver’s seat.
11. Verify the correct tire pressure using the vehicle specification label.
12. Start the EV system of the Subaru Solterra.
13. Activate the compressor to inject sealant and begin tire inflation.
14. Inflate until the recommended pressure level is achieved.
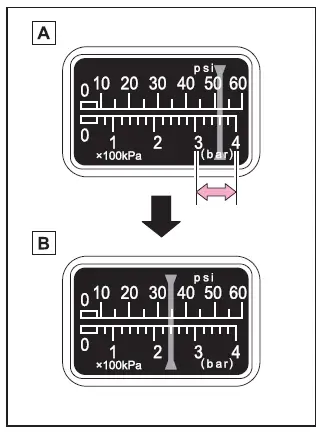
- During operation, sealant is injected first, causing pressure to temporarily rise between 44 psi (300 kPa) and 58 psi (400 kPa), then gradually stabilize.
- The pressure gauge will reflect the true tire pressure approximately 1–5 minutes after activation.
- Switch off the compressor and recheck the pressure. Repeat the process carefully until the specified tire pressure for the Subaru Solterra is reached.
- The inflation process may take 5–20 minutes depending on ambient temperature. If proper pressure is not achieved after 25 minutes, the tire damage is likely too severe. Stop immediately and contact your SUBARU dealer.
- If pressure exceeds recommended levels, release air slowly to adjust accurately.
15. Ensure the compressor switch on the Subaru Solterra is turned off, then carefully unplug the power connector from the outlet and disconnect the hose from the tire valve.
Be aware that a small amount of sealant may escape when detaching the hose, which is normal during this process.
16. Reinstall the valve cap securely onto the valve of the temporarily repaired tire.
17. Attach the air release cap back onto the end of the hose.
Failing to reinstall the cap properly may cause sealant leakage and lead to contamination of the Subaru Solterra interior or cargo area.
18. Place the bottle back into the luggage compartment while it remains connected to the compressor unit of the Subaru Solterra.
19. To ensure even distribution of the sealant inside the tire, immediately drive the Subaru Solterra for approximately 3 miles (5 km), maintaining a speed below 50 mph (80 km/h).
20. After driving, stop the vehicle safely on a firm and level surface, then reconnect the repair kit for further inspection.
Before reconnecting, remove the air release cap from the hose.
21. Turn the compressor switch on briefly for a few seconds, then switch it off and check the tire pressure.
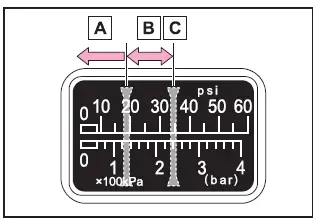
- If the tire pressure is below 19 psi (130 kPa): the tire cannot be repaired using the Subaru Solterra kit. Contact a SUBARU dealer immediately.
- If the pressure is above 19 psi but still below the recommended level: proceed to step 22.
- If the pressure matches the specified level: continue to step 23.
22. Activate the compressor again to inflate the tire to the correct pressure. Drive the Subaru Solterra for another 3 miles (5 km), then repeat step 20 to confirm stability.
23. Reattach the air release cap securely to the hose.
Improper attachment may result in sealant leakage and unwanted contamination.
24. Store the bottle again in the luggage compartment while keeping it connected to the compressor.
25. Carefully drive the Subaru Solterra to the nearest SUBARU dealer within a distance of 62 miles (100 km). Maintain a speed below 50 mph (80 km/h) and avoid sudden acceleration, harsh braking, or sharp turns.
For proper repair, tire replacement, or disposal of the used repair kit components, always consult an authorized SUBARU dealer.
When visiting the service center, inform the technician that sealant has been injected into the tire of your Subaru Solterra.
■ If the tire is inflated to more than the specified air pressure
1. Disconnect the hose from the tire valve.
2. Attach the air release cap to the hose and press its tip against the valve to gradually release excess air.
3. Remove the hose again, detach the cap, and reconnect the hose to verify pressure accuracy.
4. Turn on the compressor briefly, then turn it off and check if the correct pressure has been reached.
If pressure remains too low, repeat the inflation process until the recommended level for the Subaru Solterra is achieved.
■ After a tire is repaired with the emergency tire puncture repair kit (vehicle with the tire pressure warning system)
- The tire pressure monitoring valve and transmitter in the Subaru Solterra must be replaced after sealant use.
- Even when the tire is properly inflated, the tire pressure warning indicator may illuminate or flash temporarily.
WARNING
■ When fixing the flat tire
- Always stop the Subaru Solterra in a safe, stable, and level location before beginning any repair.
- Avoid touching wheels or brake components immediately after driving, as they may be extremely hot and can cause serious burns.
- Ensure the hose and valve connection is tight and secure while the tire remains mounted on the Subaru Solterra.
If the hose is not firmly secured to the tire valve on the Subaru Solterra, air leakage may occur and sealant could be forcefully expelled under pressure.
- If the hose disconnects from the valve during inflation, it may whip suddenly due to internal pressure, posing a risk of injury.
- After the tire has been inflated, small amounts of sealant may spray out when disconnecting the hose or releasing air pressure.
- Always follow the correct repair procedure for the Subaru Solterra. Improper handling may cause uncontrolled sealant discharge.
- Maintain a safe distance from the tire while the repair is in progress,
as there is a possibility of sudden tire failure during the procedure.
If any cracks, bulges, or visible deformation are detected on the tire, immediately switch off the compressor and discontinue the repair process.
- Extended use of the Subaru Solterra repair kit may cause overheating. Do not operate the compressor continuously for more than 40 minutes.
- Components of the repair kit may become extremely hot during operation. Handle all parts with care, especially the metal connection between the sealant bottle and compressor, which can reach high temperatures.
- Only place the vehicle speed warning sticker in the designated area. Incorrect placement, such as on an SRS airbag cover (e.g., steering wheel), may interfere with proper airbag deployment.
■ Driving to spread the liquid sealant evenly
Adhere strictly to the following precautions to minimize risk during operation.
Ignoring these guidelines may result in loss of control of the Subaru Solterra and could lead to serious injury or fatal accidents.
- Operate the Subaru Solterra at low speed and with heightened attention, especially when turning or cornering.
- If the vehicle pulls to one side or fails to maintain a straight path,
stop immediately and inspect the following:
- Condition of the tire. The tire may have partially detached from the wheel rim.
- Tire pressure level. If the pressure is 19 psi (130 kPa) or below, the tire may be critically damaged.
NOTICE
■ When performing an emergency repair
- Carry out the repair without removing the object (such as a nail or screw) embedded in the tread. Removing it may enlarge the puncture and make the Subaru Solterra repair kit ineffective.
- The repair kit is not waterproof.
Ensure that the Subaru Solterra repair kit is protected from water exposure, especially during use in rain or wet environments.
- Avoid placing the repair kit directly on dusty or sandy surfaces. Contamination may be drawn into the system and lead to malfunction.
- Keep the sealant bottle in an upright position at all times during operation.
If the bottle is tilted or laid horizontally, the Subaru Solterra repair system may not function correctly.
■ Precautions for the emergency tire puncture repair kit
- The repair kit must be powered by a 12 V DC vehicle-compatible source. Do not connect it to alternative power supplies.
- Store the Subaru Solterra repair kit in a clean and dry compartment to prevent contamination and damage.
- Keep the repair kit out of reach of children to avoid accidental misuse.
- Do not attempt to disassemble or modify the Subaru Solterra repair kit. Avoid impacts to sensitive components such as the pressure gauge, as this may result in malfunction.
■ To avoid damage to the tire pressure warning valves and transmitters (vehicle with the tire pressure warning system)
When sealant is used in the Subaru Solterra tire repair process, the tire pressure monitoring valve and transmitter may no longer function correctly. It is recommended to consult a SUBARU dealer or qualified technician immediately after use.
Following sealant application, the tire pressure monitoring components should be replaced during tire servicing to ensure continued system accuracy and safety in the Subaru Solterra.
 If a warning message is displayed
The multi-information display of the Subaru Solterra provides important
alerts related to system malfunctions, incorrect operations, and maintenance requirements.
These messages are designed to he ...
 If the EV system will not start
If your Subaru Solterra does not power on as expected, the underlying
cause can vary depending on environmental conditions, system status, or component
functionality. Carefully review the followin ...
Other materials:
Up Switch Inspection [FS5 A EL]
1. Perform the following procedures.
a. Remove the battery cover..
b. Disconnect the negative battery cable.
c. Remove the console..
d. Disconnect the selector lever component connector.
2. Inspect the continuity between the selector lever component terminals B and
H.
If ...
Front Seat Slide Adjuster Removal/Installation
WARNING:
Handling the front seats improperly can accidentally deploy the side air
bag, which may seriously injure you. Read air bag system service warnings and
cautions before handling the front seats..
CAUTION:
After removing a front seat, do not operate the slider leve ...
No.7 Bsm Indicator Light Does Not Flash While Under Bsm Indicator Light Flashing
Conditions (With Combination Switch Operation (Turn Signal Switch)) [Blind Spot
Monitoring (Bsm)]
7
BSM indicator light does not flash while under BSM indicator light-flashing
conditions (with combination switch operation (turn signal switch))
Description
The BSM indicator light does not flash or illuminate continuously,
...
