
Subaru Solterra 2023-2026 Owner's Manual: If your vehicle overheats
If the message "EV System overheated Output power reduced" appears on the multi-information display of your Subaru Solterra, it indicates that the system temperature has risen beyond optimal limits and immediate action is required to prevent potential damage.
NOTICE
■ Cooling system coolant
The Subaru Solterra utilizes a specialized radiator coolant designed specifically for its cooling system. Using water or non-approved fluids may lead to system damage. If "Genuine Traction Battery Coolant" is unavailable, promptly contact your SUBARU dealer for proper assistance.
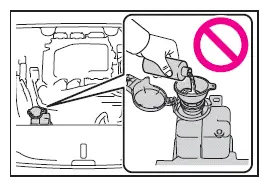
Correction procedures
1. Safely pull over the Subaru Solterra and switch off the air conditioning system to reduce load on the cooling system.
2. Keep the EV system running and carefully open the hood, ensuring caution due to possible heat buildup.
3. Inspect whether the cooling fan is operating.
If the fan is active: Allow the Subaru Solterra to idle until the overheating warning disappears, then turn off the EV system. If the message persists, contact your SUBARU dealer.
If the fan is not operating: Immediately shut down the EV system and seek professional assistance from your SUBARU dealer.
4. After sufficient cooling, inspect the radiator and hoses for leaks or visible damage.
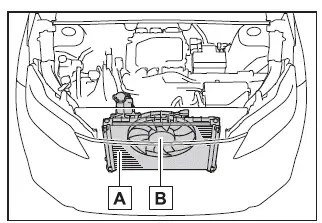
- Radiator
- Cooling fan
If significant coolant leakage is detected, discontinue use and contact your SUBARU dealer immediately.
5. Check that the coolant level in the Subaru Solterra reservoir is between the "MAX" and "MIN" markings.
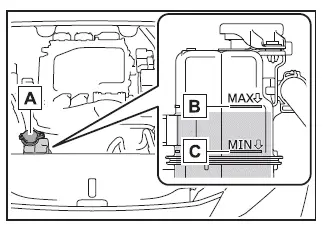
- Reservoir
- "MAX" line
- "MIN" line
6. If the coolant level is low, refill using only "Genuine Traction Battery Coolant" suitable for the Subaru Solterra.
If the correct coolant is not available, do not substitute with other fluids—contact your SUBARU dealer instead.
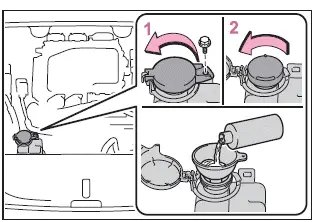
- Remove the bolt.
- Open the reservoir cap
After completing these steps, have your Subaru Solterra inspected by a SUBARU dealer to ensure the cooling system is functioning correctly.
WARNING
■ To prevent an accident or injury when inspecting under the hood of your vehicle
Always follow these safety precautions when working on your Subaru Solterra.
Failure to comply may result in severe injury, including burns.
- If steam is visible under the hood, do not open it until it has fully
dissipated.
The components within the motor compartment of the Subaru Solterra may be extremely hot.
- Keep hands, clothing, and accessories away from moving parts such as the cooling fan to avoid entanglement or injury.
- Never open the coolant reservoir cap while the system is hot, as pressurized steam or fluid may be released.
NOTICE
■ When adding coolant
Allow the Subaru Solterra to cool completely before adding coolant, and pour slowly to prevent thermal shock.
Rapid addition of coolant to a hot system may damage internal EV system components.
■ To prevent damage to the cooling system
Observe the following guidelines:
- Prevent contamination of coolant with dirt, dust, or debris.
- Do not use water or alternative coolants when refilling.
Avoid any additives, as they may negatively affect the Subaru Solterra cooling system.
 If the 12-volt battery is discharged
If the 12-volt battery in your Subaru Solterra becomes discharged,
specific procedures can be followed to restore power and restart the EV system safely.
These steps are designed to help you regai ...
 If the vehicle becomes stuck
If your Subaru Solterra becomes immobilized in mud, snow, or loose
terrain, follow the steps below to safely regain traction and mobility.
Recovering procedure
1. Turn off the EV system, apply the ...
Other materials:
Antenna Feeder No.3 Removal/Installation
4SD (With Audio Unit (With Display))
1. Disconnect the negative battery cable..
2. Remove the rain sensor cover. (Vehicles with auto light/wiper system).
3. Disconnect the rain sensor connector. (Vehicles with auto light/wiper system)
4. Partially peel back the seaming welts.
5. Remove the ...
Active Adaptive Shift (AAS)
Active Adaptive Shift (AAS)
automatically controls the transaxle shift
points to best suit the road conditions
and driver input. This improves driving
feel. The transaxle may switch to AAS
mode when driving up and down slopes,
cornering, driving at high elevations,
or depressing the accelerat ...
Front Door Checker Removal/Installation
1. Fully close the front door glass.
2. Disconnect the negative battery cable..
3. Remove the inner garnish..
4. Remove the front door trim..
5. Remove the front door speaker..
6. Remove the bolt A.
7. Remove the bolts B.
8. Pull out the front door checker from the front speake ...
