Mazda 3 Owners Manual: Ignition Switch
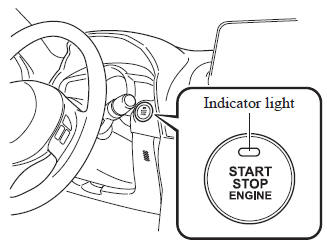
Push Button Start Positions
The system operates only when the key is within operational range.
Each time the push button start is pressed, the ignition switches in the order of off, ACC, and ON. Pressing the push button start again from ON switches the ignition off.
NOTE
- The engine starts by pressing the push button start while depressing the clutch pedal (manual transaxle) or the brake pedal (automatic transaxle). To switch the ignition position, press the push button start without depressing the pedal.
- Do not leave the ignition switched ON while the engine is not running. Doing so could result in the battery going dead. If the ignition is left in ACC (For automatic transaxle, the selector lever is in the P position, and the ignition is in ACC), the ignition switches off automatically after about 25 minutes.
Off
The power supply to electrical devices turns off and the push button start indicator light (amber) also turns off.
In this position the steering wheel is locked.
| WARNING
Before leaving the driver's seat, always
switch the ignition off , set the parking
brake, and make sure the selector lever
is in P (automatic transaxle) or in 1st
gear or R (manual transaxle):
Leaving the driver's seat without
switching the ignition off , setting the
parking brake, and shifting the selector
lever to P (automatic transaxle) or
to 1st gear or R (manual transaxle)
is dangerous. Unexpected vehicle
movement could occur which could
result in an accident. In addition, if your intention is to leave the vehicle for even a short period, it is important to switch the ignition off , as leaving it in another position will disable some of the vehicle's security systems and run the battery down. |
ACC (Accessory)
Some electrical accessories will operate and the indicator light (amber) illuminates.
NOTE The keyless entry system does not function while the push button start has been pressed to ACC, and the doors will not lock/unlock even if they have been locked manually.
ON
This is the normal running position after the engine is started. The indicator light (amber) turns off. (The indicator light (amber) illuminates when the ignition is switched ON and the engine is not running.) Some indicator lights/warning lights should be inspected before the engine is started .
NOTE When the push button start is pressed to ON, the sound of the fuel pump motor operating near the fuel tank can be heard.
This does not indicate an abnormality.

 Starting the Engine
WARNING
Radio waves from the key may aff ect
medical devices such as pacemakers:
Before using the key near people who
use medical devices, ask the medical
device manufacturer or ...
Other materials:
Transaxle Range (TR) Switch Adjustment [FS5 A EL]
CAUTION:
Water or foreign objects entering the connector can cause a poor connection
or corrosion. Be sure not to drop water or foreign objects on the connector
when disconnecting it.
1. Engage the parking brake and use wheel chocks at the front and rear of the
wheels.
2. Shi ...
No.6 Bsm Indicator Light Flashes While Not Under Bsm Indicator Light Flashing
Conditions (No Combination Switch Operation (Turn Signal Switch)) [Blind Spot Monitoring
(Bsm)]
6
BSM indicator light flashes while not under BSM indicator light-flashing
conditions (no combination switch operation (turn signal switch)
Description
The BSM indicator light flashes despite not satisfying the BSM indicator
l ...
Blind Spot Monitoring (Bsm) Control Module Inspection
1. Disconnect the negative battery cable.
2. Remove the rear combination light..
3. Remove the rear bumper..
4. Connect the negative battery cable..
5. Measure the voltage at each terminal is as indicated in the Terminal Voltage
Tables.
If the voltage or continuity is not as specif ...
