
Mazda 3 Service Manual: Hood Release Cable Removal/Installation
1. Disconnect the negative battery cable..
2. Remove the battery tray..
3. Remove the Front mudguard (LH)..
4. Remove the hood release cable from clips A.
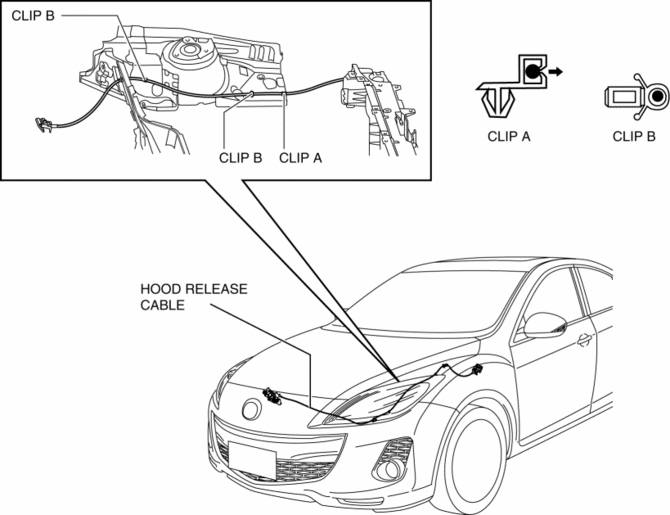
5. Remove the clips B.
6. Disconnect the hood latch from the hood release cable.
7. Remove the hood release cable from outside of the vehicle.
8. Install in the reverse order of removal.
 Hood Latch Switch Inspection
1. Disconnect the negative battery cable..
2. Remove the hood latch..
3. Verify that the continuity is as indicated in the table.
If not as indicated in the table, replace the hood latch.
...
 Hood Removal/Installation
WARNING:
Removing the hood without supporting it could cause the hood to fall and
cause serious injury. Always perform the procedure with at least another person
to prevent the hood from ...
Other materials:
Valve Clearance Adjustment [Mzr 2.0, Mzr 2.5]
1. Remove the battery cover..
2. Disconnect the negative battery cable.
3. Remove the plug hole plate..
4. Disconnect the wiring harness.
5. Remove the ignition coils..
6. Remove the spark plugs..
7. Remove the ventilation hose.
8. Remove the oil level gauge.
9. Remove the cylinder h ...
If you think something is wrong
If you observe any unusual behavior while operating your Subaru Solterra,
it may indicate that the vehicle requires inspection, adjustment, or repair. Promptly
contacting an authorized SUBARU dealer is strongly recommended to ensure continued
safety and reliability.
Visible symptoms
Fluid ...
Vehicle Speed Sensor (VSS) Removal/Installation [FS5 A EL]
CAUTION:
If foreign materials are stuck to the sensor, disturbance by magnetic flux
can cause sensor output to be abnormal and thereby negatively affect control.
Make sure that foreign materials such as iron filings are not stuck to the sensor
during installation.
1. Perform t ...
