Mazda 3 Service Manual: Key Reminder Switch Inspection
1. Disconnect the negative battery cable. (See BATTERY REMOVAL/INSTALLATION [MZR 2.0, MZR 2.5].)(See BATTERY REMOVAL/INSTALLATION [MZR 2.3 DISI Turbo].)(See BATTERY REMOVAL/INSTALLATION [SKYACTIV-G 2.0].)
2. Remove the column cover. (See COLUMN COVER REMOVAL/INSTALLATION.)
3. Disconnect the key reminder switch connector.
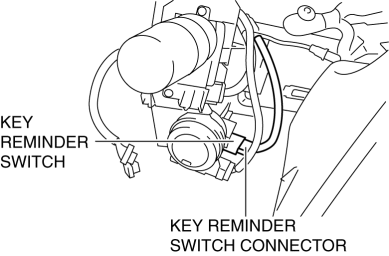
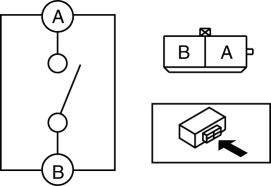
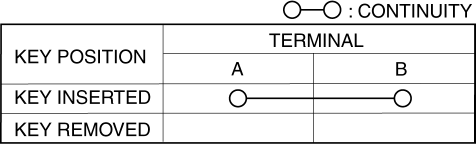
4. Verify that the continuity between the key reminder switch terminals is as indicated in the table.
-
If not as indicated in the table, replace the key reminder switch.
 Jacking Positions, Vehicle Lift (2 Supports) And Safety Stand (Rigid Rack) Positions
Jacking Positions
WARNING:
Improperly jacking a vehicle is dangerous. The vehicle can slip off the jack
and cause serious injury. Use only the correct front and rear jacking points
and ...
 Key Reminder Switch Removal/Installation
1. Disconnect the negative battery cable. (See BATTERY REMOVAL/INSTALLATION [MZR
2.0, MZR 2.5].)(See BATTERY REMOVAL/INSTALLATION [MZR 2.3 DISI Turbo].)(See BATTERY
REMOVAL/INSTALLATION [SKYACTIV- ...
Other materials:
Buckle Switch Inspection
Driver Side
1. Switch the ignition to off.
2. Disconnect the negative battery cable..
3. Remove the front seat..
4. Remove the front buckle..
5. Inspect for continuity between the buckle switch terminals using a tester.
If not as indicated in the table, replace the driver sid ...
Thermostat Inspection [Mzr 2.0, Mzr 2.5]
1. Remove the thermostat..
2. Visually check that the thermostat valve is closed.
3. Place the thermostat in water.
WARNING:
During inspection, the thermostat and water are extremely hot and can cause
severe burns. Do not touch the thermostat and water.
4. Heat the water and c ...
Seat Warmer
The front seats are electrically heated. The
ignition must be switched ON.
Press the seat warmer switch to illuminate
the indicator light while the ignition
is switched ON. The mode changes as
follows each time the seat warmer switch
is pressed.
WARNING
Be careful when using t ...
