Mazda 3 Service Manual: Positive Crankcase Ventilation (PCV) Valve Removal/Installation [Mzr 2.0, Mzr 2.5]
1. Remove the battery cover..
2. Disconnect the negative battery cable..
3. Remove the intake manifold and the fuel distributor component as a single unit..
4. Remove in the order indicated in the table.
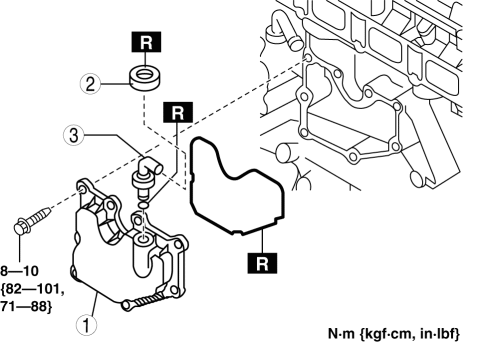
|
1 |
Oil separator |
|
2 |
Retainer (See Retainer Removal Note.) (See Retainer Installation Note.) |
|
3 |
PCV valve |
5. Install in the reverse order of removal.
Retainer Removal Note
CAUTION:
-
Be sure to follow the removal procedures below to prevent the leakage of blow-by gas caused by the damage to the tab of the oil separator or the oil separator itself.
1. Insert a flat blade screwdriver with its tip wrapped in a cloth into the gap between the retainer and the oil separator as shown in the figure.
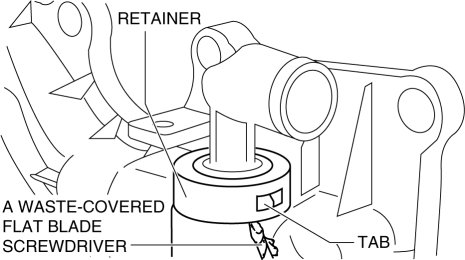
2. Spread the side surface of the retainer outward to dismount it with attention to the tab.
Retainer Installation Note
CAUTION:
-
Be sure to replace the old retainer with a new one to prevent the escape of blow-by gas. Reinstalling the old retainer will reduce airtightness.
1. Make sure that the retainer alignment mark is directed as shown in the left diagram before installing the retainer to the oil separator.

 Positive Crankcase Ventilation (PCV) Valve Inspection [Mzr 2.0, Mzr 2.5]
Airflow Inspection
1. Disconnect the section (A) of the ventilation hose shown in the figure.
2. Start the engine and verify that vacuum is applied to the end of the disconnected
ventilation ...
 Purge Solenoid Valve Inspection [Mzr 2.0, Mzr 2.5]
Airflow Inspection
1. Remove the battery cover..
2. Disconnect the negative battery cable..
3. Remove the purge solenoid valve..
4. Inspect airflow between the ports under the following conditi ...
Other materials:
Headlight Leveling Switch Removal/Installation
1. Disconnect the negative battery cable..
2. Remove the switch panel in the direction of the arrow shown in the figure.
3. Disconnect the connector.
4. Remove the headlight leveling switch in the direction of the arrow (2) shown
in the figure while pressing the tabs in the direction of ...
i-ACTIVSENSE
i-ACTIVSENSE is a collective term covering a series of advanced safety and
driver support
systems which make use of a Forward Sensing Camera (FSC) and radar sensors.
These
systems consist of active safety and pre-crash safety systems.
These systems are designed to assist the driver in safer ...
Vehicle Speed Sensor (VSS) Removal/Installation [FS5 A EL]
CAUTION:
If foreign materials are stuck to the sensor, disturbance by magnetic flux
can cause sensor output to be abnormal and thereby negatively affect control.
Make sure that foreign materials such as iron filings are not stuck to the sensor
during installation.
1. Perform t ...
