Mazda 3 Service Manual: Positive Crankcase Ventilation (PCV) Valve Inspection [Mzr 2.0, Mzr 2.5]
Airflow Inspection
1. Disconnect the section (A) of the ventilation hose shown in the figure.
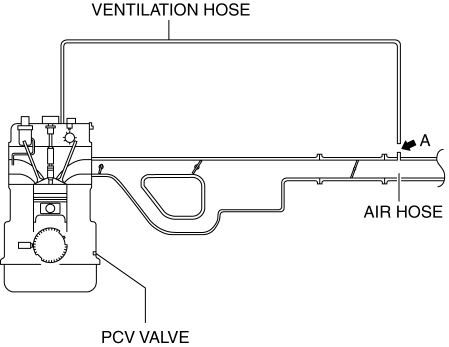
2. Start the engine and verify that vacuum is applied to the end of the disconnected ventilation hose while the engine is idling.
NOTE:
-
Because it is difficult to directly inspect the PCV valve, determine the integrity of the PCV valve by performing a simple inspection of the ventilation hose airflow condition.If the PCV valve is operating normally, vacuum occurs in the ventilation hose, however, if there is a malfunction in the PCV valve, positive pressure occurs in the ventilation hose because the blow-by gas is circulated to the air hose from the ventilation hose.
-
Verify the ventilation hose vacuum using the following methods:
-
When the tip of your finger touches the end of the ventilation hose, it is suctioned by the hose.
-
When a thin scrap of paper contacts the end of the ventilation hose, it is suctioned by the hose.
3. If it can be verified that vacuum occurs in the ventilation hose, the positive crankcase ventilation (PCV valve) system is determined to be normal.
-
If positive pressure occurs in the ventilation hose, perform the procedure from Step 4 to examine the PCV valve.
4. Remove the battery cover..
5. Disconnect the negative battery cable..
6. Remove the intake manifold and the fuel distributor component as a single unit..
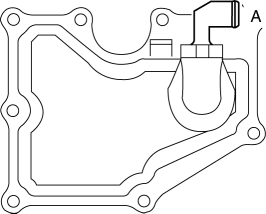
7. Remove the PCV valve and the oil separator as a single unit..
8. Verify that there is no airflow when pressure is applied to port A.
-
If there is airflow, replace the PCV valve..
9. Verify that there is airflow when vacuum is applied to port A.
-
If there is no airflow, replace the PCV valve..
 EGR Valve Removal/Installation [Mzr 2.0, Mzr 2.5]
1. Remove the battery cover..
2. Disconnect the negative battery cable..
3. Drain the engine coolant from the radiator..
4. Remove the air cleaner and the air hose as a single unit..
5. Remove ...
 Positive Crankcase Ventilation (PCV) Valve Removal/Installation [Mzr 2.0, Mzr
2.5]
Positive Crankcase Ventilation (PCV) Valve Removal/Installation [Mzr 2.0, Mzr
2.5]
1. Remove the battery cover..
2. Disconnect the negative battery cable..
3. Remove the intake manifold and the fuel distributor component as a single
unit..
4. Remove in the order indicated in ...
Other materials:
Front Door Key Cylinder Removal/Installation
1. To access the glass installation bolt, position the front door glass so that
the distance from the top of the front door glass to the upper part of the front
beltline molding is approx. 80 mm {3.1 in}.
2. Disconnect the negative battery cable..
3. Remove the following parts:
a. Inne ...
If the electronic key does not operate properly
If communication between the electronic key and the Subaru Solterra
is disrupted, or if the key cannot be used due to a depleted battery, the smart
key system and wireless remote functions will be unavailable. In such situations,
the Subaru Solterra can still be accessed and started by followi ...
Operating the Compact Disc (CD) Player
NOTE
If a disc has both music data (CD-DA)
and MP3/WMA/AAC files, playback of the
two or three file types differs depending on
how the disc was recorded.
Inserting the CD
Insert the CD into the slot, label-side up.
The auto-loading mechanism will set the
CD and begin play.
NOTE
T ...
