Mazda 3 Owners Manual: Light Bulbs
| WARNING
Do not replace the xenon fusion bulbs
yourself:
Replacing the xenon fusion bulbs
yourself is dangerous. Because the
xenon fusion bulbs require high
voltage, you could receive an electric
shock if the bulbs are handled
incorrectly. Consult an Authorized
Mazda Dealer when the replacement is
necessary.
Never touch the glass portion of a halogen bulb with your bare hands and always wear eye protection when handling or working around the bulbs: When a halogen bulb breaks, it is dangerous. These bulbs contain pressurized gas. If one is broken, it will explode and serious injuries could be caused by the fl ying glass. If the glass portion is touched with bare hands, body oil could cause the bulb to overheat and explode when lit. Always keep halogen bulbs out of the reach of children: Playing with a halogen bulb is dangerous. Serious injuries could be caused by dropping a halogen bulb or breaking it some other way. |
| CAUTION When removing the lens or lamp unit using a fl athead screwdriver, make sure that the fl athead screwdriver does not contact the interior terminal. If the fl athead screwdriver contacts the terminal, a short circuit may occur. |
NOTE
- To replace the bulb, contact an Authorized Mazda Dealer.
- If the halogen bulb is accidentally touched, it should be cleaned with rubbing alcohol before being used.
- Use the protective cover and carton for the replacement bulb to dispose of the old bulb promptly and out of the reach of children
 Replacing a Wheel
WARNING
Always use wheels of the correct size on
your vehicle:
Using a wrong-sized wheel is
dangerous. Braking and handling
could be aff ected, leading to loss of
control and ...
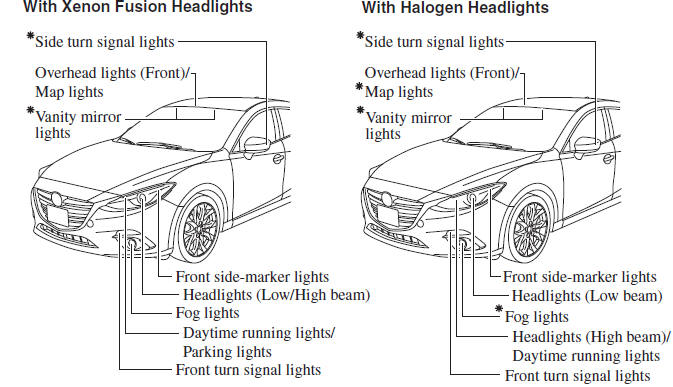
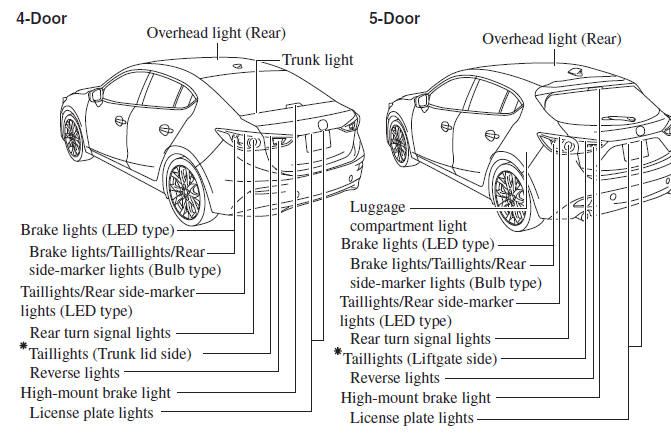
 Replacing Exterior Light Bulbs
Headlights (With xenon fusion
headlights)
Low/High beam bulbs
You cannot replace the low/high beam
bulbs by yourself. The bulbs must be
replaced at an Authorized Mazda Dealer.
Headlights (With h ...
Other materials:
Adjuster Anchor Removal/Installation
WARNING:
The side air bag sensor is attached to the lower part of the B-pillar. When
working around the B-pillar, disconnect the negative battery cable or work carefully,
avoiding excessive impact to the lower part of the B-pillar.
1. Remove the following parts:
a. Front sc ...
Discharge Headlight Service Warnings
Discharge Headlight Service Warnings
To prevent electrical shock when replacing the discharge headlight bulb,
always perform the servicing with dry hands and in an area where it does not
get wet.
Never probe the discharge headlight bulb connector directly with a finger
o ...
Front Lower Arm Inspection
1. Remove the front lower arm from the vehicle..
2. Inspect the arm for bending or damage, and the ball joint for excessive looseness.
If there is any malfunction, replace the front lower arm.
3. Rotate the ball joint stud 5 times. Install the SST to the ball
joint stud, measure t ...
