Mazda 3 Owners Manual: Locking, Unlocking
Locking, Unlocking with Transmitter
All doors and the liftgate can be locked/ unlocked by operating the keyless entry system transmitter, refer to Keyless Entry System .
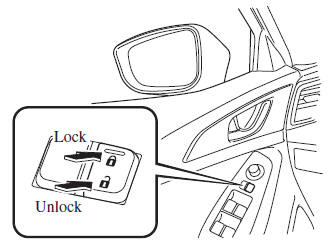
Locking, Unlocking with Door- Lock Switch
All doors and the liftgate lock automatically when the lock side is pressed. They unlock when the unlock side is pressed.
Driver's door
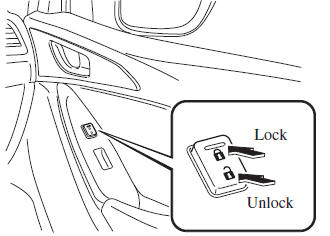
Front passenger's door
To lock all the doors and the liftgate from an open front door, press the lock side of the door lock switch and then close the door.
NOTE When locking the doors this way, be careful not to leave the key inside the vehicle.
 Locking, Unlocking with Request
Switch (With the advanced keyless
function)
Locking, Unlocking with Request
Switch (With the advanced keyless
function)
All doors and the liftgate can be locked/
unlocked by pressing the request switch
on the front doors while the key is being
carried.
(5–door)
The request switch on the liftgate can only
be use ...
 Auto Lock/Unlock Function
WARNING
Do not pull the inner handle on a front
door:
Pulling the inner handle on a front
door while the vehicle is moving
is dangerous. Passengers can fall
out of the vehicle ...
Other materials:
Speedometer
The speedometer indicates the speed of the
vehicle.
Speed Unit Selector (Type A
Instrument Cluster)
In some countries, you may have to
change the speed units between km/h and
mph.
Press the speed unit selector for 1.5
seconds or more.
The speed units for the speedometer will
change bet ...
Seat Belt Precautions
Seat belts help to decrease the possibility of severe injury during accidents
and sudden
stops. Mazda recommends that the driver and all passengers always wear seat
belts.
(U.S.A. and Canada)
All of the seat belt retractors are designed to keep the lap/shoulder belts
out of the way when
no ...
Ignition Switch Removal/Installation [Without Advanced Keyless Entry And Push
Button Start System]
1. Disconnect the negative battery cable..
2. Remove the column cover..
3. Detach the tab.
4. Pull the pin in the direction of the arrow shown in the figure and release
the lock.
5. Disconnect the ignition switch connector and key interlock solenoid connector.
6. Remove the ...
