
Mazda 3 Service Manual: Outer Mirror Glass Inspection
Vehicles With Heated Outer Mirror
1. Disconnect the negative battery cable..
2. Remove the outer mirror glass..
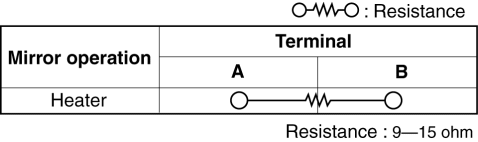
3. Verify that the resistance is as indicated in the table.
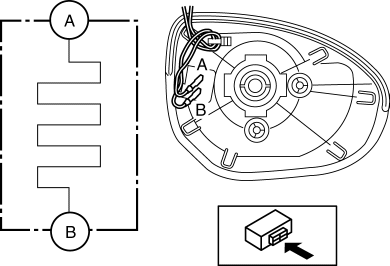
-
If not as indicated in the table, or if the resistance is not within the specification, replace the outer mirror grass..
Vehicles With BSM System
1. Disconnect the negative battery cable..
2. Remove the outer mirror glass..
3. Apply battery voltage to BSM indicator light connector (outer mirror glass side) terminal A, and connect terminal B to ground.
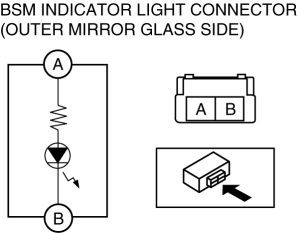
-
Verify that the BSM indicator light illuminates.
-
If there is any malfunction, replace the outer mirror glass..
 Outer Mirror Garnish Removal/Installation
1. Disconnect the negative battery cable..
2. Remove the outer mirror glass from the outer mirror..
3. Pinch the end of the tab which is visible, and release the tab by pressing
it toward the ve ...
 Outer Mirror Glass Installation
1. Connect the mirror heater connectors. (Vehicles with heated outer mirrors)
2. Connect the BSM indicator light connector. (Vehicles with BSM system)
3. Press part C on the outer mirror glass an ...
Other materials:
Engine Removal/Installation [Mzr 2.0, Mzr 2.5]
WARNING:
Fuel vapor is hazardous. It can very easily ignite, causing serious injury
and damage. Always keep sparks and flames away from fuel.
Fuel line spills and leakage are dangerous. Fuel can ignite and cause serious
injuries or death and damage. Fuel can also irritate skin ...
Blind Spot Monitoring (Bsm) Bracket Removal/Installation
1. Disconnect the negative battery cable..
2. Remove the rear combination light..
3. Remove the rear bumper..
4. Remove the BSM control module..
5. Remove the nuts.
6. Remove the clip.
7. Remove the BSM bracket.
8. Install in the reverse order of removal.
9. Perform the blind ...
PKSB (Parking Support Brake)
The Subaru Solterra PKSB (Parking Support Brake) system is engineered
to assist the driver during low-speed maneuvers, such as parking, by issuing warnings
and automatically applying braking force to help reduce potential collision damage
with detected obstacles.
PKSB (Parking Support Brake) ...
