
Subaru Solterra 2023-2026 Owner's Manual: Outside rear view mirrors
In the Subaru Solterra, the outside rear view mirrors can be precisely adjusted to provide a clear and comprehensive view of the surrounding traffic, significantly improving driving awareness and safety.
■ When using the outside rear view mirrors in a cold weather
During cold weather conditions, the Subaru Solterra mirrors may become frozen, making it difficult or impossible to fold, extend, or adjust them. Before operating the mirrors, carefully remove any ice, snow, or frost to restore full functionality.
■ Defogging the mirrors
The Subaru Solterra is equipped with mirror defoggers that help clear condensation, frost, or fog from the mirror surfaces.
To activate the mirror defoggers, turn on the rear window defogger, which simultaneously powers the outside mirror heating system.
WARNING
■ Important points while driving
Always follow these safety precautions when driving the Subaru Solterra.
Failure to comply may result in loss of vehicle control and lead to serious injury or fatal accidents.
- Do not attempt to adjust the Subaru Solterra mirrors while the vehicle is in motion.
- Never drive with the mirrors folded inward.
- Ensure both driver-side and passenger-side mirrors of the Subaru Solterra are fully extended and properly adjusted before driving.
■ When the mirror defoggers are operating
The mirror surfaces of the Subaru Solterra may become hot during defogging operation. Avoid touching them directly to prevent burns.
Adjustment procedure
1. Select the mirror you wish to adjust by turning the mirror selection switch in the Subaru Solterra.
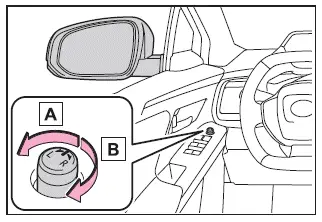
- Left mirror selection
- Right mirror selection
2. Adjust the mirror angle by operating the control switch.
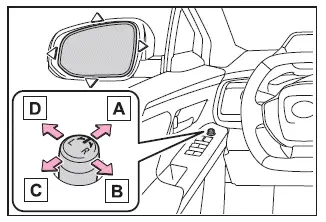
- Up
- Right
- Down
- Left
■ Mirror angle can be adjusted when
The Subaru Solterra mirror adjustment system is active when the power switch is in ACC or ON mode.
■ Automatic adjustment of the mirror angle (if equipped)
On certain Subaru Solterra models, preferred mirror angles can be stored and automatically recalled using the driving position memory system, providing convenience for multiple drivers.
Folding and extending the mirrors
Manual type
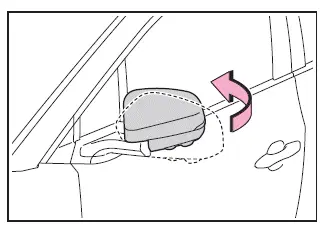
To fold the mirrors on the Subaru Solterra manually, push them gently toward the rear of the vehicle.
Power type
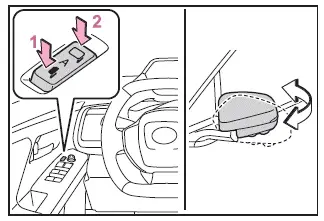
- Fold mirrors
- Extend mirrors
When the folding switch is set to the neutral position, the Subaru Solterra mirrors enter automatic mode, where folding and extending are synchronized with door locking and unlocking actions.
■ Customization
The Subaru Solterra allows certain mirror-related functions to be customized according to user preferences.
WARNING
■ When a mirror is moving
To prevent injury or damage, keep hands and objects away from the Subaru Solterra mirrors while they are folding or extending.
Linked mirror function when reversing (If equipped)
When the mirror selection switch is set to "L" or "R", the Subaru Solterra mirrors automatically tilt downward when reverse gear is engaged, providing a clearer view of the ground near the vehicle.
To disable this feature, return the mirror selection switch to the neutral center position.
■ Adjusting the mirror angle when the vehicle is reversing
With the Subaru Solterra in reverse (R), adjust the mirror to your preferred downward angle.
This position will be stored in memory and automatically applied each time reverse gear is selected.
The stored tilt angle is linked to the normal driving position. If the standard mirror angle is changed later, the reverse tilt angle will also adjust accordingly.
If the normal mirror position is modified, readjust the Subaru Solterra reverse tilt angle to maintain optimal visibility.
 Digital inner mirror
In the Subaru Solterra, the Digital inner mirror is an advanced visibility
system that utilizes a rear-mounted camera to project a real-time video image onto
the mirror display, significantly enha ...
 Opening, closing the windows
Power windows
Opening and closing the power windows
In the Subaru Solterra, the power window system allows effortless control of
all side windows through dedicated switches, ensuring convenience ...
Other materials:
Discharge Headlight Service Warnings
Discharge Headlight Service Warnings
To prevent electrical shock when replacing the discharge headlight bulb,
always perform the servicing with dry hands and in an area where it does not
get wet.
Never probe the discharge headlight bulb connector directly with a finger
o ...
Cleaning the Upholstery and
Interior Trim
Vinyl
Remove dust and loose dirt from vinyl
with a whisk broom or vacuum cleaner.
Clean vinyl with a leather-and-vinyl
cleaner.
Leather *
Remove dust and sand first using a
vacuum cleaner or other means, then wipe
dirt off using a soft cloth with a leather
cleaner or a soft cloth soaked i ...
Air Filter Removal/Installation [Mzr 2.3 Disi Turbo]
1. Remove the fuel-filler pipe protector..
2. Remove in the order indicated in the table.
1
Evaporative hose
2
Air filter
3. Install in the reverse order of removal. ...
