Subaru Solterra 2023-2026 Owner's Manual: Digital inner mirror
In the Subaru Solterra, the Digital inner mirror is an advanced visibility system that utilizes a rear-mounted camera to project a real-time video image onto the mirror display, significantly enhancing rearward visibility in various driving conditions.
The Subaru Solterra Digital inner mirror can seamlessly switch between traditional optical mirror mode and modern digital display mode by operating the integrated lever, allowing the driver to choose the most suitable viewing method at any time.
This intelligent system ensures a clear rear view even when the rear window is obstructed by passengers, head restraints, or cargo, making the Subaru Solterra safer and more practical for daily use.
Additionally, because the digital feed does not show the rear seat occupants, the Subaru Solterra enhances passenger privacy while maintaining full situational awareness for the driver.
WARNING
Always follow these important precautions when using the Subaru Solterra Digital inner mirror.
Failure to comply may result in serious injury or even fatal consequences.
■ Before using the Digital inner mirror
- Adjust the Subaru Solterra mirror system before starting to drive.
- First switch to optical mirror mode and position the mirror so that the rear view is clearly visible.
- Then switch to digital mirror mode and fine-tune display brightness, contrast, or angle settings as needed.
- Be aware that the viewing angle and depth perception in the Subaru Solterra Digital inner mirror differ from a conventional mirror, and familiarize yourself with this difference before driving.
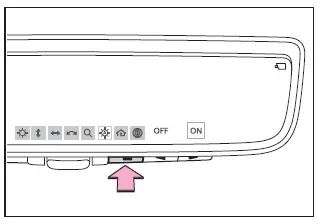
System components
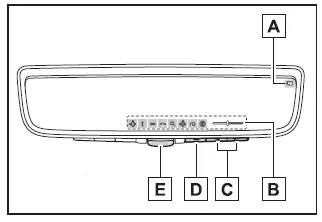
- Camera indicator
Shows that the Subaru Solterra rear camera is functioning correctly. - Icon display area
Displays system icons, adjustment levels, and configuration indicators. - Select/adjust button
Used to modify selected settings within the Subaru Solterra mirror system. - Menu button
Activates the menu interface and allows selection of adjustable parameters. - Lever
Switches between digital mirror mode and optical mirror mode.
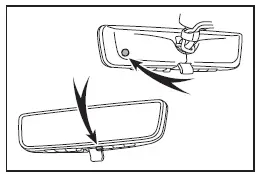
Changing modes
Use the lever on the Subaru Solterra mirror assembly to alternate between digital display mode and traditional reflective mode.
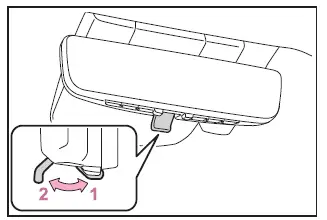
- Digital mirror mode
Displays a live camera image of the area behind the Subaru Solterra, providing a wider and unobstructed field of view.
 will illuminate in this mode.
- Optical mirror mode
Disables the display, allowing the Subaru Solterra mirror to function as a standard reflective mirror.
■ Digital mirror mode operating condition
The Subaru Solterra Digital inner mirror operates when the power switch is in the ON position.
When the power is turned OFF or switched to ACC, the display image will disappear after a few seconds.
■ When using the Digital inner mirror in digital mirror mode
- If visibility is reduced due to water, snow, dirt, or debris on the Subaru Solterra camera lens, activate the camera washer or switch to optical mode for clearer visibility.
- If the Subaru Solterra back door is open, the displayed image may be distorted or unavailable. Always ensure the back door is fully closed before driving.
- If glare or reflections make the display difficult to see, adjust cabin lighting or close the panoramic roof sunshade (if equipped).
- When driving at night, the Subaru Solterra Digital inner mirror may show
certain visual effects that are normal and do not indicate a malfunction:
- Colors may appear slightly different from actual surroundings.
- Bright lights from vehicles behind may create a halo or blurred effect.
- Automatic brightness adjustment may cause slight flickering.
If the displayed image in the Subaru Solterra is uncomfortable or difficult to interpret, switch back to optical mirror mode for a more familiar viewing experience.
- The Subaru Solterra Digital inner mirror may become warm during extended
use in digital mode.
This is a normal characteristic of the system and not a malfunction.
- Depending on the driver’s vision or age, focusing on the display may take additional time. If necessary, revert to optical mode.
- Passengers should avoid focusing on the Subaru Solterra display while the vehicle is moving, as it may cause discomfort or motion sickness.
■ When the system malfunctions
If a warning symbol appears while using the Subaru Solterra Digital inner mirror, it may indicate a system issue.
The symbol will typically disappear after a few seconds. Switch to optical mirror mode and have the Subaru Solterra inspected by an authorized dealer as soon as possible.
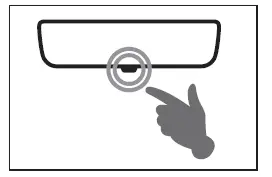
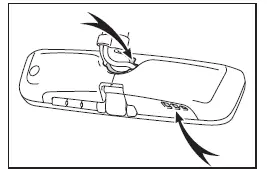
Adjusting the mirror
■ Adjusting the mirror height
In the Subaru Solterra, the height of the rear view mirror can be precisely adjusted to match the driver’s seating position and line of sight, ensuring maximum rearward visibility.
Switch the Subaru Solterra mirror to optical mirror mode, then adjust its vertical position by moving it up or down until a clear and natural rear view is achieved.

■ Display settings (digital mirror mode)
The Subaru Solterra Digital inner mirror allows multiple display parameters to be customized, including image position, brightness, zoom level, and automatic anti-glare settings, enabling a tailored viewing experience.
1. Press the menu button on the Subaru Solterra mirror.
The control icons will appear on the display.
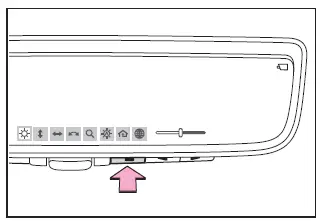
2. Press the menu button repeatedly to navigate through the available adjustment options.
3. Use
 or
or
 to modify the selected setting.
If no button is pressed for approximately 5 seconds, the Subaru Solterra display icons will automatically disappear.
 Select this option to adjust the display brightness for optimal visibility.
 Select this option to shift the displayed image vertically.
 Select this option to move the displayed image horizontally.
 Select this option to adjust the angle of the displayed image.
 Select this option to zoom in or out on the displayed image.
 Select this option to enable or disable the automatic anti-glare function.* The
Subaru Solterra system automatically adjusts reflected brightness from trailing
vehicles.
Select this option to enable or disable the automatic anti-glare function.* The
Subaru Solterra system automatically adjusts reflected brightness from trailing
vehicles.
The automatic anti-glare feature is activated each time the Subaru Solterra power switch is turned ON.
 Select this option to display the HomeLink training tutorial for programming garage
door systems.
Select this option to display the HomeLink training tutorial for programming garage
door systems.
 Select this option to change the language of the HomeLink training guide.
*: Although this function applies primarily to optical mirror mode, it can also be adjusted while using the Subaru Solterra digital mirror mode.
■ Enabling/disabling the automatic anti-glare function (optical mirror mode)
The Subaru Solterra allows the automatic anti-glare function in optical mirror mode to be turned ON or OFF, with adjustments possible in both digital and optical modes.
When operating in optical mirror mode
1. Press the menu button.
The settings interface will appear on the Subaru Solterra display.
2. Press
 or
or
 to switch the function ON or OFF.
If no input is detected for approximately 5 seconds, the Subaru Solterra interface will close automatically.
■ Adjusting the display (digital mirror mode)
- The Subaru Solterra adjustment icons will disappear automatically after a short period of inactivity.
- After modifying the image settings, slight visual distortion may occur. This is a normal characteristic of the digital display system.
- If the display brightness is set excessively high, it may cause eye strain. Adjust the Subaru Solterra display to a comfortable level, or switch to optical mirror mode if needed.
- The Subaru Solterra automatically adapts display brightness based on ambient lighting conditions in front of the vehicle.
■ To prevent the light sensors from malfunctioning
To maintain accurate performance of the Subaru Solterra light sensors, avoid touching or covering them with objects or materials.
WARNING
Always follow these precautions when using the Subaru Solterra Digital inner mirror.
Failure to observe these instructions may result in serious injury or accidents.
■ While driving
- Do not adjust the Subaru Solterra Digital inner mirror position or display
settings while driving.
Stop the vehicle safely before operating the mirror controls.
Adjusting settings while driving may lead to loss of control and increase the risk of an accident.
- Always remain attentive to the surroundings when driving the Subaru Solterra.
In the Subaru Solterra, the perceived size and distance of vehicles or surrounding objects may differ between digital mirror mode and traditional optical mirror mode.
When reversing or maneuvering the Subaru Solterra, always visually check the surroundings directly, especially the area immediately behind the vehicle, to ensure complete safety.
In low-light conditions, such as nighttime driving, approaching vehicles from behind may cause the surrounding environment in the Subaru Solterra digital display to appear darker or less detailed.
■ To prevent causes of fire
If you notice smoke, unusual odor, or abnormal heat coming from the Subaru Solterra Digital inner mirror while it is in use, immediately stop using the system. Continued operation under such conditions may lead to fire. Contact your SUBARU dealer without delay.
Cleaning the Digital inner mirror
■ Cleaning the mirror surface
If the display surface of the Subaru Solterra mirror becomes dirty, the clarity of the image may be reduced.
Gently clean the surface using a soft, dry cloth to maintain optimal visibility and prevent scratches.
■ Cleaning the camera
If visibility of the Subaru Solterra Digital inner mirror image is reduced due to water droplets, snow, dirt, or mud on the camera lens, activate the camera washer or temporarily switch to optical mirror mode.
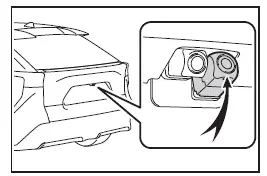
■ The camera
The rear-mounted camera of the Subaru Solterra Digital inner mirror system is positioned as illustrated below.
■ Cleaning the camera with washer fluid
- When cleaning the Subaru Solterra camera, temporary visibility reduction may occur due to washer fluid residue. Always remain attentive to surroundings while driving.
- If washer fluid remains on the lens, night-time visibility may be affected by reflections from headlights behind. In such cases, switch the Subaru Solterra to optical mirror mode for improved clarity.
- Some dirt or residue may not be fully removed during automatic cleaning. If necessary, rinse the Subaru Solterra camera lens with a sufficient amount of clean water and wipe gently with a soft damp cloth.
- The washer system only sprays the camera lens surface. Ice, snow, or debris around the Subaru Solterra camera housing may still require manual removal.
NOTICE
■ To prevent the Digital inner mirror from malfunctioning
- Avoid using harsh chemicals such as thinner, benzene, or alcohol when cleaning the Subaru Solterra mirror, as these substances may damage or discolor the surface.
- Do not disassemble, modify, or attempt to repair the Subaru Solterra Digital inner mirror on your own.
■ To prevent the camera from malfunctioning
- Follow these precautions to ensure reliable operation of the Subaru
Solterra Digital inner mirror camera system:
- Do not strike or apply strong force to the camera, as this may alter its alignment or position.
- Never remove, disassemble, or modify the camera unit.
- When cleaning, rinse the Subaru Solterra camera with plenty of water
and wipe gently using a soft cloth.
Avoid rubbing the lens aggressively, as scratches may reduce image clarity.
- Prevent substances such as wax, window cleaner, or glass coating agents from adhering to the camera surface. If contamination occurs, clean it immediately.
- Do not pour hot water onto the Subaru Solterra camera in cold conditions, as sudden temperature changes may cause malfunction.
- When using a high-pressure washer, avoid directing water streams at the camera or its surrounding area.
- Avoid exposing the Subaru Solterra camera to strong impacts, as this
may result in system failure.
If damage is suspected, have the Subaru Solterra inspected by an authorized SUBARU dealer immediately.
- Do not block the ventilation openings of the Subaru Solterra mirror. Obstruction may cause overheating, which can lead to malfunction or fire risk.
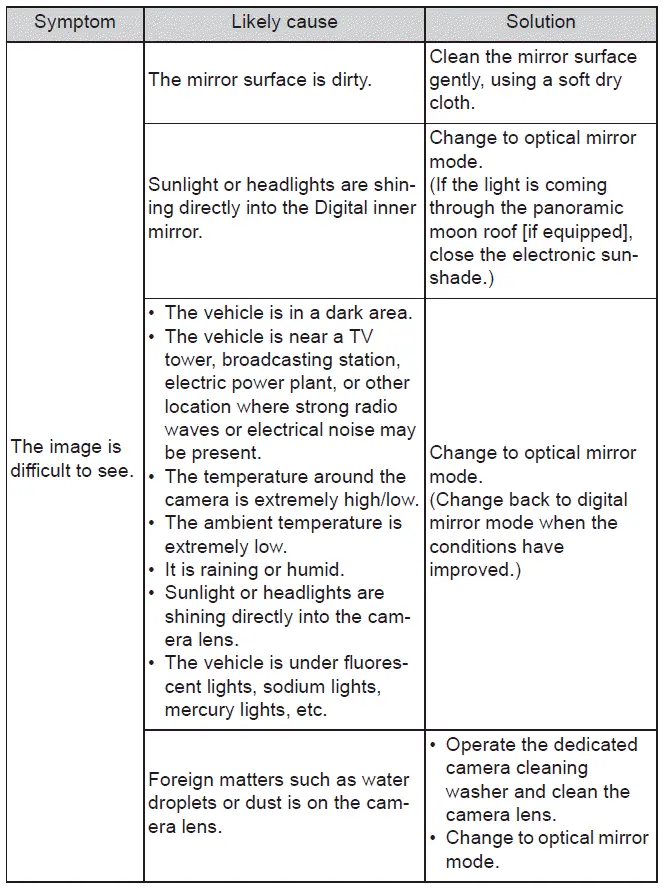
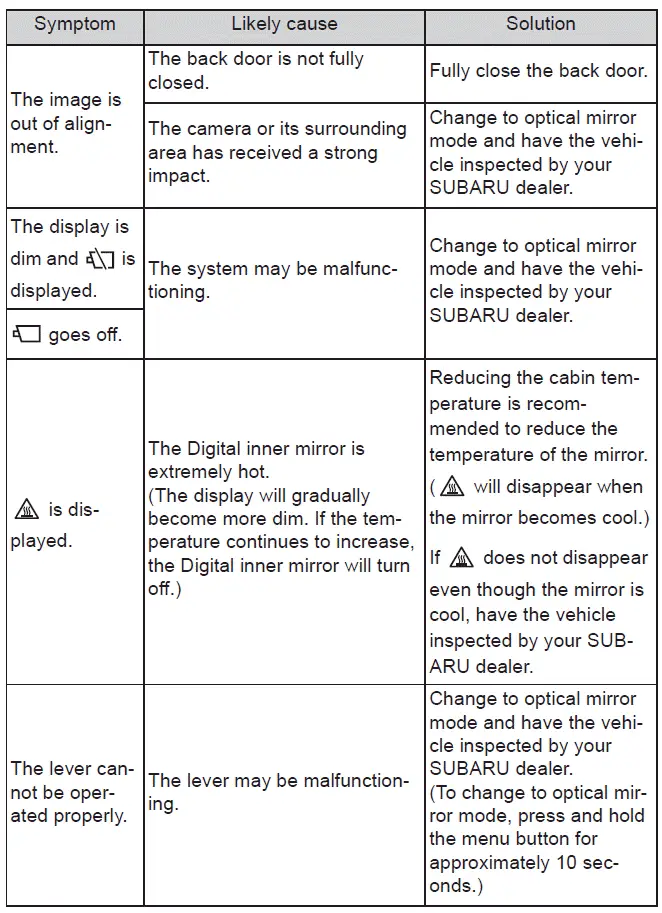
If you notice any symptoms
If you observe any irregularities in the Subaru Solterra Digital inner mirror operation, refer to the diagnostic table for possible causes and recommended actions.
If the issue cannot be resolved using the suggested measures, contact your SUBARU dealer for professional inspection and service.
 Inside rear view mirror
In the Subaru Solterra, the inside rear view mirror is designed to
provide a clear and accurate view of the area behind the vehicle, allowing the driver
to maintain full awareness of surrounding t ...
 Outside rear view mirrors
In the Subaru Solterra, the outside rear view mirrors can be precisely
adjusted to provide a clear and comprehensive view of the surrounding traffic, significantly
improving driving awareness and ...
Other materials:
Trunk End Trim Removal/Installation
4SD
1. Remove the trunk mat..
2. Remove the trunk board..
3. Remove the fasteners.
4. Pull the trunk end trim indicated in the arrow shown in the figure, then detach
clips A, pins B, pin C, D and tabs E.
5. Remove the trunk end trim.
6. Install in the reverse order of removal.
5HB ...
Spark Plug Removal/Installation [Mzr 2.3 Disi Turbo]
CAUTION:
If a spark plug that is not as specified is installed, engine performance
will be deteriorated. Install only the specified spark plug when replacing.
1. Remove the battery cover..
2. Disconnect the negative battery cable..
3. Remove the charge air cooler..
4. Remove t ...
Operating the Radio
Radio ON
Select the icon on the home
screen to display the Entertainment screen. When selecting
the desired radio, the following icons are indicated in the lower part of the
center display.
AM/FM Radio
Icon
Function
Displays the Entertainment menu. Use to ...
