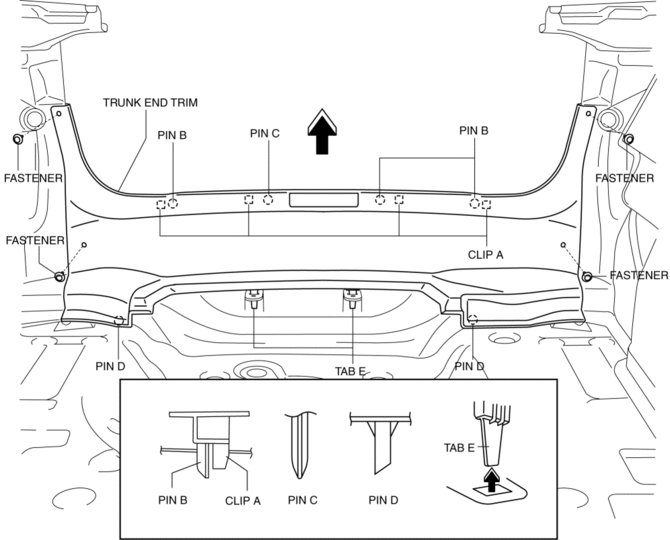
Mazda 3 Service Manual: Trunk End Trim Removal/Installation
4SD
1. Remove the trunk mat..
2. Remove the trunk board..
3. Remove the fasteners.
4. Pull the trunk end trim indicated in the arrow shown in the figure, then detach clips A, pins B, pin C, D and tabs E.
5. Remove the trunk end trim.
6. Install in the reverse order of removal.
5HB
1. Remove the trunk mat..
2. Remove the trunk board..
3. Remove the fasteners.
4. Pull the trunk end trim indicated in the arrow shown in the figure, then detach clips A, pins B, pin C, guides D and pins E.

5. Remove the trunk end trim.
6. Install in the reverse order of removal.
 Trunk Compartment Light Bulb Removal/Installation
1. Disconnect the negative battery cable..
2. Disengage the tabs by pressing both ends of the lens in the directions indicated
by the arrows and remove the lens.
3. Remove the trunk compartm ...
 Trunk Lid Adjustment
1. Measure the gap and height difference between the trunk lid and the body.
Standard clearance
a: 2.4—4.4 mm {0.10—0.17 in}
b: -4.6—-2.6 mm {-0.18—-0.11 in}
c: ...
Other materials:
Brake Hose (Front) Removal/Installation [Mzr 2.0, Skyactiv G 2.0, Mzr 2.5]
1. Remove in the order indicated in the table.
2. Install in the reverse order of removal.
3. Add brake fluid, bleed the brakes, and inspect for leakage after the installation
has been completed..
1
Brake pipe
2
Clip
3
...
Variable Swirl Solenoid Valve Inspection [Mzr 2.3 Disi Turbo]
Airflow Inspection
1. Remove the battery cover..
2. Disconnect the negative battery cable..
3. Remove the variable swirl solenoid valve..
4. Inspect the airflow between the ports under the following conditions.
If not as specified, replace the variable swirl solenoid valve..
...
Rear Seat Back Frame Removal/Installation
1. Remove the rear seat cushion..
2. Remove the rear buckle installation bolt..
3. Remove the rear seat back..
4. Remove the headrest.
5. Open the fasteners.
6. Detach the hooks.
7. Remove the child-restraint seat anchor covers in the order of (1), (2) as
shown in the figure. (5H ...
