
Mazda 3 Service Manual: Trunk Compartment Light Bulb Removal/Installation
1. Disconnect the negative battery cable..
2. Disengage the tabs by pressing both ends of the lens in the directions indicated by the arrows and remove the lens.
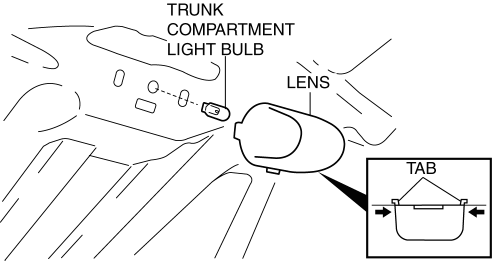
3. Remove the trunk compartment light bulb.
4. Install in the reverse order of removal.
 Trunk Board Removal/Installation
1. Remove the trunk mat in the direction of arrow shown in the figure.
2. Remove the trunk board in the direction of arrow shown in the figure.
3. Install in the reverse order of removal. ...
 Trunk End Trim Removal/Installation
4SD
1. Remove the trunk mat..
2. Remove the trunk board..
3. Remove the fasteners.
4. Pull the trunk end trim indicated in the arrow shown in the figure, then detach
clips A, pins B, pin C, D ...
Other materials:
Rear Lateral Link Removal/Installation
1. Remove in the order indicated in the table.
2. Install in the reverse order of removal.
3. Inspect the wheel alignment and adjust it if necessary..
1
Rear stabilizer control link upper nut
2
Rear lateral link
(See Rear Lateral Link ...
Slide Motor Inspection
1. Remove the battery cover..
2. Disconnect the negative battery cable and wait 1 min or more..
3. Disconnect the slide motor connector.
4. Apply battery positive voltage to the slide motor terminals and inspect the
slide motor operation
If not as specified, replace the front sea ...
Glass Antenna Inspection
4SD
1. Disconnect the negative battery cable..
2. Disconnect the antenna amplifier connector B..
3. Disconnect the antenna feeder No.3 connector C. (with audio unit (with display)).
4. Inspect the glass antenna for damage visually.
5. Inspect for continuity between the glass antenna termin ...
