Subaru Solterra 2023-2026 Owner's Manual: Inside rear view mirror
In the Subaru Solterra, the inside rear view mirror is designed to provide a clear and accurate view of the area behind the vehicle, allowing the driver to maintain full awareness of surrounding traffic conditions.
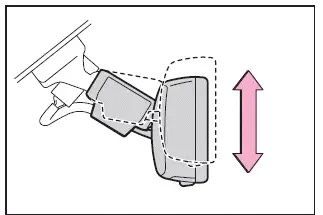
Adjusting the height of rear view mirror
The position of the rear view mirror in the Subaru Solterra can be precisely adjusted to match the driver’s seating posture and line of sight.
To achieve the optimal viewing angle, move the Subaru Solterra rear view mirror up or down until the rear window is fully visible and unobstructed.
WARNING
■ Caution while driving
Never attempt to adjust the Subaru Solterra rear view mirror while the vehicle is in motion.
Adjusting the mirror during driving may distract the driver and result in loss of control, increasing the risk of serious injury or fatal accidents.
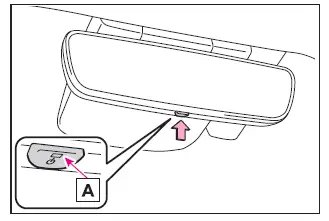
Anti-glare function
The Subaru Solterra is equipped with an automatic anti-glare rear view mirror that reduces glare from headlights of vehicles behind, improving nighttime driving comfort and safety.
This system continuously monitors light intensity and automatically dims the mirror surface to minimize reflected brightness.
Changing automatic anti-glare function mode on/off
When the anti-glare feature of the Subaru Solterra is active, the indicator A illuminates to confirm operation.
Each time the power switch is turned ON, the Subaru Solterra automatically activates the anti-glare mode by default.
Pressing the control button will deactivate the function, and the indicator A will turn off accordingly.
■ To prevent sensor error
To maintain proper operation of the Subaru Solterra anti-glare system, ensure that the built-in sensors remain unobstructed and clean at all times.
Avoid touching, covering, or placing objects near the sensors, as this may interfere with accurate light detection and reduce system performance.
 Steering wheel
Adjustment procedure
1. Firmly hold the Subaru Solterra steering wheel and push the adjustment lever
downward to release the lock.
2. Move the steering wheel vertically and horizontally to a ...
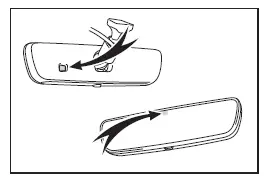
 Digital inner mirror
In the Subaru Solterra, the Digital inner mirror is an advanced visibility
system that utilizes a rear-mounted camera to project a real-time video image onto
the mirror display, significantly enha ...
Other materials:
Oil Control Valve (OCV) Removal/Installation [Mzr 2.0, Mzr 2.5]
1. Remove the battery cover..
2. Disconnect the negative battery cable..
3. Remove the plug hole plate..
4. Disconnect the wiring harness.
5. Remove the ignition coils..
6. Remove the ventilation hose.
7. Remove the oil level gauge.
8. Remove the cylinder head cover..
9. Remove in th ...
Master Cylinder Removal/Installation [Mzr 2.0, Skyactiv G 2.0, Mzr 2.5]
1. Remove the battery and battery tray..
2. Remove in the order indicated in the table.
3. Install in the reverse order of removal.
1
Brake fluid level sensor connector
2
Reserve hose (MTX)
(See Reserve Hose (MTX) Removal Note.)
(Se ...
Starter Cut Relay Removal/Installation [MTX]
Advanced Keyless Entry And Push Button Start System Only
1. Disconnect the negative battery cable..
2. Remove the following parts:
Front scuff plate (LH).
Front side trim (LH).
Side wall.
Console.
3. Set the hood release lever out of the way..
4. Remove the ...
