Mazda 3 Service Manual: Oil Control Valve (OCV) Removal/Installation [Mzr 2.0, Mzr 2.5]
1. Remove the battery cover..
2. Disconnect the negative battery cable..
3. Remove the plug hole plate..
4. Disconnect the wiring harness.
5. Remove the ignition coils..
6. Remove the ventilation hose.
7. Remove the oil level gauge.
8. Remove the cylinder head cover..
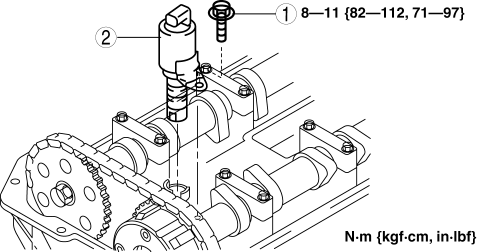
9. Remove in the order indicated in the table.
10. Install in the reverse order of removal.
|
1 |
OCV installation bolt |
|
2 |
OCV |
 Oil Control Valve (OCV) Inspection [Mzr 2.0, Mzr 2.5]
Coil Resistance Inspection
1. Remove the battery cover..
2. Disconnect the negative battery cable..
3. Remove the plug hole plate..
4. Disconnect the OCV connector.
5. Measure the resistance ...
 Oil Cooler Flushing [FS5 A EL]
NOTE:
If the automatic transaxle is replaced, flush and inspect the oil cooler.
When replacing the automatic transaxle, inspect the oil cooler together with
flushing it using the fo ...
Other materials:
Front ABS Wheel Speed Sensor Inspection
Sensor Output Value Inspection
CAUTION:
Resistance inspection using other testers may cause damage to the ABS wheel-speed
sensor internal circuit. Be sure to use the M-MDS to inspect the ABS wheel-speed
sensor.
1. Switch the ignition to off.
2. Connect the M-MDS to the DLC-2. ...
Antenna Feeder No.2 Removal/Installation
1. Disconnect the negative battery cable..
2. Remove the rain sensor cover. (Vehicles with auto light/wiper system).
3. Disconnect the rain sensor connector. (Vehicles with auto light/wiper system)
4. Partially peel back the seaming welts.
5. Remove the following parts:
a. Sunroof seaming ...
Brake Hose (Rear) Removal/Installation [Mzr 2.5, Mzr 2.3 Disi Turbo]
1. Remove in the order indicated in the table.
2. Install in the reverse order of removal.
3. Add brake fluid, bleed the brakes, and inspect for leakage after the installation
has been completed..
1
Brake pipe
(See Clip and Brake Pipe Installation Note.)
...
