Mazda 3 Service Manual: Parking Brake Cable Removal/Installation
1. Remove the following parts:
a. Upper panel.
b. Shift knob (MTX).
c. Selector lever knob (ATX).
d. Shift panel.
e. Side wall.
f. Console.
2. Remove the under cover..
3. Remove the tunnel member (rear). (MZR 2.0, MZR 2.5, MZR 2.3 DISI Turbo).
4. Remove the brace bar. (SKYACTIV-G 2.0).
5. Remove the TWC. (MZR 2.0, MZR 2.5, SKYACTIV-G 2.0).
6. Remove the presilencer. (MZR 2.3 DISI Turbo).
7. Remove the insulator (middle No.1) and the insulator (middle No.2)..
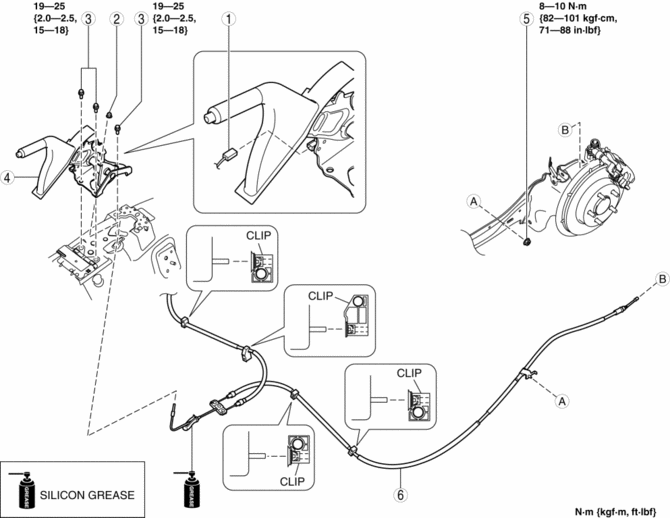
8. Remove in the order indicated in the table.
9. Install in the reverse order of removal.
10. After installation, inspect the parking brake stroke and adjust if necessary..
|
1 |
Parking brake switch connector |
|
2 |
Adjusting nut |
|
3 |
Bolt |
|
4 |
Parking brake lever |
|
5 |
Nut |
|
6 |
Parking brake cable (See Parking Brake Cable Installation Note.) |
Parking Brake Cable Installation Note
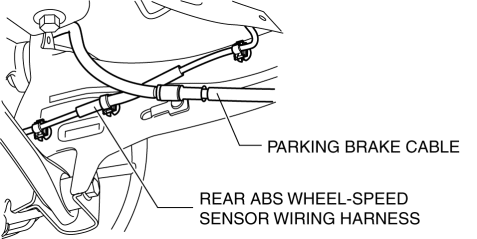
1. Pass the parking brake cable inside the rear ABS wheel-speed sensor wiring harness as shown in the figure.
2. Install the rear parking brake cable.
3. Verify that the end of the parking brake cable outer end is out of the caliper as shown in the figure.

 Parking Brake
...
 Parking Brake Lever Adjustment
1. Pump the brake pedal a few times.
2. Remove the upper panel..
3. Turn the adjusting nut and adjust the parking brake lever.
4. After adjustment, pull the parking brake lever one notch and ...
Other materials:
Driveline/Axle SST
49 F027 004
Attachment ø80
49 U027 005
Bearing installer
49 H027 002
Bearing remover
49 H034 201
Support block
49 H028 203
Block S
...
Advanced Park perpendicular exiting (forward/ reverse) function
When preparing to leave a perpendicular parking space, the Subaru Solterra Advanced
Park system evaluates surrounding conditions and, if it determines that a safe exit
path is available, the perpendicular exiting (forward/reverse) function can be activated.
In more complex environments, the Su ...
Roof Carrier Bracket Removal/Installation
4SD
1. Disconnect the negative battery cable..
2. Remove the following parts:
a. Sunroof seaming welt (vehicles with sunroof)
b. Front scuff plate.
c. Rear scuff plate.
d. A-pillar trim.
e. B-pillar lower trim.
f. Upper anchor of the front seat belt installation bolt.
g. B-pillar up ...
