Mazda 3 Service Manual: Passenger Side Air Bag Module Removal/Installation [Two Step Deployment Control System]
WARNING:
-
Handling the air bag module improperly can accidentally deploy the air bag module, which may seriously injure you. Read the air bag system service warnings and cautions before handling the air bag module..
-
Due to the adoption of 2-step deployment control in the passenger-side air bag module, depending on the impact force, it is possible that inflator No.2 might not deploy. In such cases, before disposing of the air bag module, make sure to follow the inflator deployment procedures and verify complete deployment of inflators No.1 and 2.
NOTE:
-
When replacing the passenger-side air bag module after the deployment, replace it together with the mid-wiring harness.
-
When installing the mid-wiring harness, install it along the vehicle wiring harness using bands or tape.
1. Switch the ignition to off.
2. Disconnect the negative battery cable and wait for 1 min or more
..
3. Remove the following parts:
a. Passenger-side front scuff plate.
b. Passenger-side front side trim.
c. Dashboard under cover.
d. Glove compartment.
e. Passenger-side lower panel.
f. SIRIUS satellite radio unit (with SIRIUS satellite radio system).
4. Disconnect the connector.
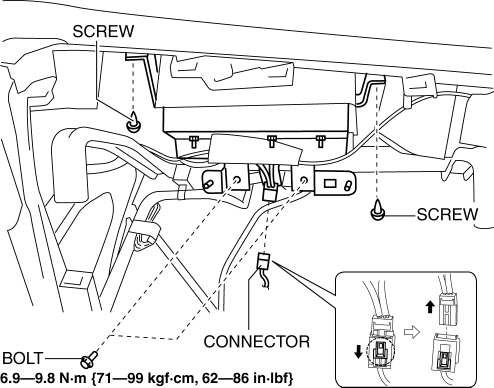
5. Remove the screws.
6. Remove the bolts.
7. Pull the passenger-side air bag module in the direction of arrow (1) and detach the hook A from the instrument panel.
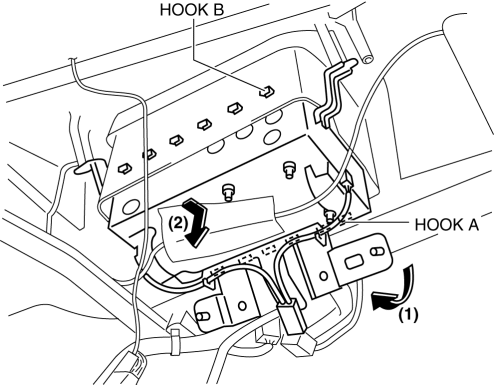
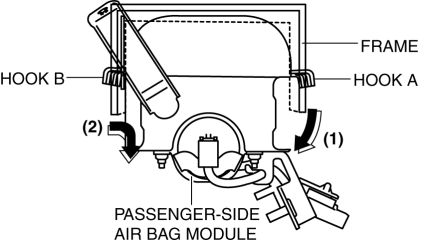
8. Pull the passenger-side air bag module in the direction of arrow (2) and detach the hook B from the instrument panel and remove it.
9. Install in the reverse order of removal.
10. Switch the ignition to ON.
11. Verify that the air bag system warning light illuminates for approx. 6 s
and goes out.
-
If the air bag system warning light does not operate, refer to the on-board diagnostic system (air bag system) and perform inspection of the system..
 Passenger Side Air Bag Module Removal/Installation [Standard Deployment Control
System]
Passenger Side Air Bag Module Removal/Installation [Standard Deployment Control
System]
WARNING:
Handling the air bag module improperly can accidentally deploy the air bag
module, which may seriously injure you. Read the air bag system service warnings
and cautions before h ...
 Pressure Sensor Removal/Installation [Two Step Deployment Control System]
1. Switch the ignition to off.
2. Disconnect the negative battery cable and wait for 1 min or more..
3. Remove the inner garnish..
4. Remove the front door trim..
5. Remove the bolts.
6 ...
Other materials:
Quick Release Connector Removal/Installation [Mzr 2.0, Mzr 2.5]
WARNING:
Fuel is very flammable liquid. If fuel spills or leaks from the pressurized
fuel system, it will cause serious injury or death and facility breakage. Fuel
can also irritate skin and eyes. To prevent this, always complete the “Fuel
Line Safety Procedure”, while referring to ...
Moonroof
The moonroof can be opened or closed
electrically only when the ignition is
switched ON.
WARNING
Do not let passengers stand up or
extend part of the body through the
open moonroof while the vehicle is
moving:
Extending the head, arms, or other
parts of the body throu ...
Cruise Control Switch Inspection [Mzr 2.3 Disi Turbo]
1. Remove the battery cover..
2. Disconnect the negative battery cable and wait for 1 min or more..
3. Remove the driver–side air bag module..
4. Disconnect the clock spring connector (part wiring harness-side).
5. Measure the resistance between clock spring terminals K and M (part wiring
...
