Mazda 3 Service Manual: Quick Release Connector Removal/Installation [Mzr 2.0, Mzr 2.5]
WARNING:
-
Fuel is very flammable liquid. If fuel spills or leaks from the pressurized fuel system, it will cause serious injury or death and facility breakage. Fuel can also irritate skin and eyes. To prevent this, always complete the “Fuel Line Safety Procedure”, while referring to the “BEFORE SERVICE PRECAUTION”.
-
A person charged with static electricity could cause a fire or explosion, resulting in death or serious injury. Before draining fuel, make sure to discharge static electricity by touching the vehicle body.
CAUTION:
-
Disconnecting/connecting the quick release connector without cleaning it may cause damage to the fuel pipe and quick release connector. Always clean the quick release connector joint area before disconnecting/connecting using a cloth or soft brush, and make sure that it is free of foreign material.
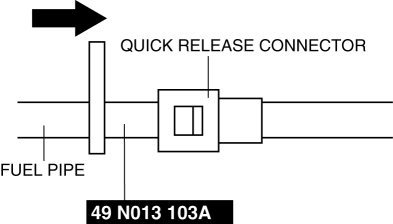
Quick Release Connector Type
CAUTION:
-
Verify the type and location, and install/remove properly.
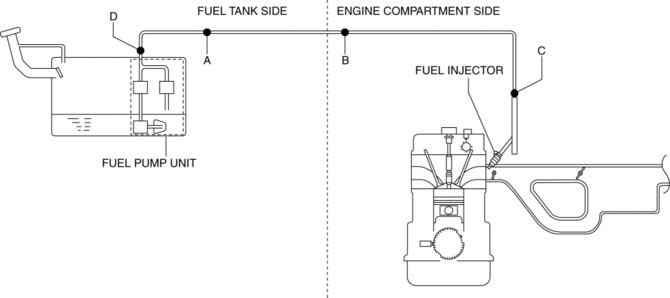
Type A Removal
CAUTION:
-
Be careful not to damage the pipe when unlocking the retainer.
1. Complete the “BEFORE SERVICE PRECAUTION”..
2. Insert the SST into the quick release connector.
3. Pull the fuel hose straight out from the fuel pipe and disconnect it.
4. Cover the disconnected quick release connector and fuel pipe with vinyl sheeting or a similar material to prevent it from getting scratched or dirty.
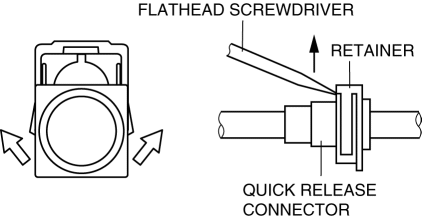
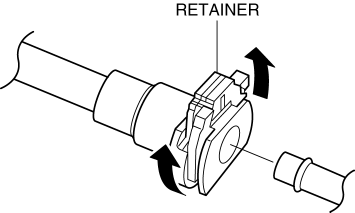
Type B Removal
1. Complete the “BEFORE SERVICE PRECAUTION”..
2. Move the retainer upward using a small flathead screwdriver or a similar tool.
3. Pull out the fuel hose straight from the fuel pipe and disconnect it.
4. Cover the disconnected quick release connector and fuel pipe with vinyl sheeting or a similar material to prevent it from getting scratched or dirty.
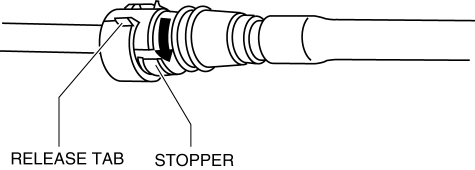
Type C Removal
1. Complete the “BEFORE SERVICE PRECAUTION”..
CAUTION:
-
The quick release connector may be damaged if the release tab is bent excessively. Do not expand the release tab over the stopper.
NOTE:
-
The fuel hose can be removed by pushing it to the fuel pipe side to release the lock.
2. Rotate the release tab on the quick release connector to the stopper position.
3. Pull out the fuel hose straight from the fuel pipe and disconnect it.
4. Cover the disconnected quick release connector and fuel pipe with vinyl sheeting or a similar material to prevent it from getting scratched or dirty.
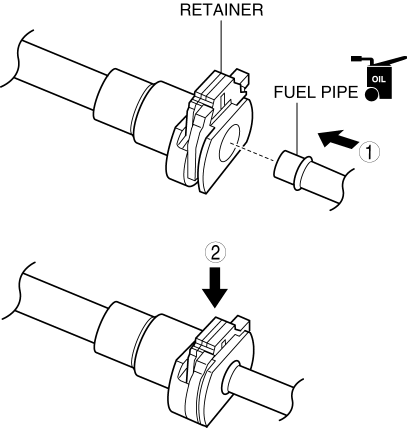
Type D Removal
1. Complete the “BEFORE SERVICE PRECAUTION”..
CAUTION:
-
The quick release connector may be damaged if the release tab is bent excessively. Do not expand the release tab over the stopper.
NOTE:
-
The fuel hose can be removed by pushing it to the pipe side to release the lock.
2. Release the retainer shown in the figure.
3. Disconnect the quick release connector.
4. Cover the disconnect the quick release connector and fuel pipe with vinyl sheeting or similar material to prevent it from getting scratched or dirty.
Type A Installation
NOTE:
-
If the quick release connector O-ring is damaged or has slipped, replace the piping component.
-
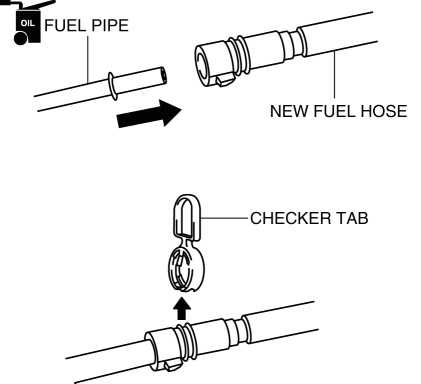
A checker tab is integrated with the quick release connector for new fuel hoses and fuel hoses. Remove the checker tab from the quick release connector after the connector is completely engaged with the fuel pipe.
1. Inspect the fuel hose and fuel pipe sealing surface for damage and deformation.
-
If there is any malfunction, replace it with a new one.
2. Apply a small amount of clean engine oil to the sealing surface of the fuel pipe.
3. Install a new retainer to the quick release connector.
4. Reconnect the fuel hose straight to the fuel pipe until a click is heard.
5. Lightly pull and push the quick release connector a few times by hand, and then verify that it is connected securely.
6. Complete the “AFTER SERVICE PRECAUTION”..
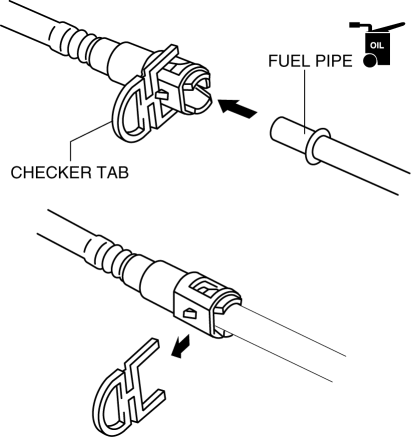
Type B Installation
NOTE:
-
If the quick release connector O-ring is damaged or has slipped, replace the fuel hose.
-
A checker tab is integrated with the quick release connector for new fuel hoses. Remove the checker tab from the quick release connector after the connector is completely engaged with the fuel pipe.
1. Inspect the fuel hose and fuel pipe sealing surface for damage and deformation.
-
If there is any malfunction, replace it with a new one.
2. Apply a small amount of clean engine oil to the sealing surface of the fuel pipe.
3. Install the quick release connector.
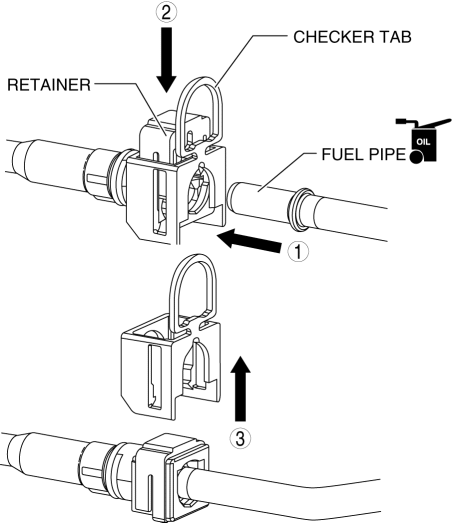
-
Insert the fuel pipe straight to the end of the quick release connector.
-
Push down the retainer using a finger.
-
If the retainer cannot be pushed down, push the fuel pipe further to the quick release connector.
4. Lightly pull and push the quick release connector a few times by hand, and then verify that it is connected securely.
5. Complete the “AFTER SERVICE PRECAUTION”..
Type C Installation
NOTE:
-
If the quick release connector O-ring is damaged or has slipped, replace the fuel hose.
-
A checker tab is integrated with the quick release connector for new fuel hoses. Remove the checker tab from the quick release connector after the connector is completely engaged with the fuel pipe.
1. Inspect the fuel hose and fuel pipe sealing surface for damaged and deformation.
-
If there is any malfunction, replace it with a new one.
2. Apply a small amount of clean engine oil to the sealing surface of the fuel pipe.
3. Reconnect the fuel hose straight to the fuel pipe until a click is heard.
NOTE:
-
If the quick release connector does not move at all, disconnect it, verify that the O-ring is not damaged or has not slipped, and then reconnect the quick release connector.
4. Lightly pull and push the quick release connector a few times by hand, and then verify that it can move 2.0—3.0 mm {0.08—0.12 in}
and is connected securely.
5. Complete the “AFTER SERVICE PRECAUTION”..
Type D Installation
1. Inspect the fuel hose and fuel pipe sealing surface for damage and deformation.
-
If there is any malfunction, replace it with a new one.
2. Apply a small amount of clean engine oil to the sealing surface of the fuel pipe.
3. Install the quick release connector.
-
Insert the fuel pipe straight to the end of the quick release connector.
-
Push down the retainer using a finger.
-
If the retainer cannot be pushed down, push the fuel pipe further to the quick release connector.
4. Lightly pull and push the quick release connector a few times by hand, and then verify that it is connected securely.
5. Complete the “AFTER SERVICE PRECAUTION”..
 No.28 Fuel Filling Shut Off Concerns [Mzr 2.0, Mzr 2.5]
28
FUEL FILLING SHUT OFF CONCERNS
DESCRIPTION
Fuel does not shut off properly.
POSSIBLE CAUSE
...
 Intake
...
Other materials:
Front Door Hinge Removal/Installation
1. Disconnect the negative battery cable..
2. Remove the following parts:
a. Front bumper.
b. Front combination light.
c. Front fender molding.
d. Side step molding.
e. Front fender panel.
f. Front door.
3. Remove in the order indicated in the table.
1
B ...
Rear Door Latch And Lock Actuator Inspection
1. The following actuator and switch are integrated with the rear door latch
and lock actuator. Inspect the rear door latch and lock actuator according to each
inspection procedure for the following items.
Rear door lock actuator.
Rear door latch switch.
Rear door lock-li ...
Power Outer Mirror Inspection
Mirror Glass Adjustment Motor
1. Disconnect the negative battery cable..
2. Remove the inner garnish..
3. Disconnect the power outer mirror connector.
4. Remove the front door trim..
5. Apply battery positive voltage and connect the ground to the power outer mirror
terminals and inspect t ...
