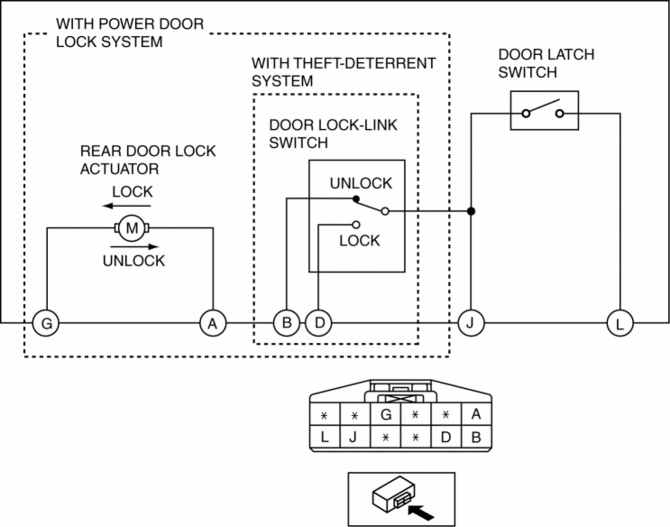
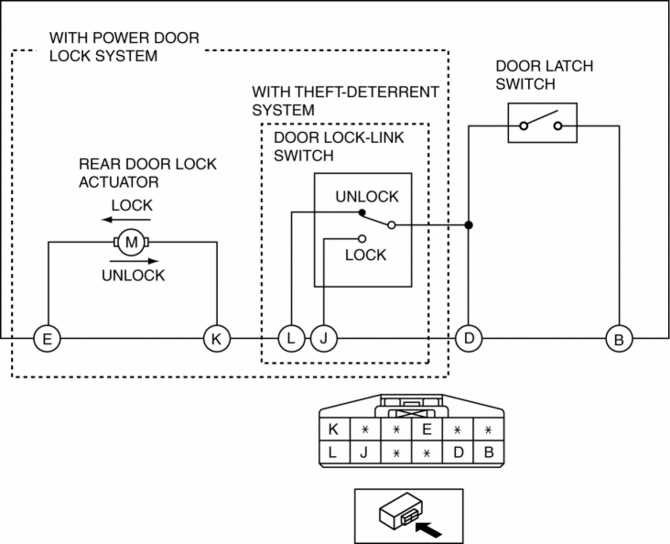
Mazda 3 Service Manual: Rear Door Latch And Lock Actuator Inspection
1. The following actuator and switch are integrated with the rear door latch and lock actuator. Inspect the rear door latch and lock actuator according to each inspection procedure for the following items.
-
Rear door lock actuator.
-
Rear door latch switch.
-
Rear door lock-link switch.
LH
RH
 Rear Door Hinge Removal/Installation
1. Disconnect the negative battery cable..
2. Remove the following parts:
a. Rear door.
b. Front scuff plate.
c. Rear scuff plate.
d. B-pillar lower trim.
3. Remove in the order indicated ...
 Rear Door Latch And Lock Actuator Removal/Installation
1. Fully open the rear door glass.
2. Disconnect the negative battery cable..
3. Remove the following parts:
a. Rear door trim.
b. Rear inner handle.
c. Rear door speaker.
d. Rear power wi ...
Other materials:
Vanity Mirror Illumination Bulb Removal/Installation
1. Disconnect the negative battery cable..
2. Insert a tape-wrapped fastener remover into the service hole, and pry it in
the direction indicated by the arrow to remove the lens.
3. Remove the vanity mirror illumination bulb.
4. Install in the reverse order of removal. ...
Transaxle Oil Replacement [G66 M R]
1. Park the vehicle on level ground.
2. Remove the aerodynamic under cover No.2..
3. Remove the drain plug and washer.
4. Drain the oil into a suitable container.
5. Install a new washer and the drain plug.
Tightening torque
39—59 N·m {4.0—6.0 kgf·m, 29—43 ft·lbf}
...
Wheel Balance Adjustment
CAUTION:
Adjust the outer wheel balance first, then the inner wheel balance.
Be careful not to scratch the wheels.
Adhesive-type Balance Weight (Outer)
1. Remove the old balance weight from the wheel.
2. Remove the double-sided adhesive tape remaining on the wheel, then clea ...
