Mazda 3 Service Manual: Rear Door Latch And Lock Actuator Removal/Installation
1. Fully open the rear door glass.
2. Disconnect the negative battery cable..
3. Remove the following parts:
a. Rear door trim.
b. Rear inner handle.
c. Rear door speaker.
d. Rear power window motor.
e. Rear door glass.
4. Remove the screw.
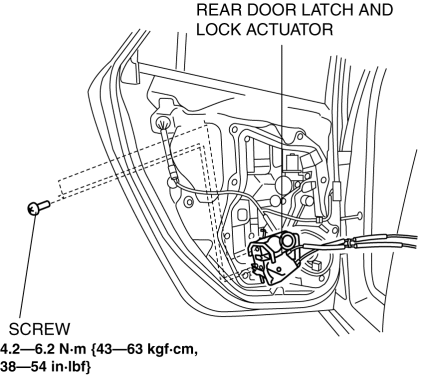
5. Remove the rear door latch and lock actuator.
6. Install in the reverse order of removal.
 Rear Door Latch And Lock Actuator Inspection
1. The following actuator and switch are integrated with the rear door latch
and lock actuator. Inspect the rear door latch and lock actuator according to each
inspection procedure for the followi ...
 Rear Door Latch Switch Inspection
1. Fully open the rear door glass.
2. Disconnect the negative battery cable..
3. Remove the following parts:
a. Rear door trim.
b. Rear inner handle.
c. Rear door speaker.
d. Rear power wi ...
Other materials:
Registering Your Vehicle in A Foreign
Country (Except United States and
Canada)
Registering your vehicle in a foreign country may be problematic depending on
whether it
meets the specific emission and safety standards of the country in which the
vehicle will be
driven. Consequently, your vehicle may require modifications at personal expense
in order
to meet the regulat ...
Relay Inspection [Mzr 2.0, Mzr 2.5, Mzr 2.3 Disi Turbo]
Relay Type
Connector type
Part name
Type A
Front fog light relay
Headlight relay (HI)
Headlight relay (LO)
Horn relay
TNS relay
A/C relay
AT ma ...
Joint Shaft Disassembly [Mzr 2.0, Mzr 2.5]
1. Disassemble in the order indicated in the table.
1
Joint shaft component
.
2
Bearing
.
3
Dust seal (LH)
4
Joint shaft
5
Dust seal (RH)
...
