Mazda 3 Service Manual: Rear Door Latch Switch Inspection
1. Fully open the rear door glass.
2. Disconnect the negative battery cable..
3. Remove the following parts:
a. Rear door trim.
b. Rear inner handle.
c. Rear door speaker.
d. Rear power window motor.
e. Rear door glass.
f. Rear door latch and lock actuator.
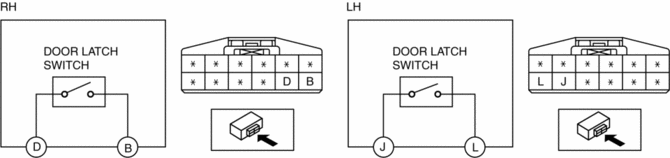
4. Verify that the continuity is as indicated in the table.
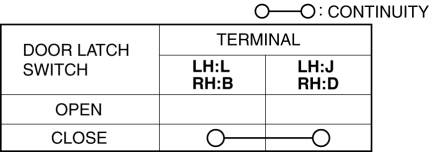
-
If not as indicated in the table, replace the rear door latch and lock actuator.
NOTE:
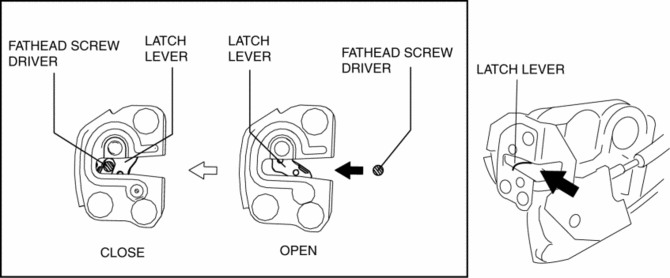
-
When inspecting the close condition of the rear door latch switch, press in the latch lever using a flathead screwdriver.
 Rear Door Latch And Lock Actuator Removal/Installation
1. Fully open the rear door glass.
2. Disconnect the negative battery cable..
3. Remove the following parts:
a. Rear door trim.
b. Rear inner handle.
c. Rear door speaker.
d. Rear power wi ...
 Rear Door Module Panel Removal/Installation
1. Fully open the rear door glass.
2. Disconnect the negative battery cable..
3. Remove the following parts:
a. Rear door trim.
b. Rear door speaker.
c. Rear power window motor.
d. Rear do ...
Other materials:
Engine Removal/Installation [Mzr 2.0, Mzr 2.5]
WARNING:
Fuel vapor is hazardous. It can very easily ignite, causing serious injury
and damage. Always keep sparks and flames away from fuel.
Fuel line spills and leakage are dangerous. Fuel can ignite and cause serious
injuries or death and damage. Fuel can also irritate skin ...
Front Seat Cushion Trim Removal/Installation
WARNING:
Handling a front seat (with built-in side air bag) improperly can accidentally
operate (deploy) the air bag, which may seriously injure you. Read the service
warnings before handling a front seat (with built-in side air bag)..
CAUTION:
After removing a front seat ...
Magnetic Clutch Inspection [Manual Air Conditioner]
1. Connect battery to terminal A of magnetic clutch and ground to A/C compressor
body.
SKYACTIV-G 2.0
MZR 2.0
MZR 2.5
2. Verify that the magnetic clutch operates.
If there is any malfunction, replace the magnetic clutch.
...
