Mazda 3 Service Manual: Rear Door Module Panel Removal/Installation
1. Fully open the rear door glass.
2. Disconnect the negative battery cable..
3. Remove the following parts:
a. Rear door trim.
b. Rear door speaker.
c. Rear power window motor.
d. Rear door quarter glass.
e. Rear door glass.
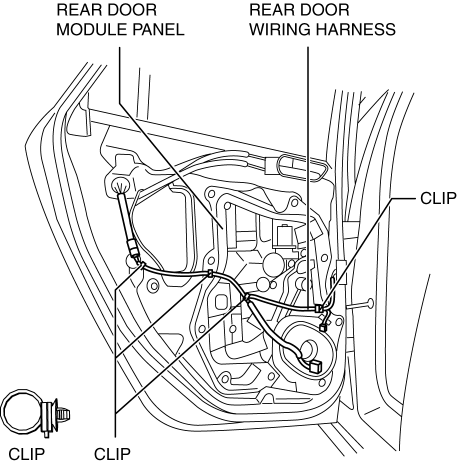
4. Remove the clips securing the rear door wiring harness from the rear door module panel.
5. Remove the bolts.
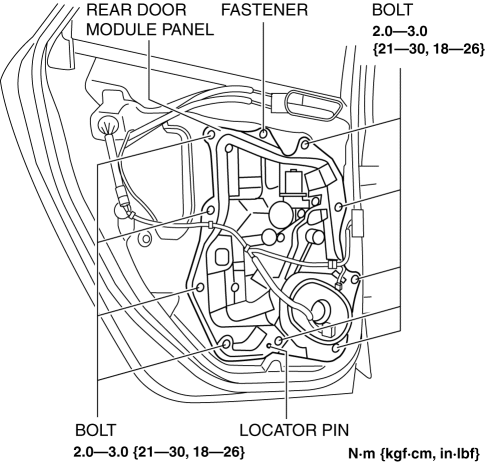
6. Remove the fastener.
7. Remove the rear door module panel.
8. Remove the rear power window regulator..
9. Install in the reverse order of removal.
 Rear Door Latch Switch Inspection
1. Fully open the rear door glass.
2. Disconnect the negative battery cable..
3. Remove the following parts:
a. Rear door trim.
b. Rear inner handle.
c. Rear door speaker.
d. Rear power wi ...
 Rear Door Pad Removal/Installation
1. Fully open the rear door glass.
2. Disconnect the negative battery cable..
3. Remove the following parts:
a. Rear door trim.
b. Rear door speaker.
c. Rear power window motor.
d. Rear do ...
Other materials:
Back Up Light Bulb Removal/Installation
4SD
1. Disconnect the negative battery cable..
2. Remove the trunk rid trim..
3. Disconnect the connector.
4. Rotate the socket in the direction of the arrow as shown in the figure to
remove it.
5. Remove the back-up light bulb.
6. Install in the reverse order of removal.
...
Rearview Mirror
WARNING
Do not stack cargo or objects higher
than the seatbacks:
Cargo stacked higher than the
seatbacks is dangerous. It can block
your view in the rearview mirror, which
might cause you to hit another car
when changing lanes.
Rearview mirror adjustment
Before dri ...
Brake Hose (Rear) Removal/Installation [Mzr 2.0, Skyactiv G 2.0]
CAUTION:
If the brake hose is installed to the caliper on the vehicle, the tool cannot
be installed correctly resulting in brake fluid leakage due to improper installation.
Therefore, remove the caliper and brake hose as a single unit when removing
the brake hose, and tighten the br ...
