Mazda 3 Service Manual: Rear Shock Absorber Disposal
1. Clamp a rear shock absorber on a flat surface or with the piston pointing downwards.
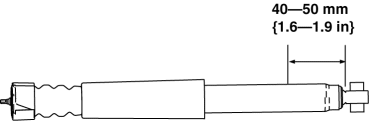
2. Drill a 2—3 mm {0.08—0.11 in}
hole at a point 40—50 mm {1.6—1.9 in}
from the bottom of the tube, so that the gas can escape.
WARNING:
-
Whenever drilling into a rear shock absorber, wear protective eye wear. The gas in the rear shock absorber is pressurized, and could spray metal chips into the eyes and face when drilling.
3. Turn the hole downwards.
4. The oil can be collected by moving the piston rod several times up and down and cutting the tube at the end.
5. Dispose of waste oil according to the waste disposal law.
 Rear Lower Arm Removal/Installation
1. Disconnect the auto leveling sensor link lower side. (Vehicles with AFS).
2. Remove in the order indicated in the table.
3. Install in the reverse order of removal.
4. Inspect the wheel alig ...
 Rear Shock Absorber Inspection
1. Remove the rear shock absorber..
2. Inspect for damage and oil leakage.
3. Compress and extend the shock piston at least three times. Verify that the
operational force does not change and tha ...
Other materials:
Front Door Key Cylinder Switch Inspection
1. To access the glass installation bolt, position the front door glass so that
the distance from the top of the front door glass to the upper part of the front
beltline molding is approx. 80 mm {3.1 in}.
2. Disconnect the negative battery cable..
3. Remove the following parts:
a. Inne ...
Operating Tips for USB device
This unit plays audio files as follows:
*1 Type B
CAUTION
Do not use an audio fi le extension on
fi les other than audio fi les. In addition,
do not change the audio fi le extension.
Otherwise, the unit will not recognize
the fi le correctly resulting in noise or a
mal ...
Relay Inspection [Mzr 2.0, Mzr 2.5, Mzr 2.3 Disi Turbo]
Relay Type
Connector type
Part name
Type A
Front fog light relay
Headlight relay (HI)
Headlight relay (LO)
Horn relay
TNS relay
A/C relay
AT ma ...
