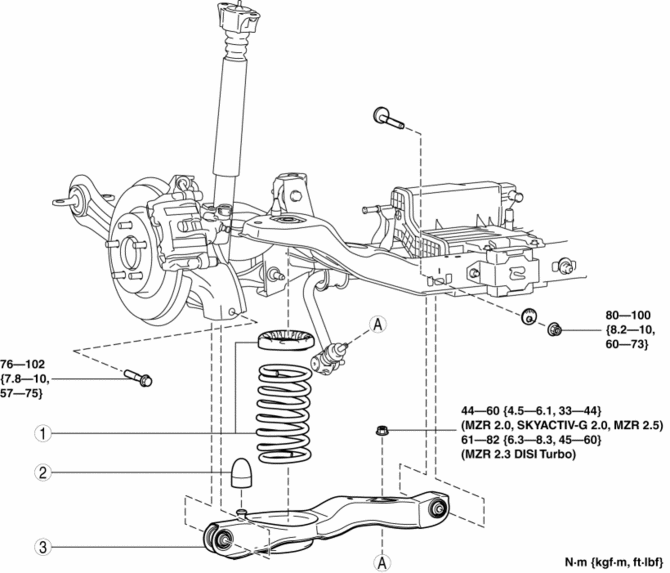
Mazda 3 Service Manual: Rear Lower Arm Removal/Installation
1. Disconnect the auto leveling sensor link lower side. (Vehicles with AFS).
2. Remove in the order indicated in the table.
3. Install in the reverse order of removal.
4. Inspect the wheel alignment and adjust it if necessary..
|
1 |
Rear coil spring component . |
|
2 |
Bound stopper |
|
3 |
Rear lower arm (See Rear Lower Arm Removal Note (RH) (MZR 2.0 (Except Mexico), SKYACTIV-G 2.0, MZR 2.3 DISI Turbo, MZR 2.5 (Except Mexico)).) (See Rear Lower Arm Installation Note (RH) (MZR 2.0 (Except Mexico), SKYACTIV-G 2.0, MZR 2.3 DISI Turbo, MZR 2.5 (Except Mexico)).) |
Rear Lower Arm Removal Note (RH) (MZR 2.0 (Except Mexico), SKYACTIV-G 2.0, MZR 2.3 DISI Turbo, MZR 2.5 (Except Mexico))
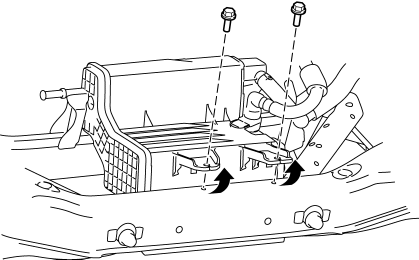
1. Remove the charcoal canister installation bolts (rear side), and push the charcoal canister up slightly.
2. Remove the rear lower arm inner bolt.
3. Remove the rear lower arm.
Rear Lower Arm Installation Note (RH) (MZR 2.0 (Except Mexico), SKYACTIV-G 2.0, MZR 2.3 DISI Turbo, MZR 2.5 (Except Mexico))
1. Push the charcoal canister up slightly.
2. Install the rear lower arm inner bolt.
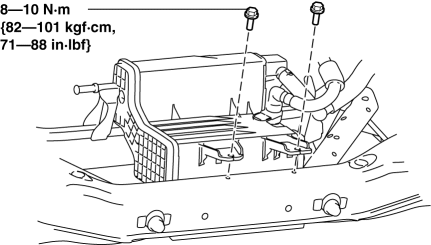
3. Tighten the charcoal canister installation bolts (rear side).
 Rear Lateral Link Removal/Installation
1. Remove in the order indicated in the table.
2. Install in the reverse order of removal.
3. Inspect the wheel alignment and adjust it if necessary..
1
Rear stabiliz ...
 Rear Shock Absorber Disposal
1. Clamp a rear shock absorber on a flat surface or with the piston pointing
downwards.
2. Drill a 2—3 mm {0.08—0.11 in} hole at a point 40—50 mm {1.6—1.9
in} from the bottom of the tube ...
Other materials:
Boost Air Temperature Sensor Inspection [Mzr 2.3 Disi Turbo]
Resistance Inspection
NOTE:
Because the boost air temperature sensor is integrated in the MAP sensor,
replacing the boost air temperature sensor includes replacement of the MAP sensor/boost
air temperature sensor.
1. Remove the battery cover..
2. Disconnect the negative batter ...
Steering Shaft Inspection
1. Inspect the column bearing for excessive play and damage.
2. Verify that the measurement of the steering shaft indicated in the figure
is as specified.
If not within the specification replace the steering shaft component.
Steering shaft length
315—320 mm {12.41—1 ...
Key Removed from Vehicle
Warning Beep
Vehicles with advanced keyless function
If the key is taken out of the vehicle while
the ignition is not switched OFF and
all the doors are closed, the beep which
sounds outside of the vehicle will be heard
6 times, the beep which sounds inside
the vehicle will be heard 6 times, and the
KEY w ...
