Mazda 3 Service Manual: Windshield Wiper And Washer Switch Inspection
1. Disconnect the negative battery cable..
2. Remove the following parts:
a. Front scuff plate (Driver‘s side).
b. Front side trim (Driver‘s side).
c. Hood release lever.
d. Upper panel.
e. Shift knob (MTX).
f. Selector lever knob (ATX).
g. Shift panel.
h. Side wall.
i. Console.
j. Lower panel.
k. Column cover.
l. Wiper and washer switch.
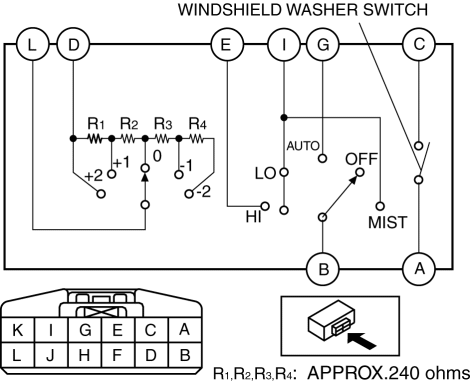
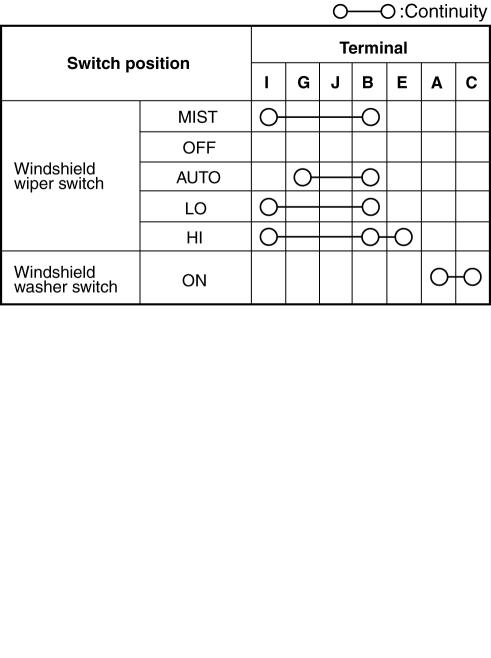
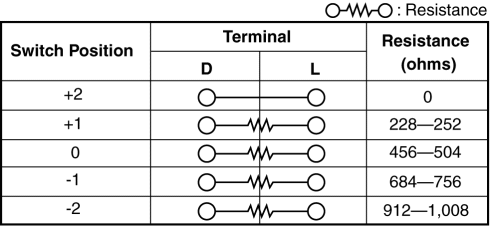
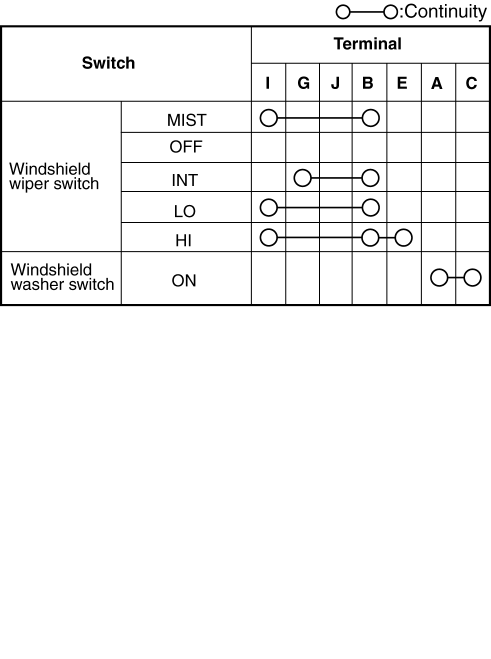
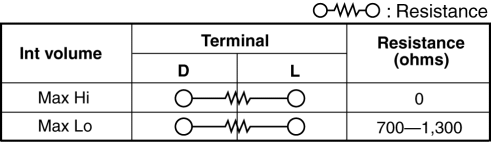
3. Verify that the resistance and continuity between the windshield wiper and washer switch terminals as indicated in the table.
-
If the continuity is not as indicated in the table, or if the resistance is not within the specification, replace the windshield wiper and washer switch.
Vehicles With Auto Wiper System
Vehicles Without Auto Wiper System

 Rear Wiper And Washer Switch Inspection
1. Disconnect the negative battery cable..
2. Remove the following parts:
a. Front scuff plate (Driver‘s side).
b. Front side trim (Driver‘s side).
c. Hood release lever.
d. Lower panel. ...

Other materials:
Timing Chain Removal/Installation [Mzr 2.3 Disi Turbo]
WARNING:
Fuel vapor is hazardous. It can very easily ignite, causing serious injury
and damage. Always keep sparks and flames away from fuel.
Fuel line spills and leakage are dangerous. Fuel can ignite and cause serious
injuries or death and damage. Fuel can also irritate skin ...
How to use USB mode (Type B)
Type
Playable data
USB mode
MP3/WMA/AAC/OGG file
This unit does not support a USB 3.0 device. In addition, other devices may
not be
supported depending on the model or OS version.
USB devices formatted to FAT32 are supported (USB devices formatted to other
...
Shift Lock System Inspection
Shift-Lock System Inspection
1. Switch the ignition to ON.
2. Shift the selector lever to the P position.
3. Perform the following procedures to inspect the shift-lock system.
If there is any malfunction, inspect the shift-lock solenoid and P position
switch..
a. Verify that th ...
