Mazda 3 Service Manual: PCM Removal/Installation [Mzr 2.0, Mzr 2.5]
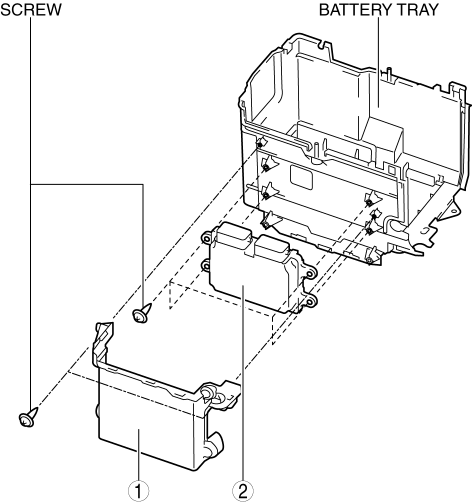
1. Remove the battery cover..
2. Disconnect the negative battery cable..
3. Remove the following items:.
-
Battery
-
PCM cover No.1
4. Disconnect the PCM connector..
5. Remove the battery tray and PCM component..
6. Remove in the order indicated in the table.
|
1 |
PCM cover No.2 |
|
2 |
PCM |
7. Install in the reverse order of removal.
8. When replacing the PCM on the vehicles, perform the following:
-
PCM configuration.
-
Immobilizer system-related parts programming.
PCM Connector Connection Note
CAUTION:
-
If the PCM connector is connected incorrectly it could be damaged. When connecting the PCM connector, connect it using the following procedure.
-
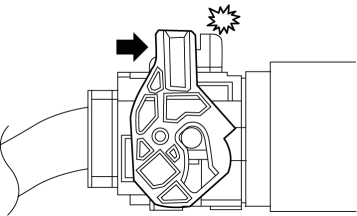
If the PCM connector is inserted at an angle and the lever is moved, the connector could be damaged. Verify that the PCM connector is inserted straight.

1. Verify that the PCM connector lever is tilted towards the wiring harness side as shown in the figure.
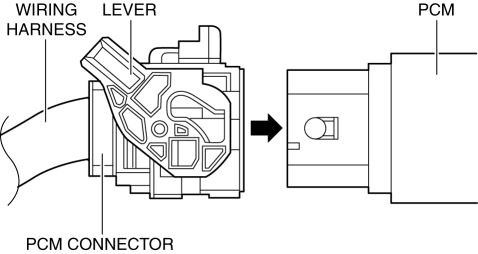
2. Insert the PCM connector straight until it contacts the PCM and verify that the lever reverts upward naturally.
3. Push the lever until a click is heard.
 PCM Inspection [Mzr 2.0, Mzr 2.5]
Using M-MDS
NOTE:
PIDs for the following parts are not available on this model. Go to the appropriate
part inspection page.
CMP sensor
Main relay
1. Co ...
 PID/Data Monitor Inspection [Standard Deployment Control System]
1. Connect the M-MDS (IDS) to the DLC-2.
2. After the vehicle is identified, select the following items from the initialization
screen of the IDS.
a. Select “DataLogger”.
b. Select “ ...
Other materials:
Oil Seal (Differential) Replacement [G35 M R]
1. On level ground, jack up the vehicle and support it evenly on safety stands.
2. Remove the aerodynamic under cover No.2..
3. Drain the oil from the transaxle..
4. Remove the front splash shield..
5. Separate the drive shaft and joint shaft from the transaxle..
6. Remove the oil seals u ...
Control Switches
AUTO switch
By pressing the AUTO switch the
following functions will be automatically
controlled in accordance with the selected
set temperature:
Airflow temperature
Amount of airflow
Selection of airflow mode
Outside/Recirculated air selection
Air conditioner operation
NOTE
AUTO ...
Transaxle Oil Inspection [A26 M R]
1. Park the vehicle on level ground.
2. Remove the aerodynamic under cover No.2..
3. Remove the oil level plug and gasket.
4. Verify that the oil is near the brim of the plug port.
If the oil level is lower than the low level, add the specified amount and
type of oil through the ...
