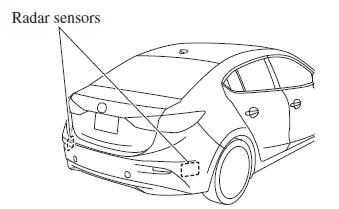
Mazda 3 Owners Manual: Radar Sensors (Rear)
The radar sensors (rear) for the rear vehicle monitoring system are equipped inside the rear bumper, one each on the left and right sides.
Sedan
Hatchback
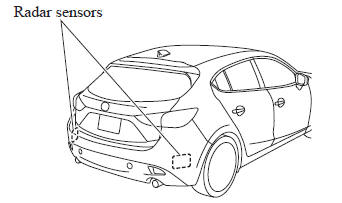
The surface area of the rear bumper near the radar sensors (rear) should always be clean so that the rear vehicle monitoring system operates correctly. Do not apply stickers or similar objects to the rear bumper.
Refer to Exterior Care on .
NOTE Consult an Authorized Mazda Dealer for radar sensors (rear) repairs and replacement, or repair, replacement or painting of the rear bumper near a radar sensors (rear).
 Laser Sensor (Front)
The Smart City Brake Support (SCBS) laser sensor is installed at the top of
the windshield
near the rearview mirror.
Always keep the surface of the windshield around the laser sensor clean to ...
 Cruise Control
With cruise control, you can set and automatically maintain any speed of more
than about
25 km/h (16 mph).
WARNING
Do not use the cruise control under the following conditions:
Using ...
Other materials:
Engine Coolant Temperature (ECT) Sensor Inspection [Mzr 2.0, Mzr 2.5]
ECT Sensor No.1
Resistance inspection
WARNING:
When the engine is hot, it can badly burn. Turn off the engine and wait until
it is cool before removing the ECT sensor.
1. Remove the battery cover..
2. Disconnect the negative battery cable..
3. Drain the engine coolant..
4. R ...
Map Light Inspection
1. Disconnect the negative battery cable..
2. Remove the map light..
3. Verify that the continuity between the map light terminals is as indicated
in the table.
If not as indicated in the table, inspect the bulb. If there is no malfunction,
replace the map light.
4. ...
Positive Crankcase Ventilation (PCV) Valve Inspection [Mzr 2.0, Mzr 2.5]
Airflow Inspection
1. Disconnect the section (A) of the ventilation hose shown in the figure.
2. Start the engine and verify that vacuum is applied to the end of the disconnected
ventilation hose while the engine is idling.
NOTE:
Because it is difficult to directly inspect the PC ...
