Subaru Solterra 2023-2026 Owner's Manual: Tire information
Typical tire symbols
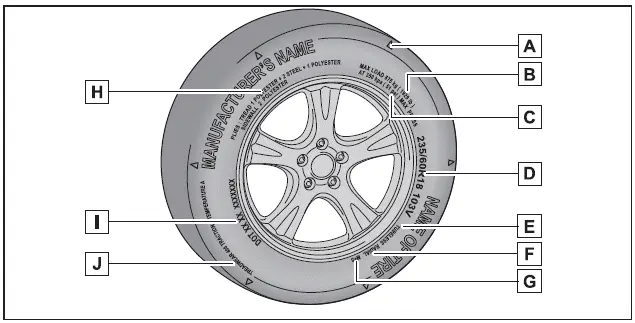
- Location of treadwear indicators
- Maximum load rating at the specified cold tire pressure for the Subaru Solterra
- Maximum cold tire inflation pressure
This value indicates the highest pressure level permitted for safe tire inflation. - Tire size designation used for the Subaru Solterra
- TUBELESS or TUBE TYPE
Tubeless tires used on the Subaru Solterra hold air directly within the tire structure, while tube-type tires rely on an internal tube to maintain pressure. - Radial or bias-ply construction
Tires marked "RADIAL" on the Subaru Solterra sidewall indicate radial construction, while unmarked tires are bias-ply. - Seasonal classification (summer or all-season)
All-season tires display "M+S" markings. If absent, the tire is typically designed for summer conditions. - Tire ply composition and materials
Ply layers consist of rubber-coated cords that provide structural integrity. These cords are essential components in Subaru Solterra tire durability. - DOT symbol and Tire Identification Number (TIN)
- Uniform Tire Quality Grading
Refer to the section below for detailed grading standards applied to Subaru Solterra tires.
Typical DOT and Tire Identification Number (TIN)
Type A
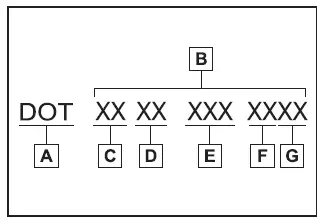
- DOT certification symbol*
- Tire Identification Number (TIN)
- Manufacturer identification code
- Tire size designation code
- Optional manufacturer tire type code (3 or 4 characters)
- Production week
- Production year
*: The DOT marking confirms that the tire complies with applicable Federal Motor Vehicle Safety Standards for the Subaru Solterra.
Type B
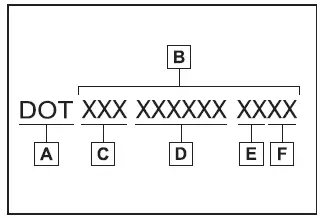
- DOT certification symbol*
- Tire Identification Number (TIN)
- Manufacturer identification code
- Factory-specific code
- Production week
- Production year
*: This DOT symbol verifies compliance with required safety regulations.
Tire size
■ Typical tire size information
The diagram below illustrates a standard tire size format used on the Subaru Solterra, helping drivers correctly interpret tire markings.
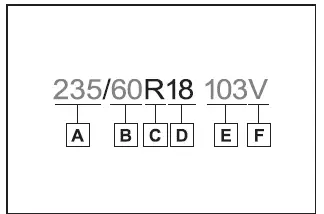
- Section width in millimeters
- Aspect ratio (relationship between tire height and width)
- Tire construction type (R = radial, D = diagonal)
- Wheel diameter in inches
- Load index indicating maximum supported weight
- Speed rating symbol representing maximum safe speed
■ Tire dimensions
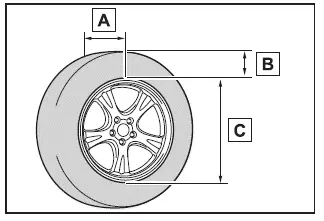
- Section width
- Tire height
- Wheel diameter
Tire section names
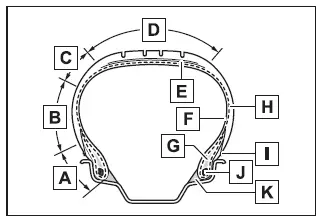
- Bead
- Sidewall
- Shoulder
- Tread
- Belt
- Inner liner
- Reinforcing rubber
- Carcass
- Rim lines
- Bead wires
- Chafer
Uniform Tire Quality Grading
This classification system is defined according to standards issued by the National Highway Traffic Safety Administration (NHTSA) of the U.S. Department of Transportation. It provides important comparative data on treadwear, traction, and temperature resistance for tires used on the Subaru Solterra, helping drivers make informed maintenance and replacement decisions.
This section provides Subaru Solterra owners and potential buyers with essential information regarding the uniform tire quality grading system, helping them better understand tire performance characteristics and safety standards.
Your SUBARU dealer remains an important resource and can assist in clarifying any details related to tire specifications and ratings for your Subaru Solterra.
■ DOT quality grades
All tires installed on passenger vehicles, including the Subaru Solterra, must comply with Federal Safety Standards in addition to carrying specific quality grades. These grades are typically displayed on the tire sidewall, located between the tread shoulder and the widest section of the tire.
Example marking: Treadwear 200 Traction AA Temperature A
■ Treadwear
The treadwear grade assigned to Subaru Solterra tires represents a comparative indicator of expected wear rate under controlled testing conditions on a standardized government test course.
For instance, a tire with a treadwear rating of 150 is expected to last approximately one and a half times longer than a tire rated at 100 when tested under identical conditions.
However, real-world performance for Subaru Solterra tires may vary significantly depending on driving style, maintenance practices, road surfaces, and environmental conditions.
■ Traction AA, A, B, C
Traction grades evaluate a tire’s ability to stop on wet surfaces. The ratings range from AA (highest) to C (lowest), based on controlled braking tests performed on asphalt and concrete surfaces.
A tire rated C may exhibit reduced traction performance, particularly in wet conditions.
Warning: The traction rating for Subaru Solterra tires is based solely on straight-line braking tests and does not account for cornering or turning grip.
■ Temperature A, B, C
The temperature grade reflects the tire’s resistance to heat buildup and its ability to dissipate heat effectively during operation. Ratings range from A (highest performance) to C (minimum acceptable standard).
Prolonged exposure to high temperatures can degrade tire materials, shorten service life, and increase the risk of sudden tire failure in the Subaru Solterra.
Grade C meets the minimum performance requirements set by Federal Motor Vehicle Safety Standard No. 109.
Grades B and A indicate enhanced heat resistance and durability compared to the legal minimum.
Warning: Temperature ratings assume proper inflation and correct load conditions for Subaru Solterra tires.
Driving at excessive speeds, underinflating tires, or overloading the vehicle may cause excessive heat buildup, potentially leading to tire failure.
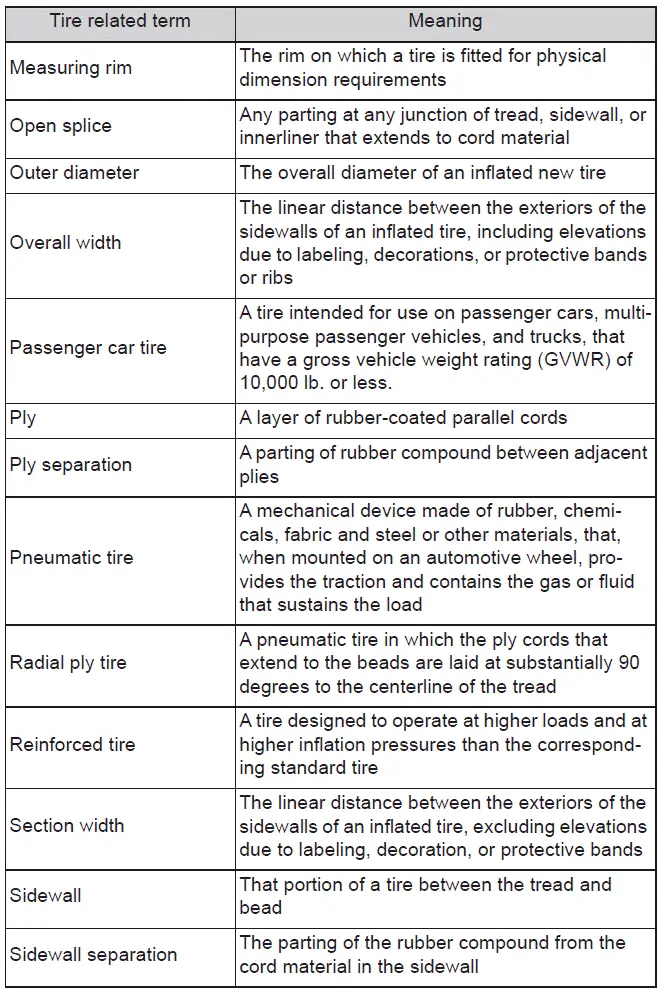
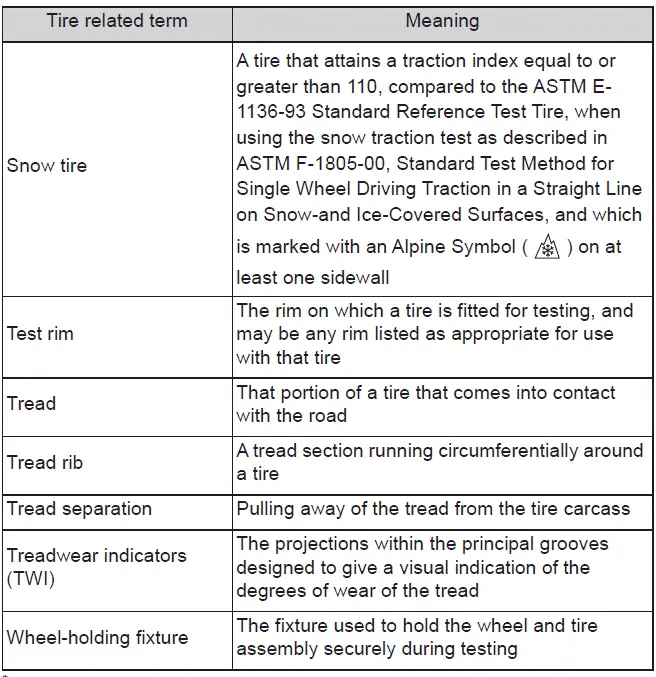
Glossary of tire terminology

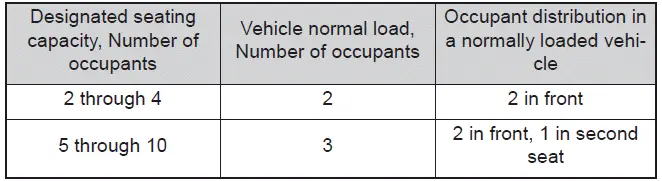
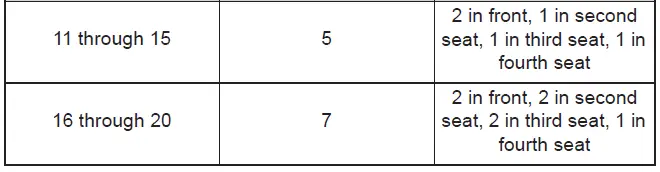
*: Table 1 - Occupant loading and distribution for normal load conditions based on seating capacity in the Subaru Solterra
 Maintenance data
Dimensions and weights
*: Unladen vehicle
Seating capacity
Vehicle identification
■ Vehicle identification number
The vehicle identification number (VIN) of your Subaru Solterra ser ...
 Customization
Customizable features
The Subaru Solterra is equipped with a wide range of configurable
electronic systems that allow you to tailor vehicle behavior and comfort settings
according to your persona ...
Other materials:
Riding with children
When traveling with children in the Subaru Solterra, always follow
these important safety recommendations to ensure their protection and comfort during
every journey.
Always use a child restraint system that is appropriate for the child’s
age, size, and weight until they are able to correct ...
Windshield Wiper Motor Inspection
1. Disconnect the negative battery cable..
2. Remove the following parts:
a. Windshield wiper arm and blade.
b. Front fender molding.
c. Cowl grille.
d. Center cowl grille No.1, No.2
3. Disconnect windshield wiper motor connector.
4. Connect the battery positive voltage to windshield w ...
Cooling System Service Warnings [Mzr 2.0, Mzr 2.5]
WARNING:
Never remove the cooling system cap or loosen the radiator drain plug while
the engine is running, or when the engine and radiator are hot. Scalding engine
coolant and steam may shoot out and cause serious injury. It may also damage
the engine and cooling system.
Tu ...
